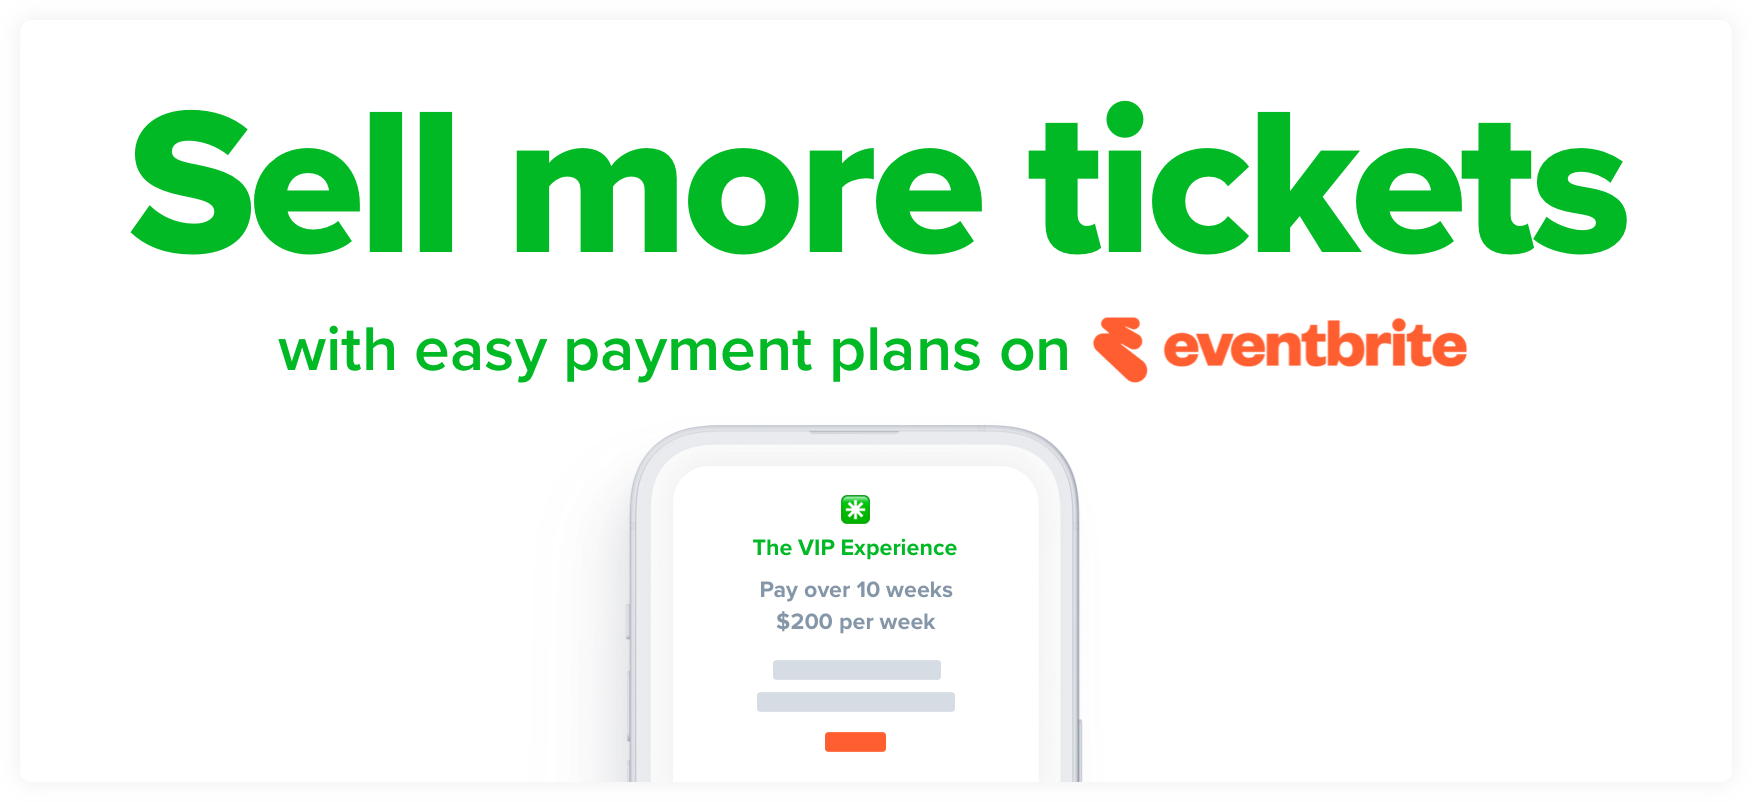
Yes you can. Offering payment plans on Eventbrite is possible with Paythen using Zapier. This requires about 10 minutes of setup for which we’ve provided step-by-step instructions below. You can continue reading this setup guide or if you’d like some general information on how Paythen works with Eventbrite, you can go here instead.
You can offer payment plans for your event using two different approaches outlined below. Both use an email based workflow – buyers will choose their ticket and quantity and complete the checkout process on Eventbrite and they will get an email with their customized payment plan link based on their total.
Approach #1: Create separate ticket types for people that want to pay via a payment plan
Eg: If you have two ticket types, Standard and VIP, you can create two additional ones called: Standard – Pay via a payment plan and VIP – Pay via a payment plan and when attendees buy those tickets, they get an email with their payment plan link. This approach gives you more flexibility by letting you offer payment plans only for some ticket types if you’d prefer – eg: if you just wanted your higher tiers to have a payment plan option, you can do that. You can also manage the quantity of this ticket type separately. You also don’t pay Eventbrite service fees on these tickets with this approach since they are set up as free tickets.
👉 Try a working demo of this approach
⚙️ Jump to setup instructions for this approach
Approach #2: Use your existing ticket types and enable an offline payment method like “Pay via invoice” for payment plans
Eg: For any of your existing ticket types, you would enable Eventbrite’s built in offline payment method – pay via invoice, and when customers choose this in the payment options, they get an email with their payment plan link. This approach is good because it keeps your ticket types cleaner and easier to understand but has some downsides to consider:
1. Eventbrite still charges their service fees since this uses “offline” payment methods in Eventbrite which still incur service fees.
2. This approach enables payment plans on all ticket types. You can’t offer them only on specific ticket types.
3. You can’t control the quantity of “payment plan tickets” separately with this approach
👉 Try a working demo of this approach
⚙️ Jump to setup instructions for this approach
Approach #1 Separate ticket types step-by-step setup instructions
- Before you start, if you haven’t already done so, create your Paythen account and a Zapier account.
- In Eventbrite, create a free ticket type for each category of tickets you want to offer payment plans on – eg: VIP Tickets Payment Plan, etc.
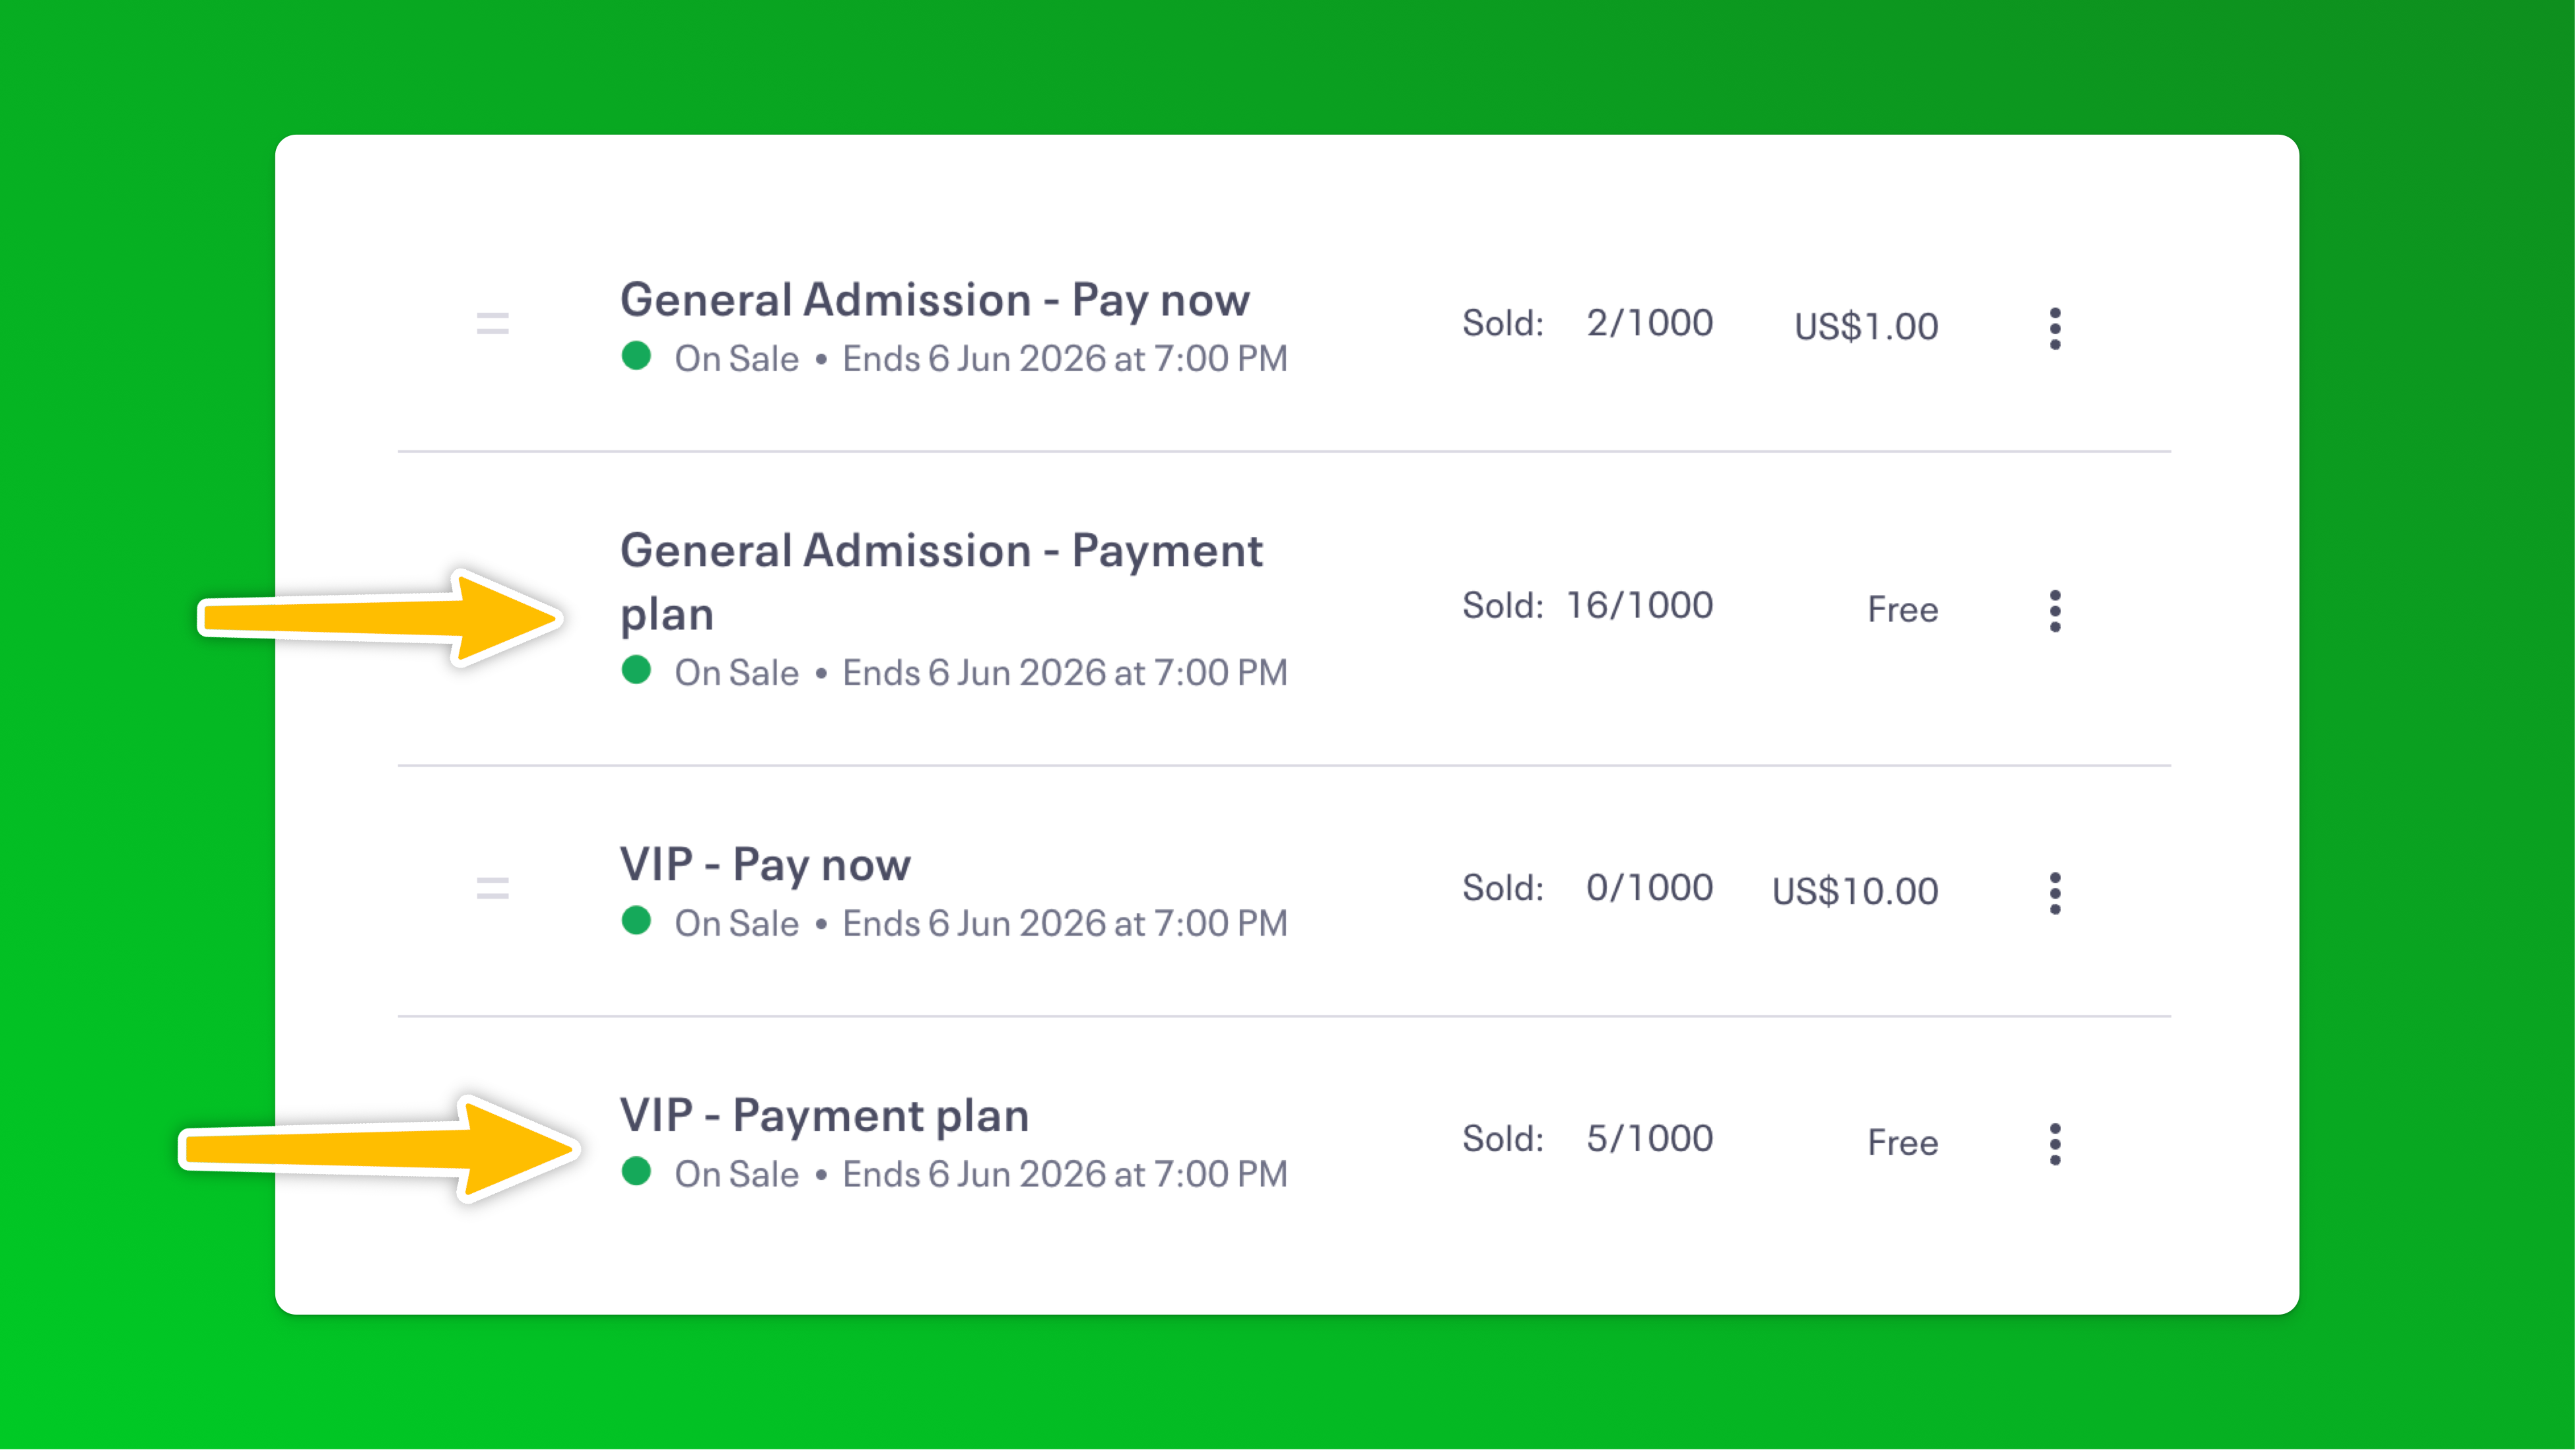
- In the ticket description, under advanced settings let attendees know what will happen next: Eg: Choose this ticket to pay over 8 easy monthly payments. Once you complete this, we’ll email you a link for your payment plan. Your ticket is not reserved until you complete this step.
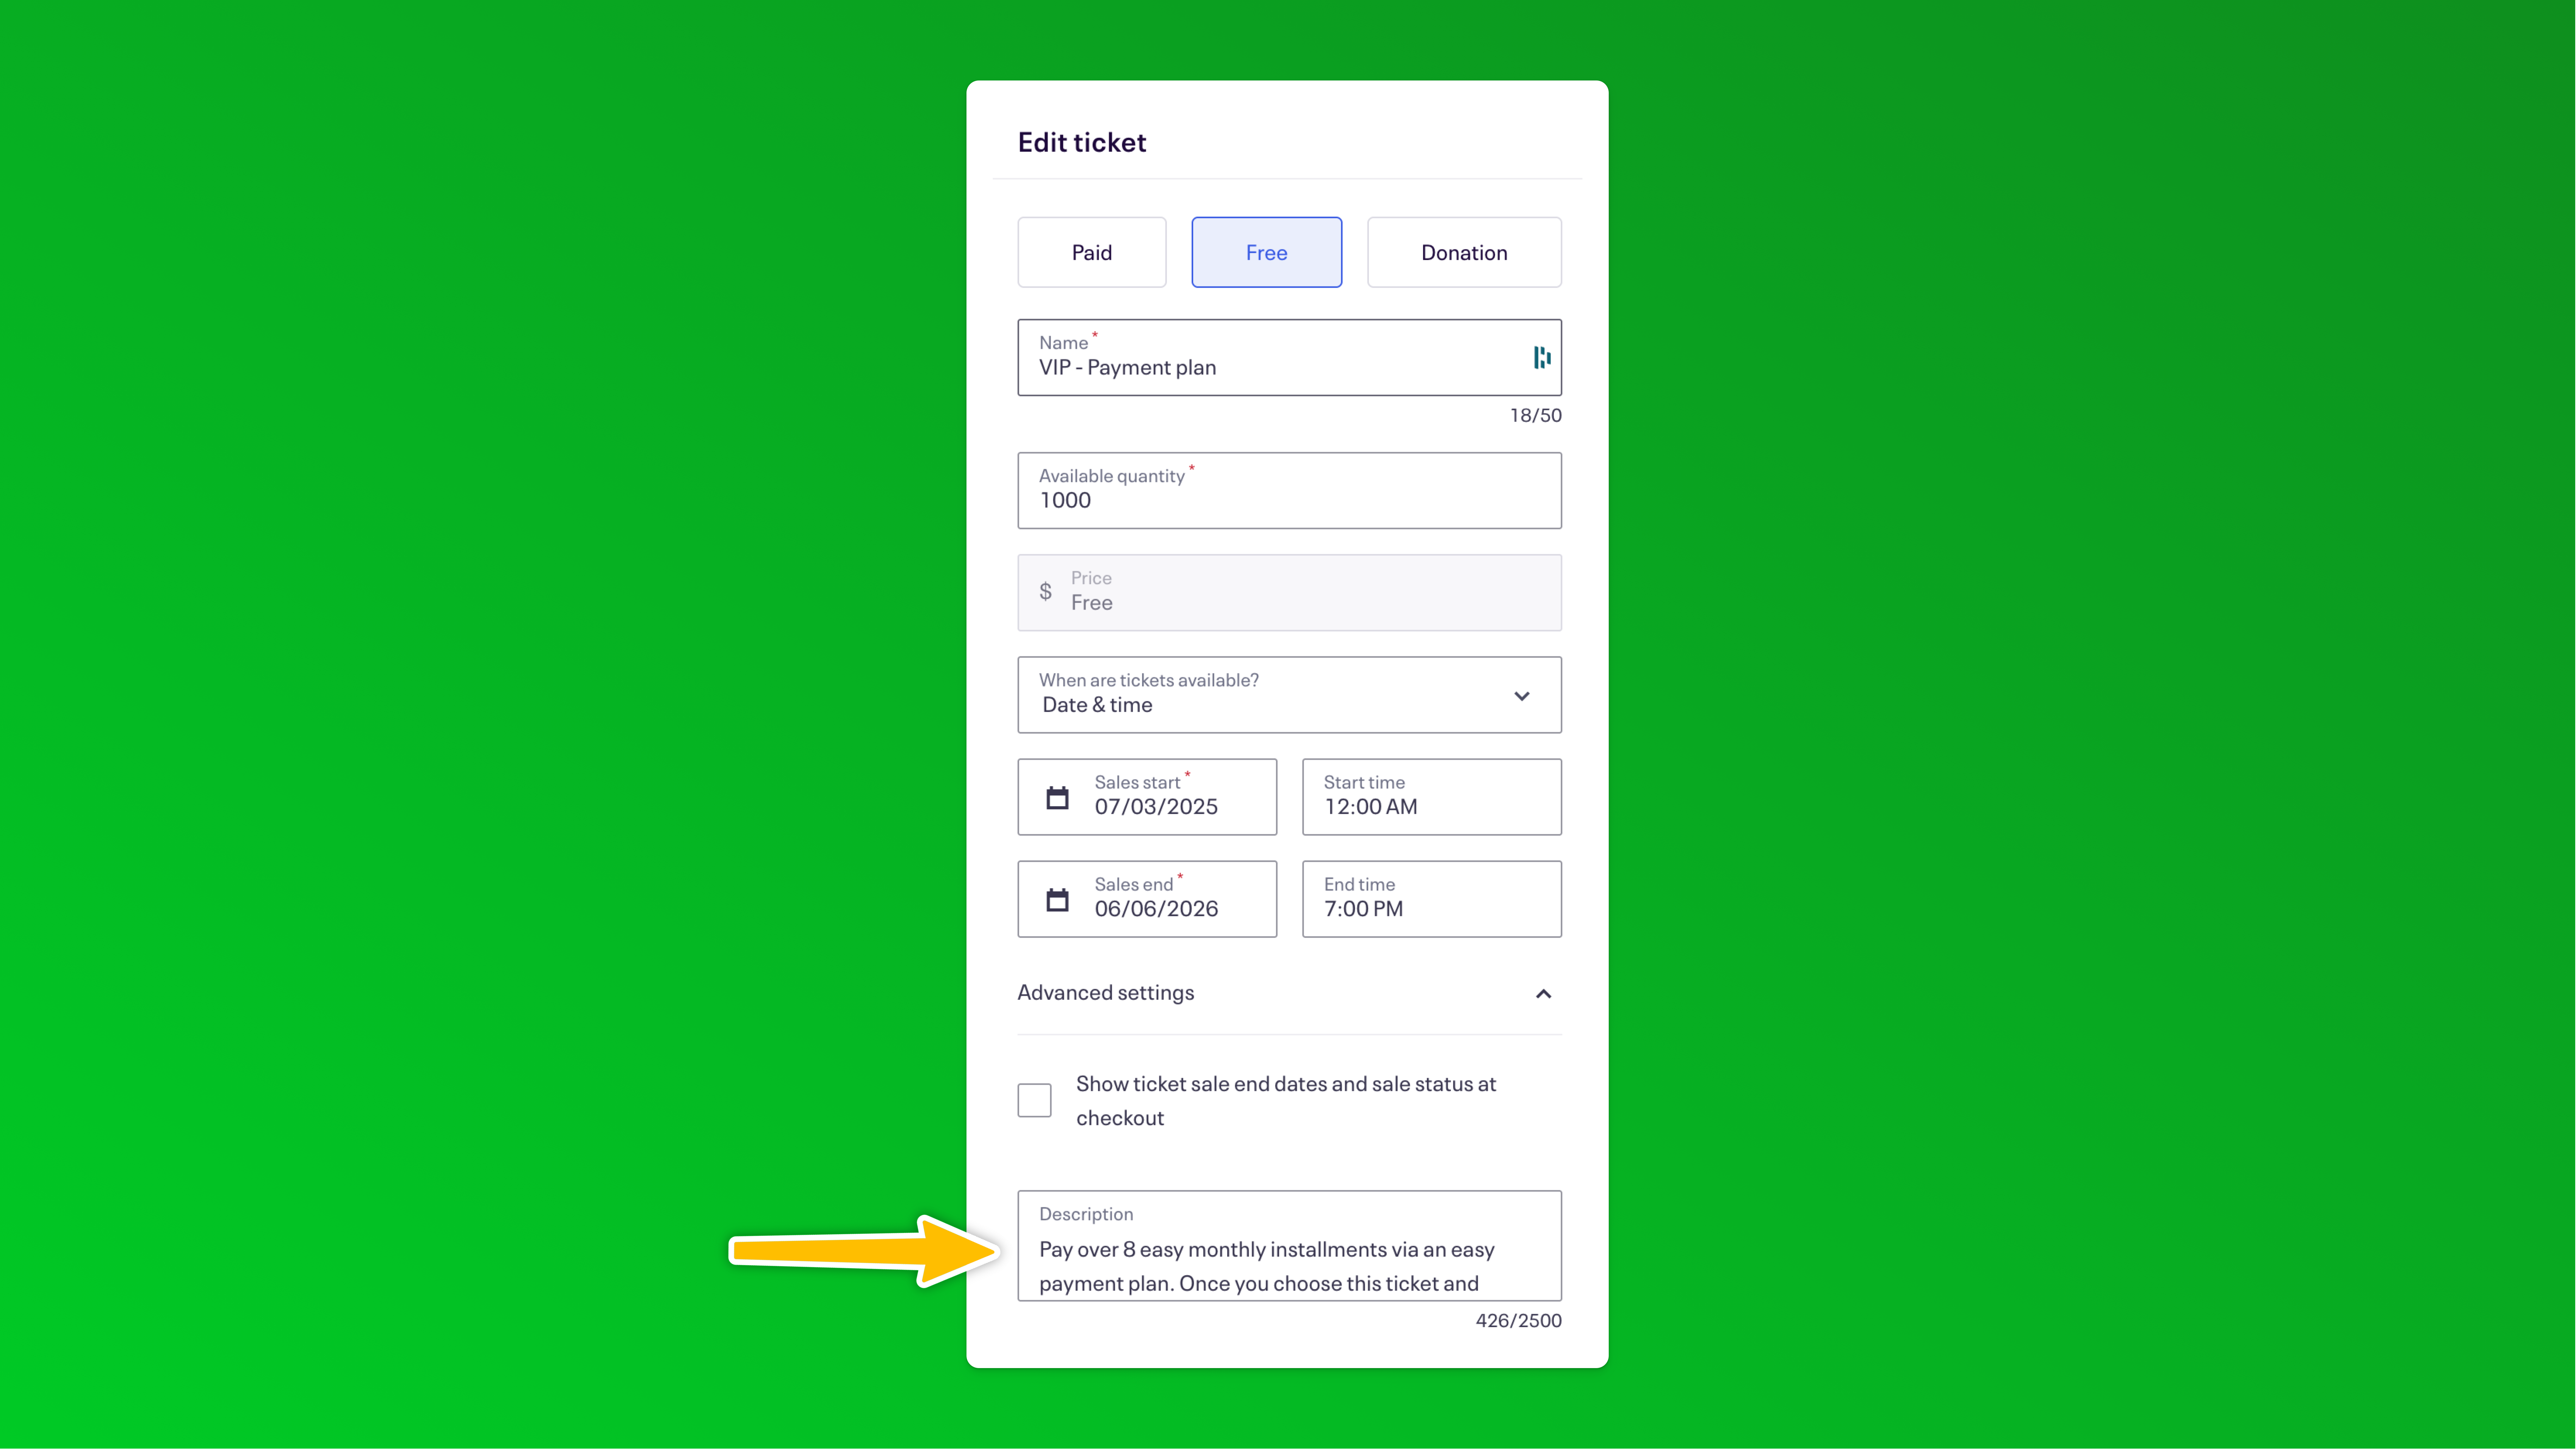 We recommend clearly highlighting the fact that the ticket is not reserved until they complete their first payment plan payment even in the event description so potential buyers don’t miss that.
 - In addition to the ticket and event description, we also recommend clearly highlighting on the order confirmation apge what attendees who chose the payment plan option need to do to reserve their tickets. You can add a custom message there by going to Order Options > Order Confirmation in Eventbrite and adding some text here:
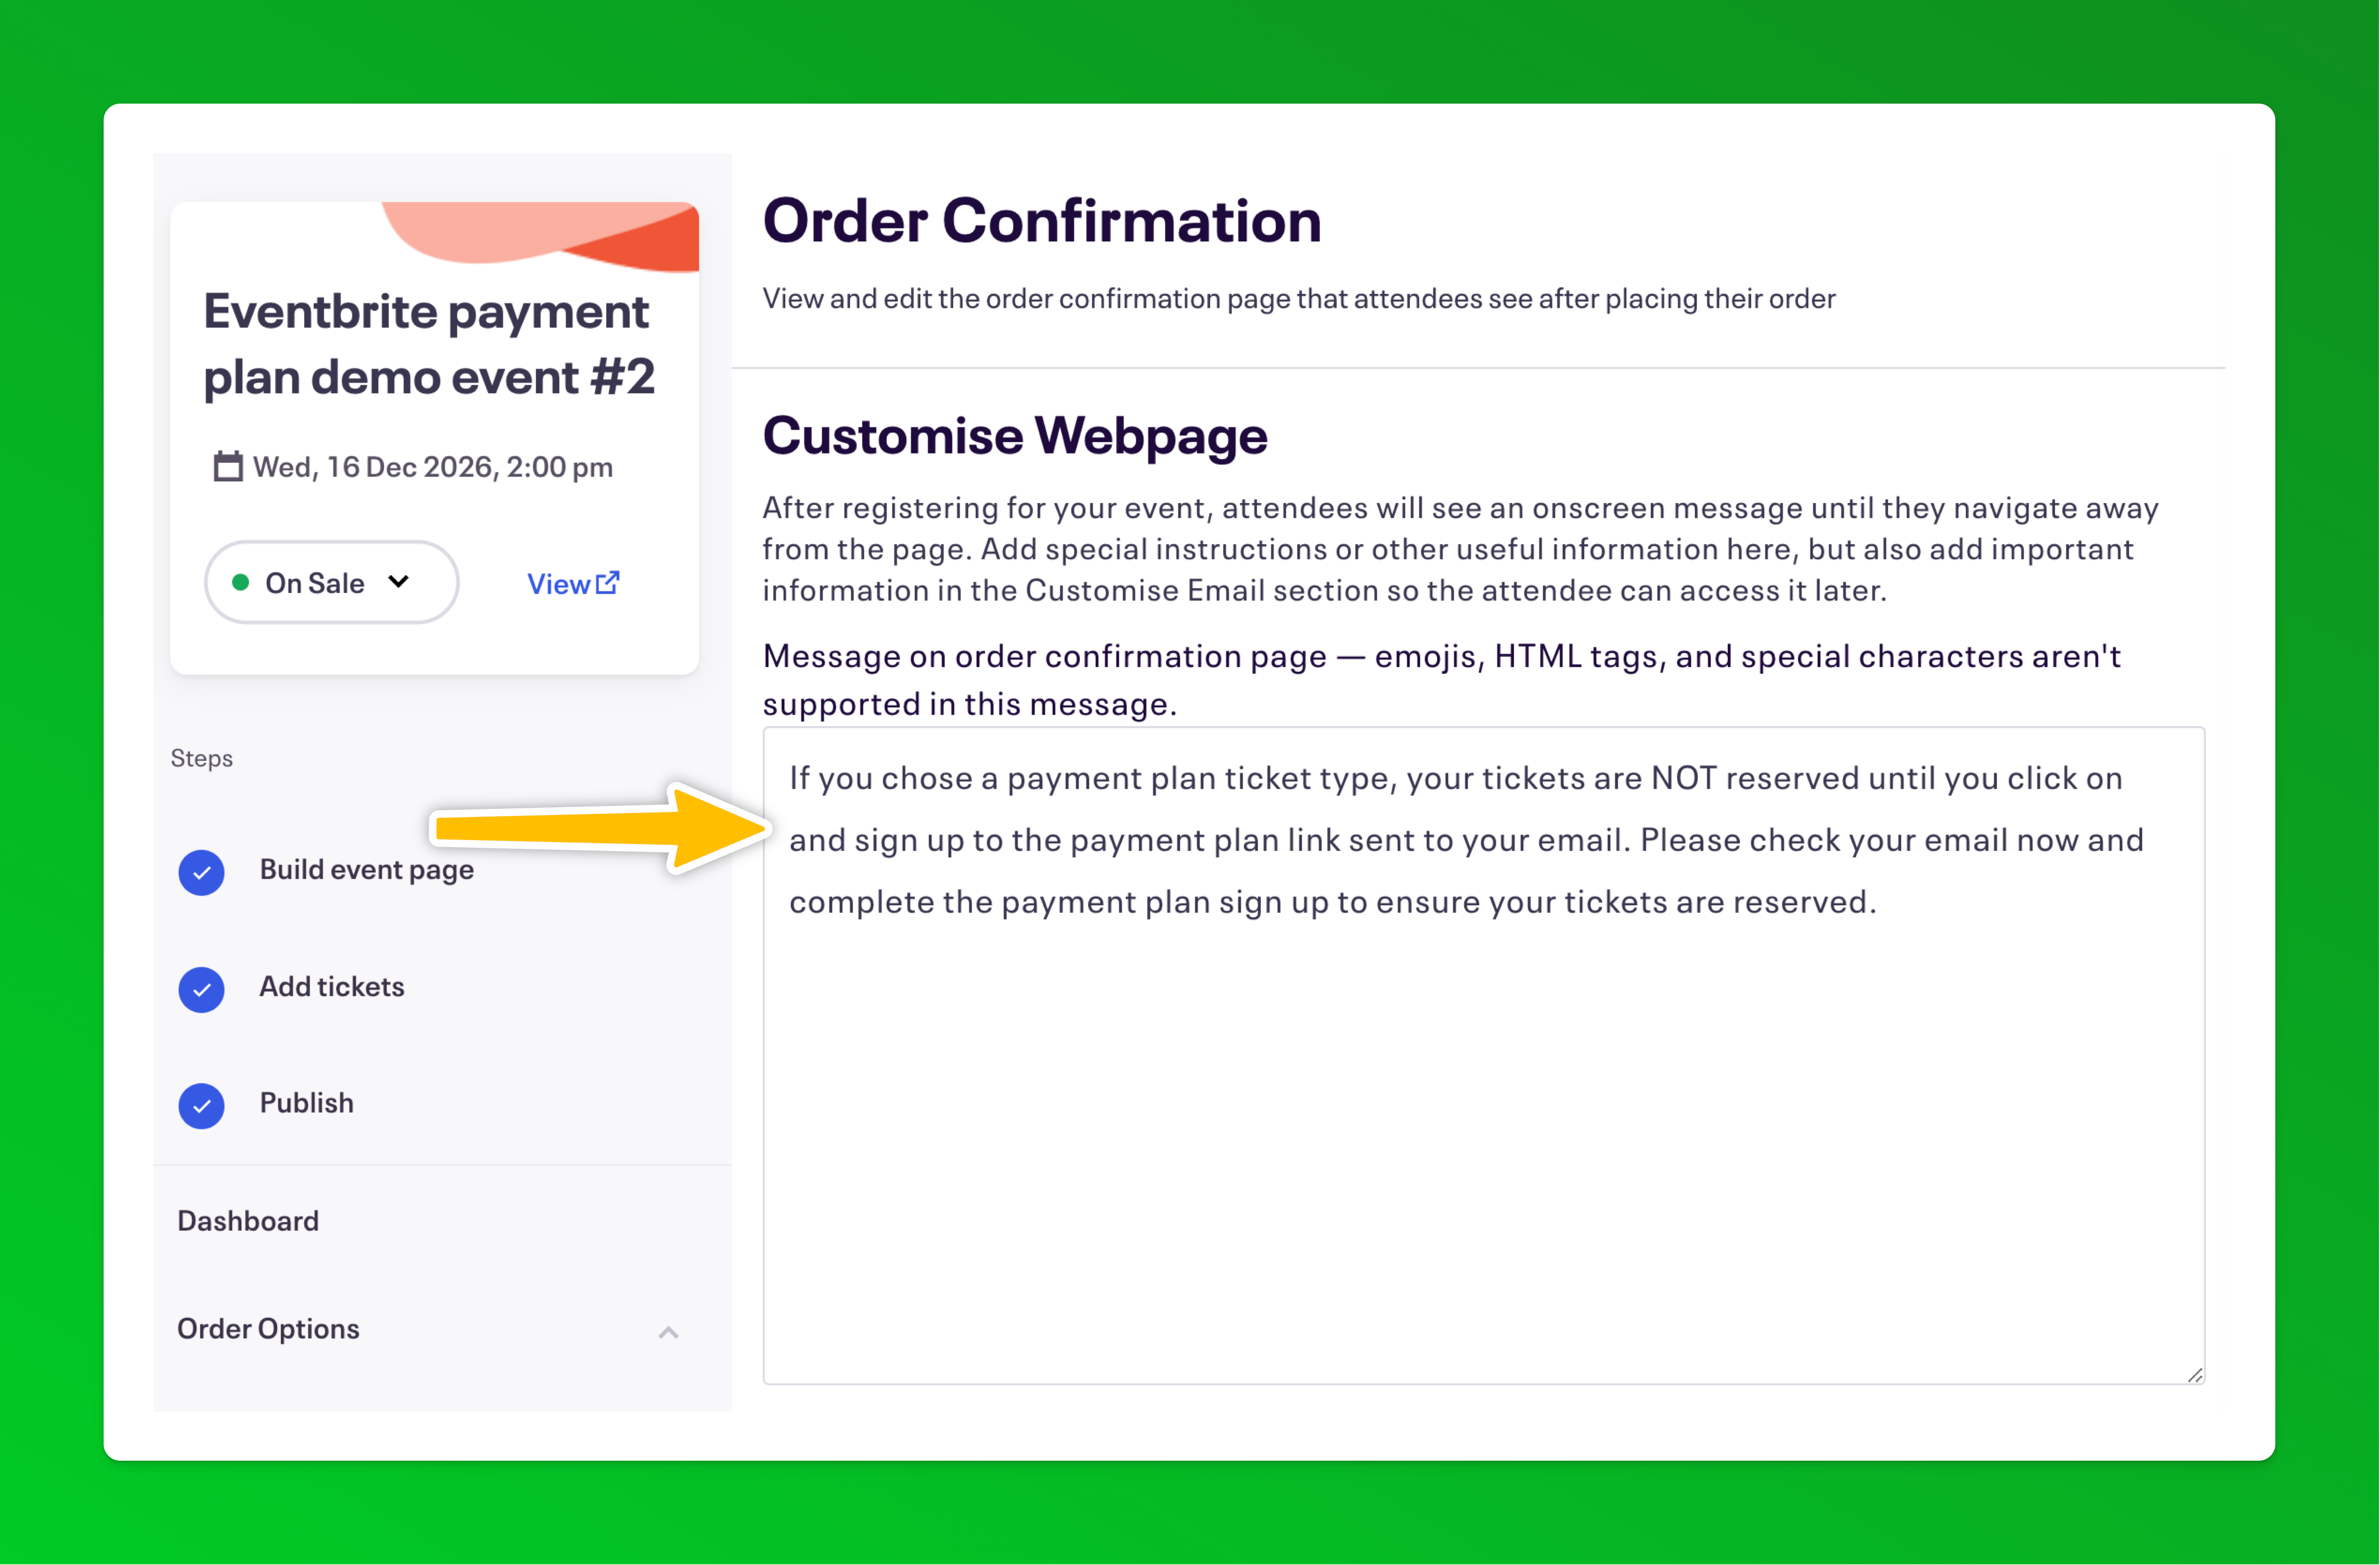 👉 It’s important to repeat this messaging in as many places as possible to counter the Eventbrite default messaging which can make it seem like the order is completed which can lead to attendees who choose the payment plan option forgetting to complete the payment step. 👈
 - Complete one purchase with each payment plan ticket type so that data is available as test records in the Zapier setup below. Buy each ticket type in a separate order. Eg; if you have three payment plan ticket types, complete three separate purchases – we recommend choosing more than 1 in the quantity so in the later step you can be sure the total payment plan amount is accurate based on the order total.
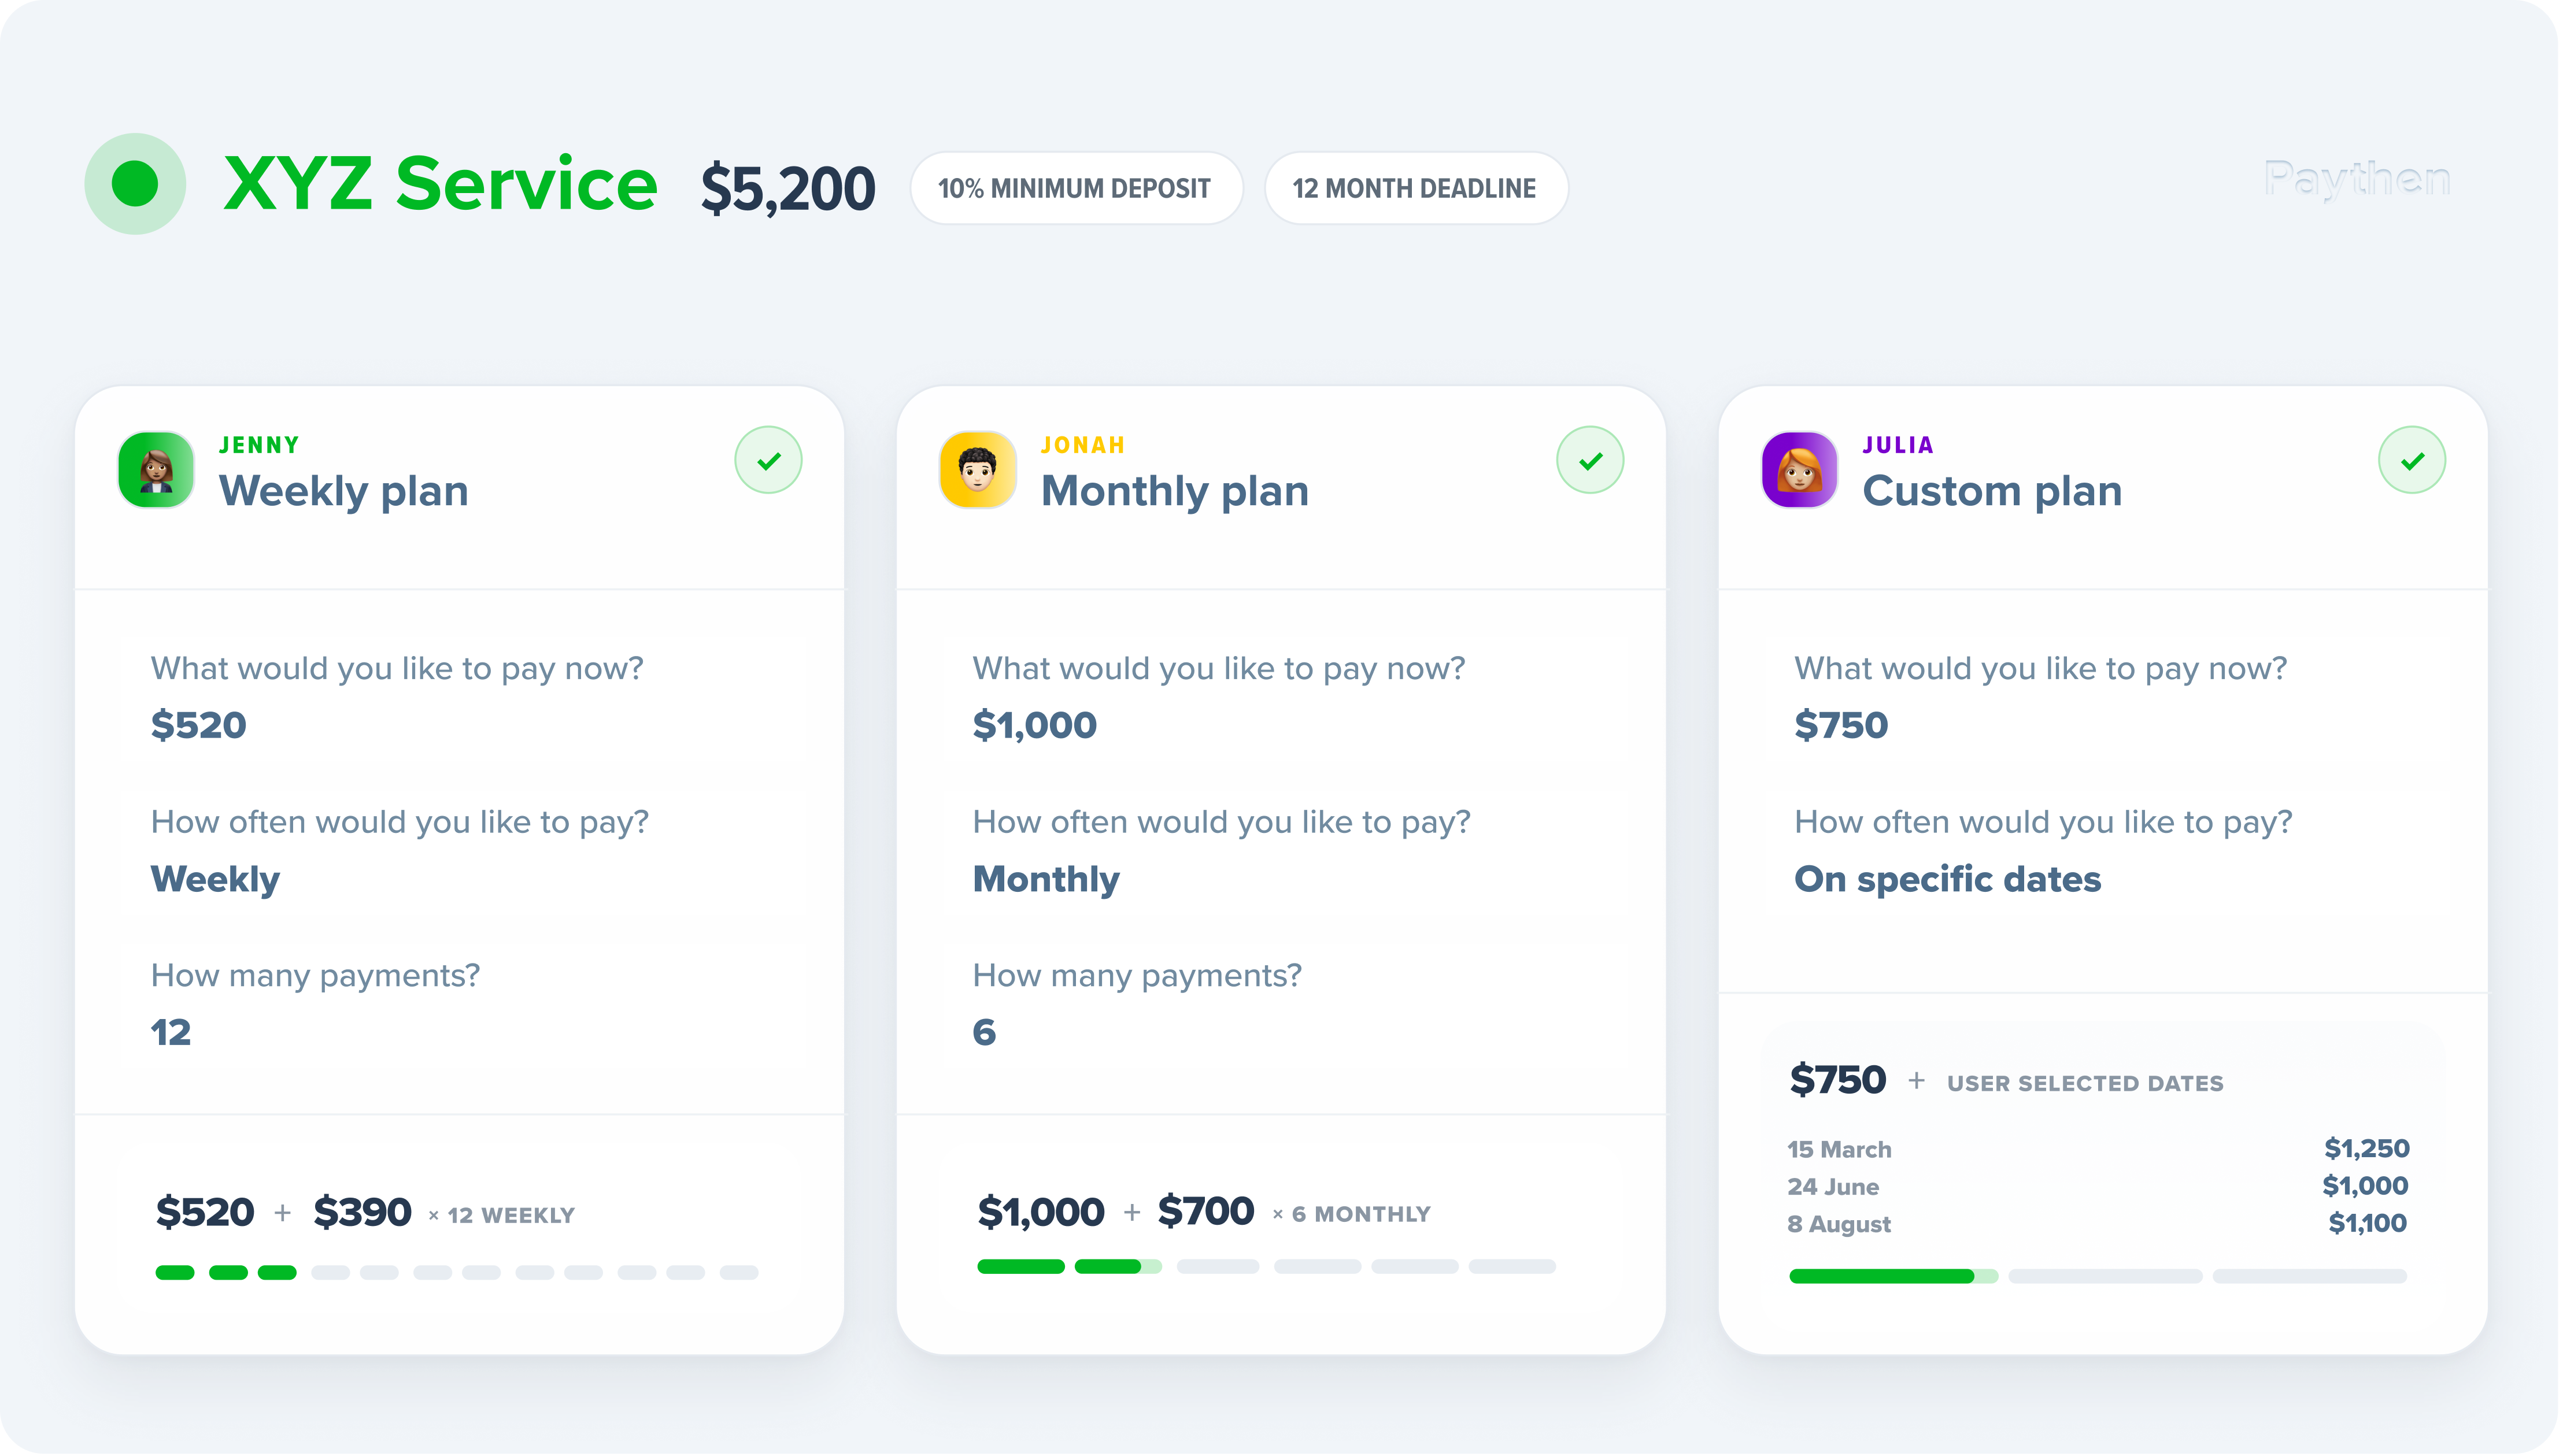
- In your Paythen dashboard, create a new template
 We recommend either the standard payment plan template or if you’d like to align all payment plan buyers payments to the same future dates, consider the date-based payment plan template. You can read more about each template type here. In the template setup, you can choose the amounts, billing intervals, etc – most of these fields can be overwritten and replaced with dynamic data from Eventbrite when we set up Zapier below. You can also edit the template fields any time.
 - Once you’ve created the template, it will generate a template link that you will need for the Zapier step below.
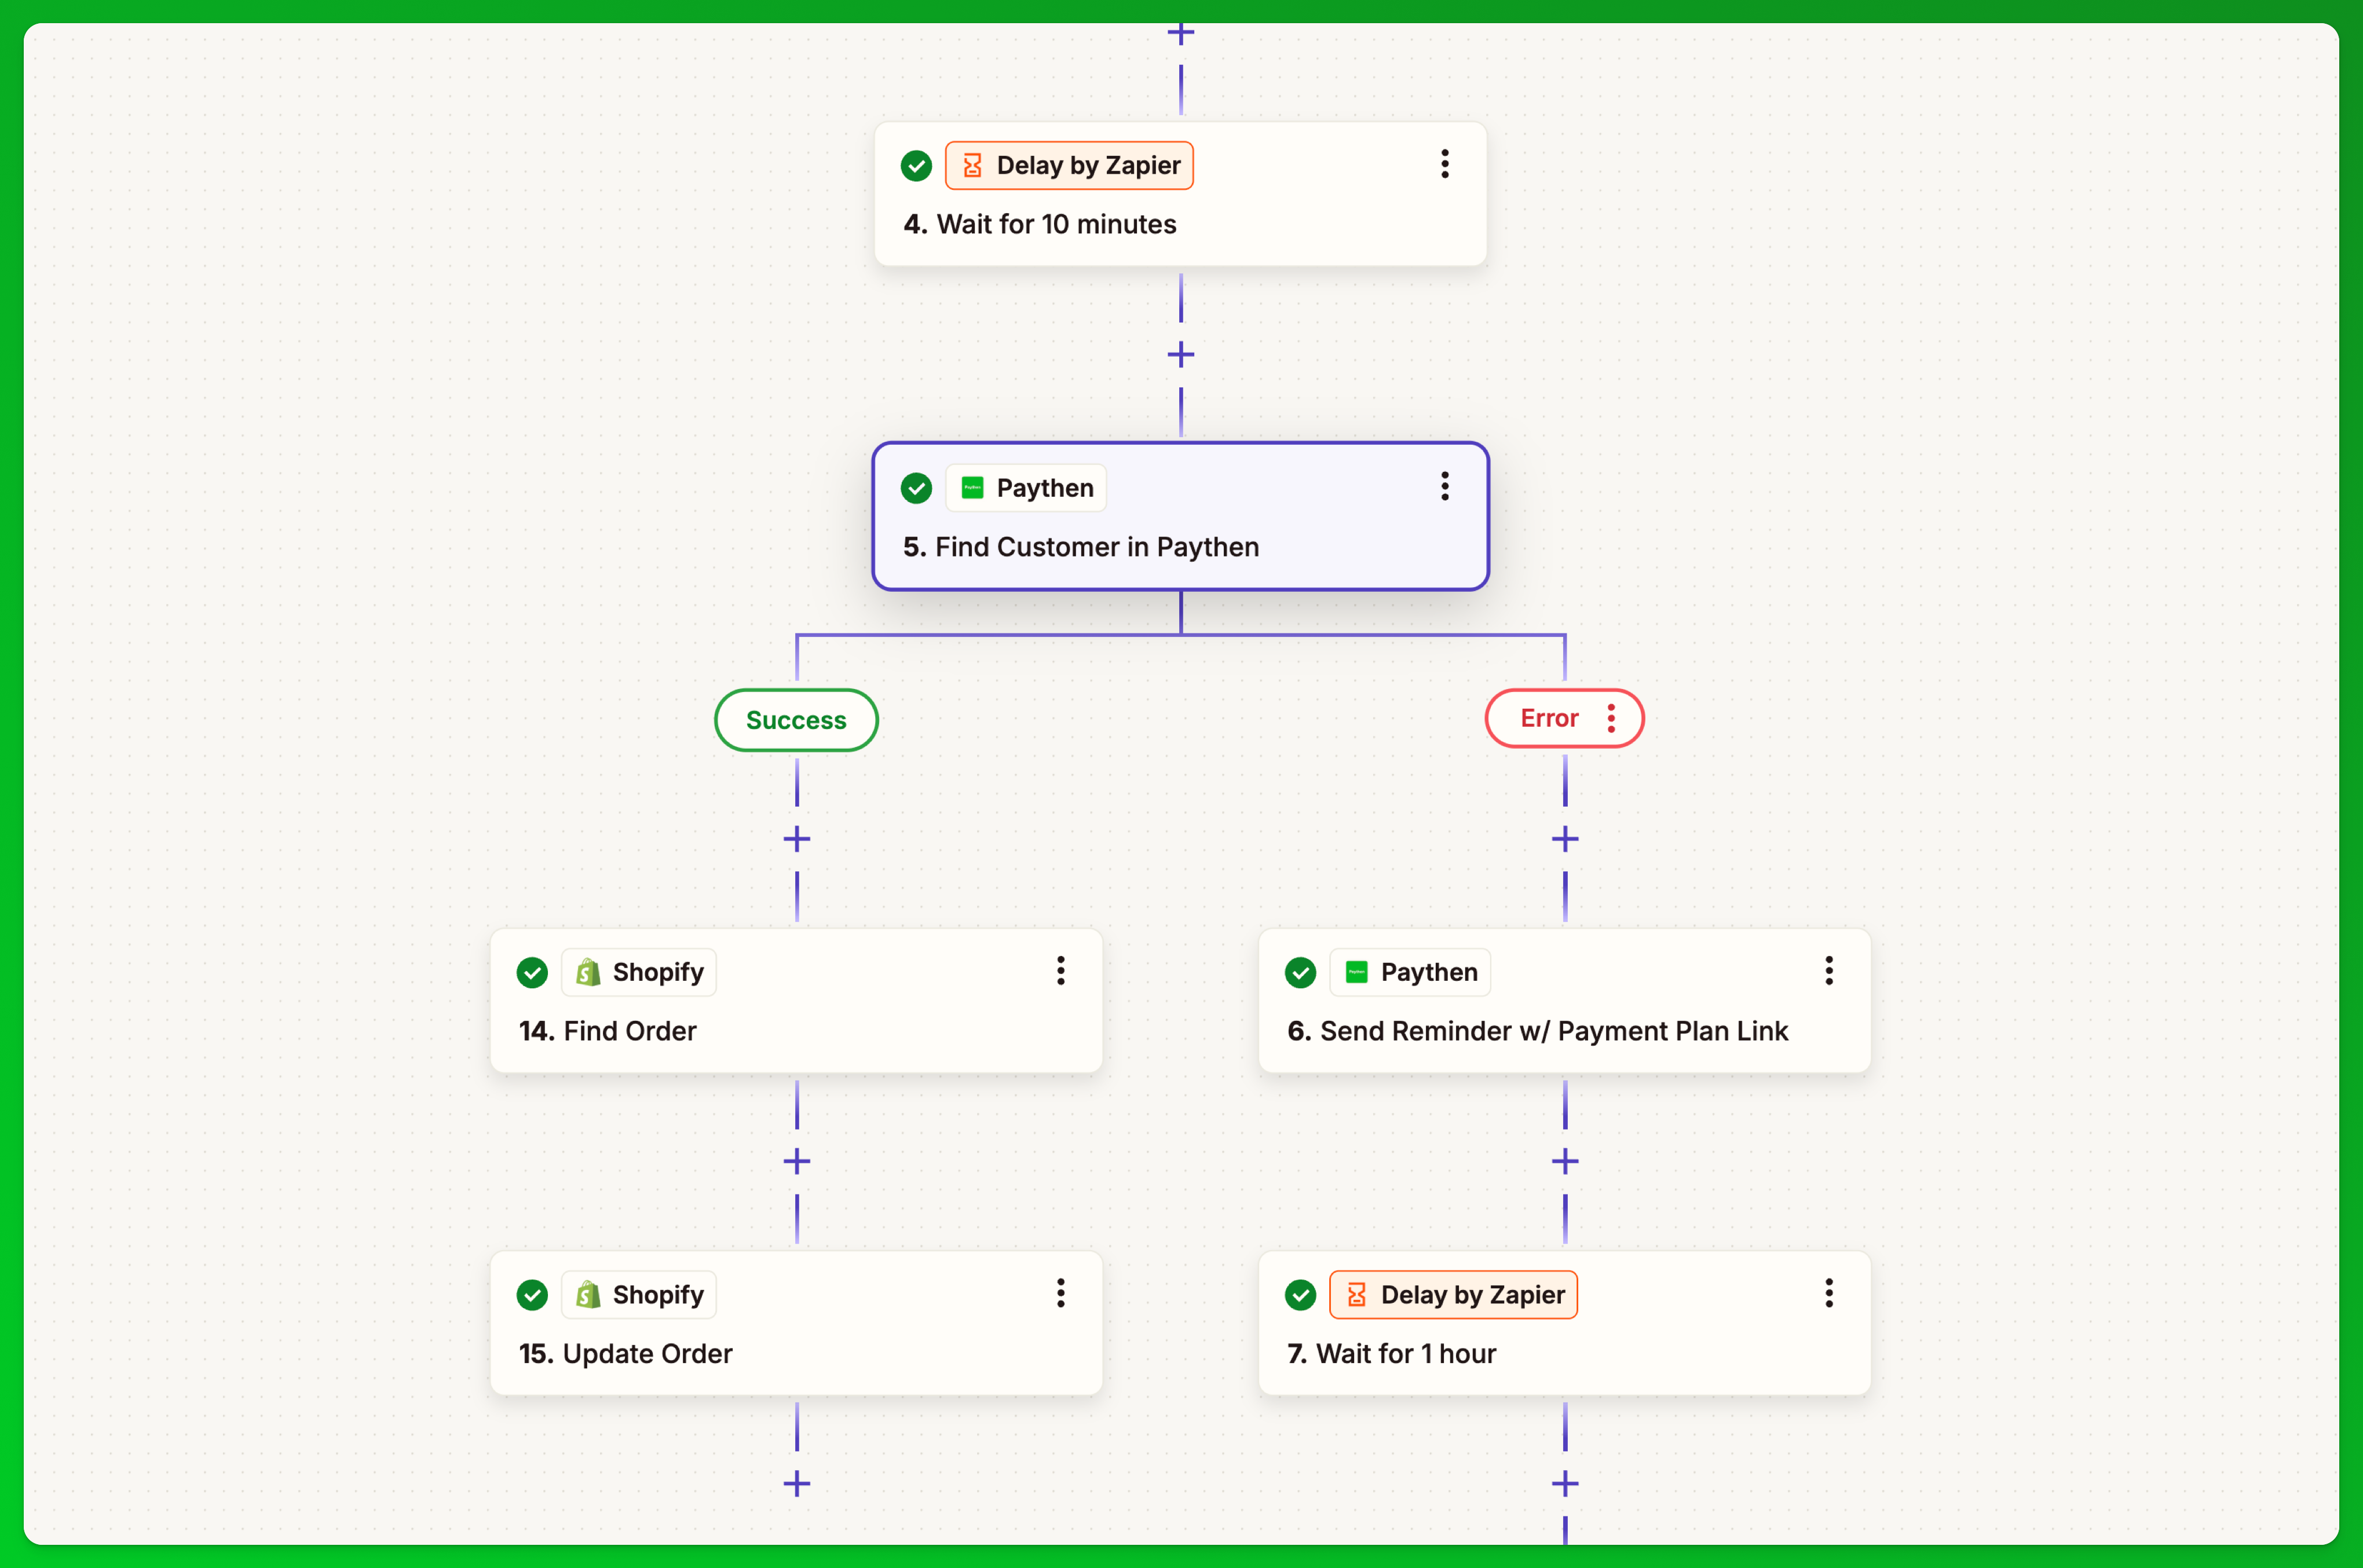
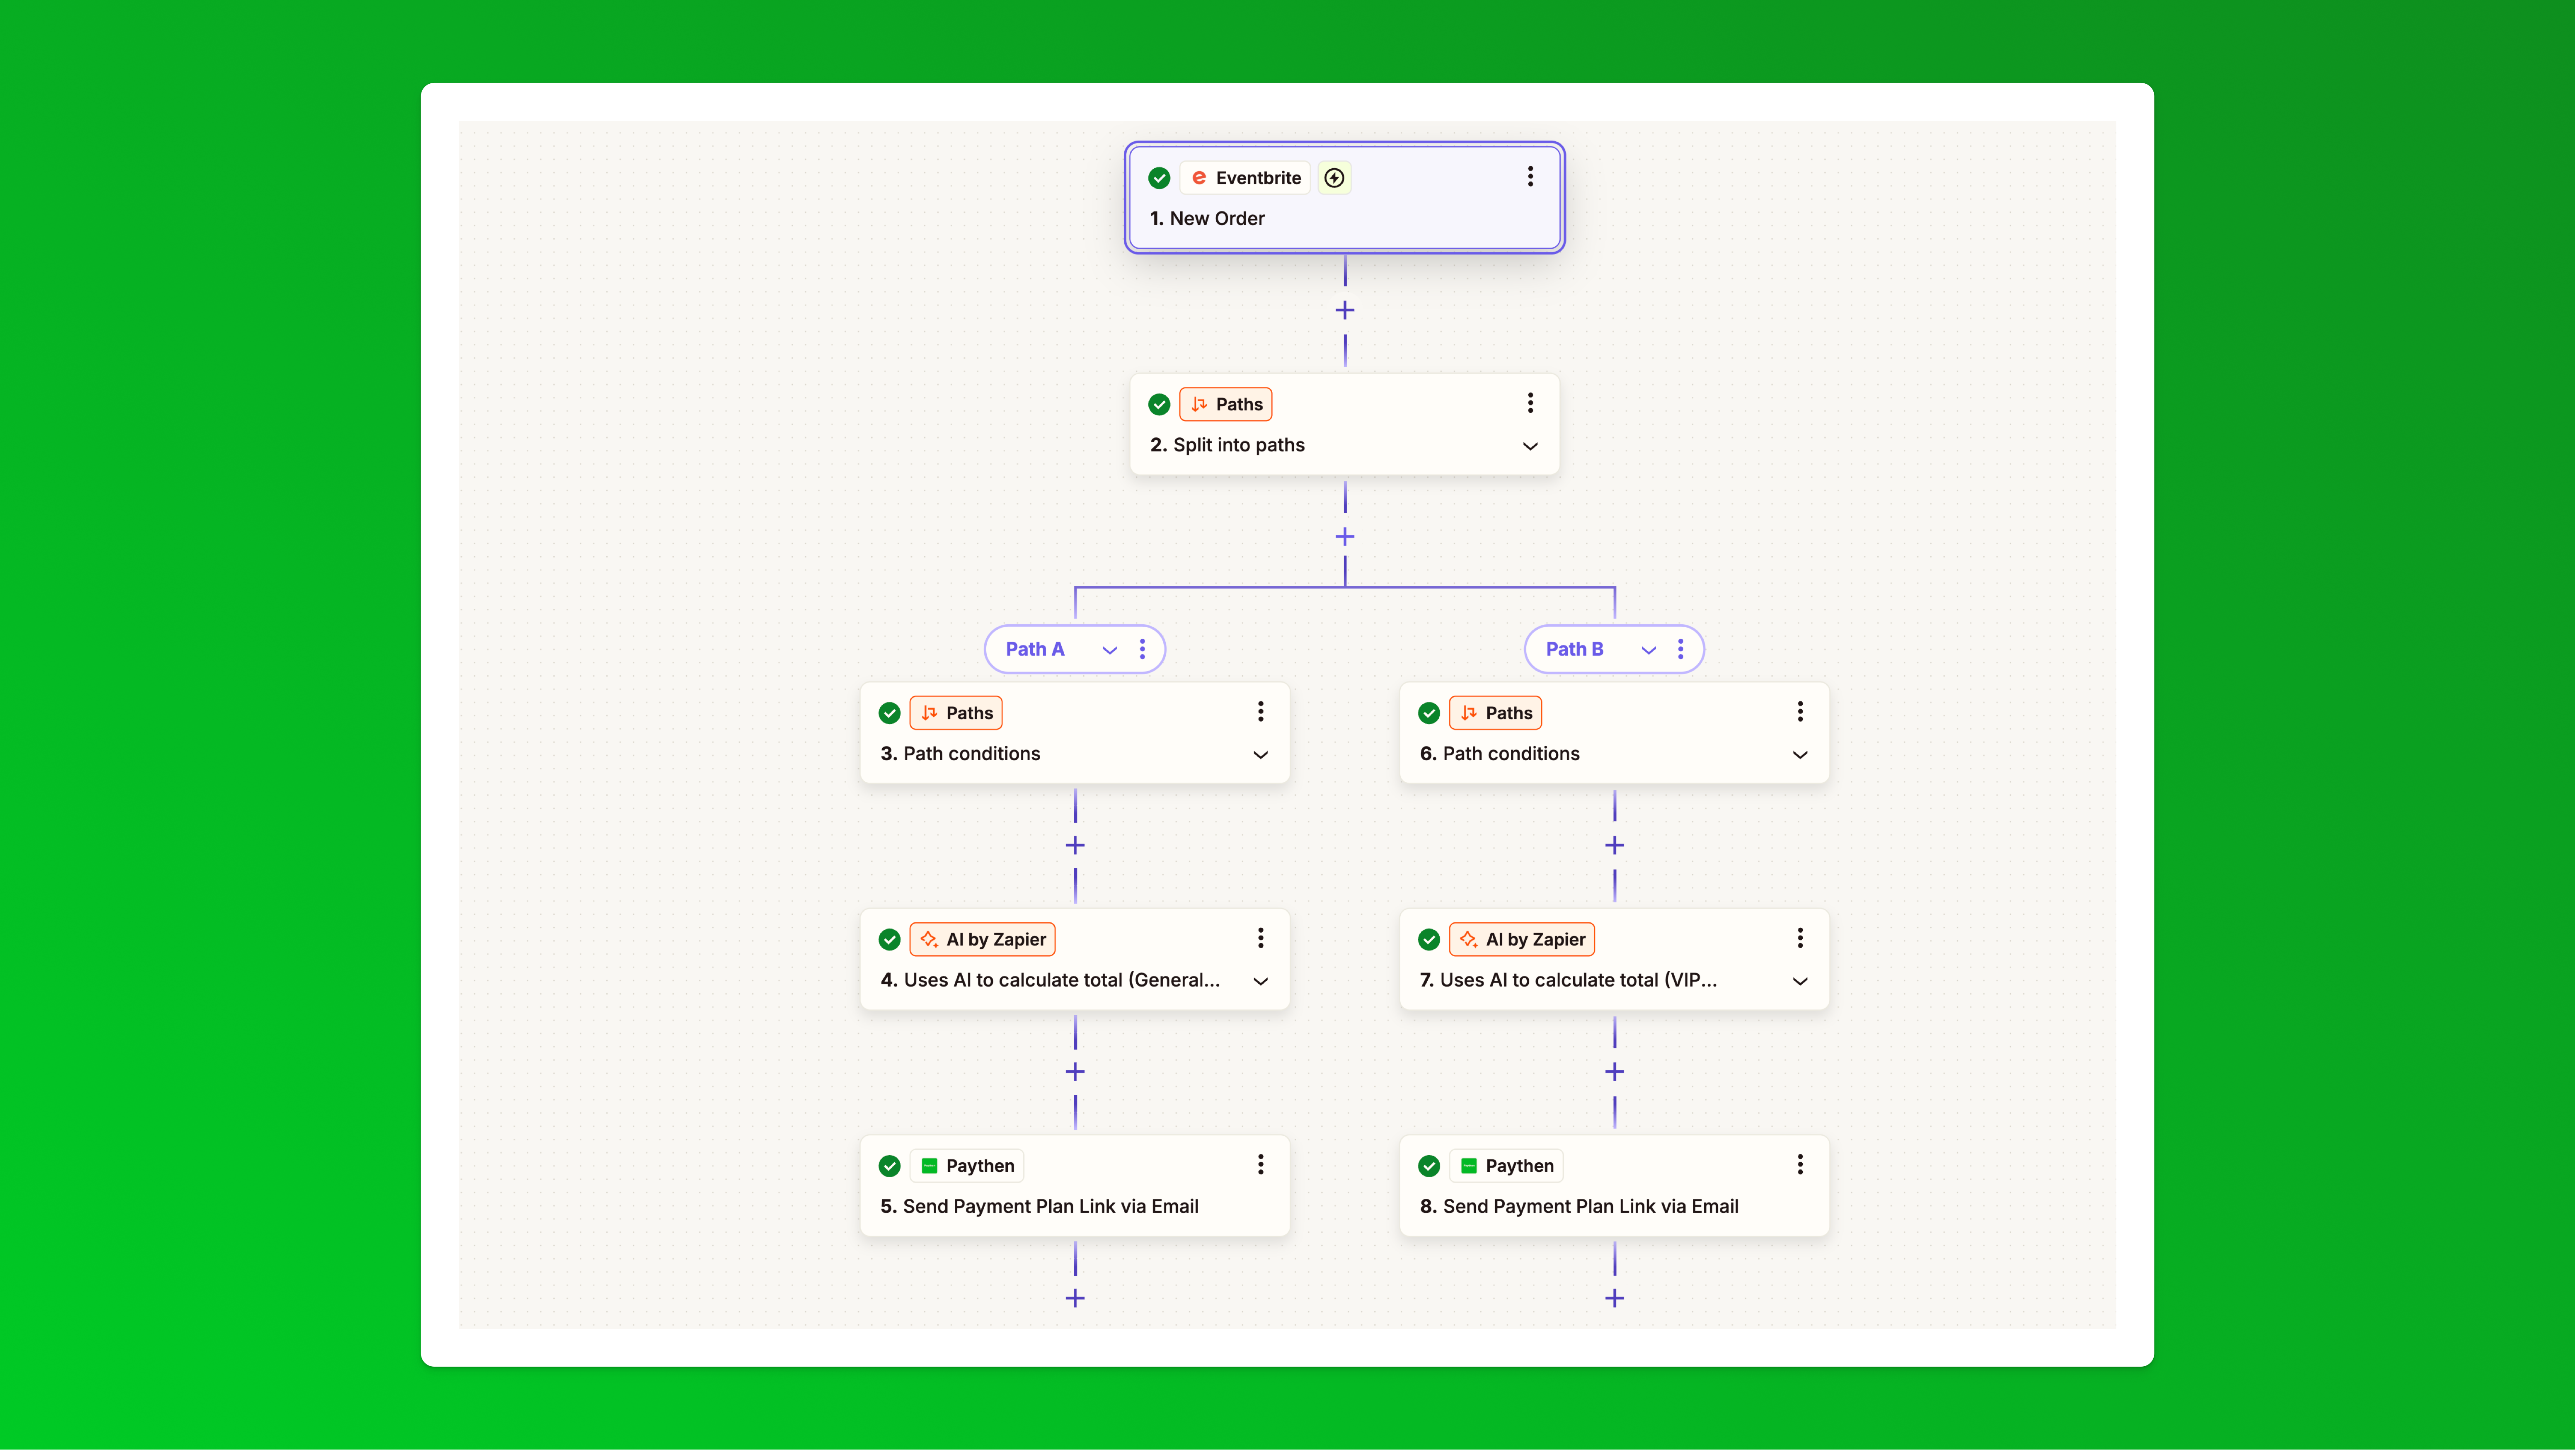
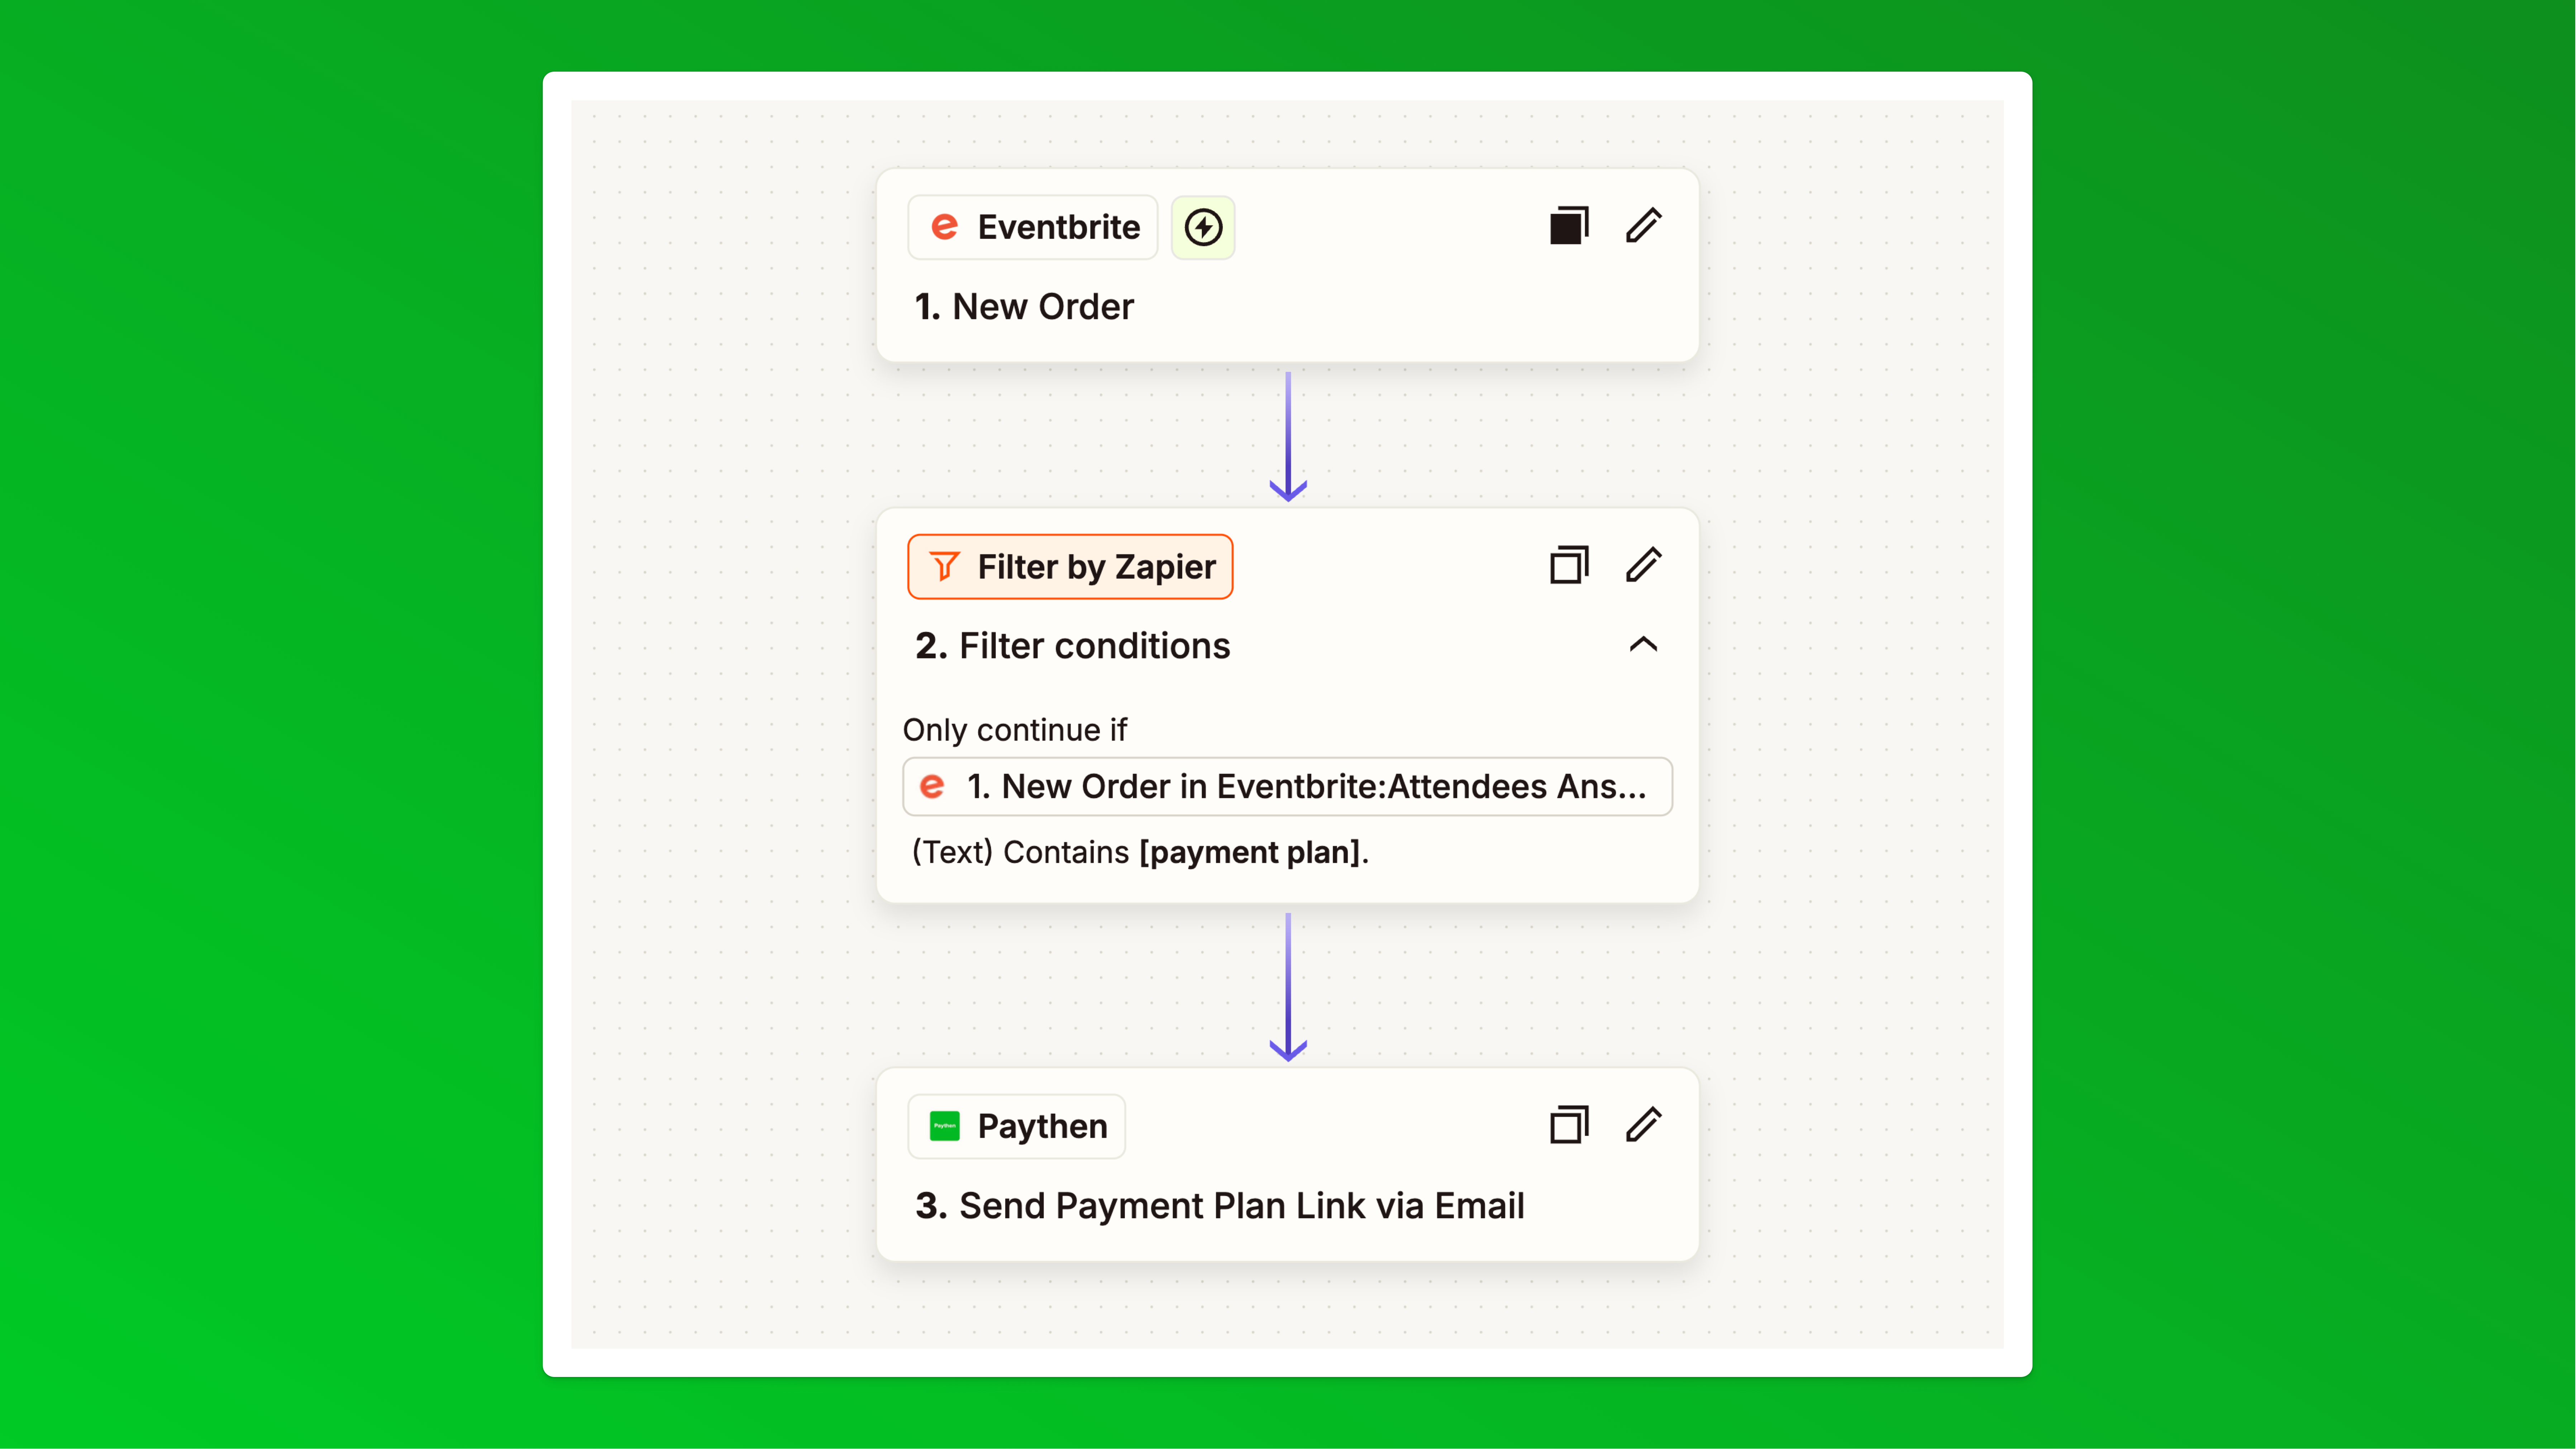
- In your Zapier account, create a new zap. This will use the “New order” trigger from Eventbrite, a filter to check and organize the ticket types and then paths for each ticket type.
 Zapier doesn’t support templates for zaps with paths so we can’t share a pre-set Zapier template link for this approach (like we have for approach 2 below) but here is exactly what you need to set up in each step of the Zap:
 - Zapier step 1: Choose Eventbrite as the app and New order as the trigger. Connect your Eventbrite account and choose your event. In the “Test” step you should see one or more of your test orders you placed earlier. If you can’t we recommend placing an order on your even with the payment plan ticket type selected to make it easier to map data in the following steps. Select a test order and continue your Zap.
- Zapier step 2: Add a Paths step and add one path for each payment plan ticket type you’re offering. In our demo, we have two ticket types and each has a payment plan option so we have two paths.
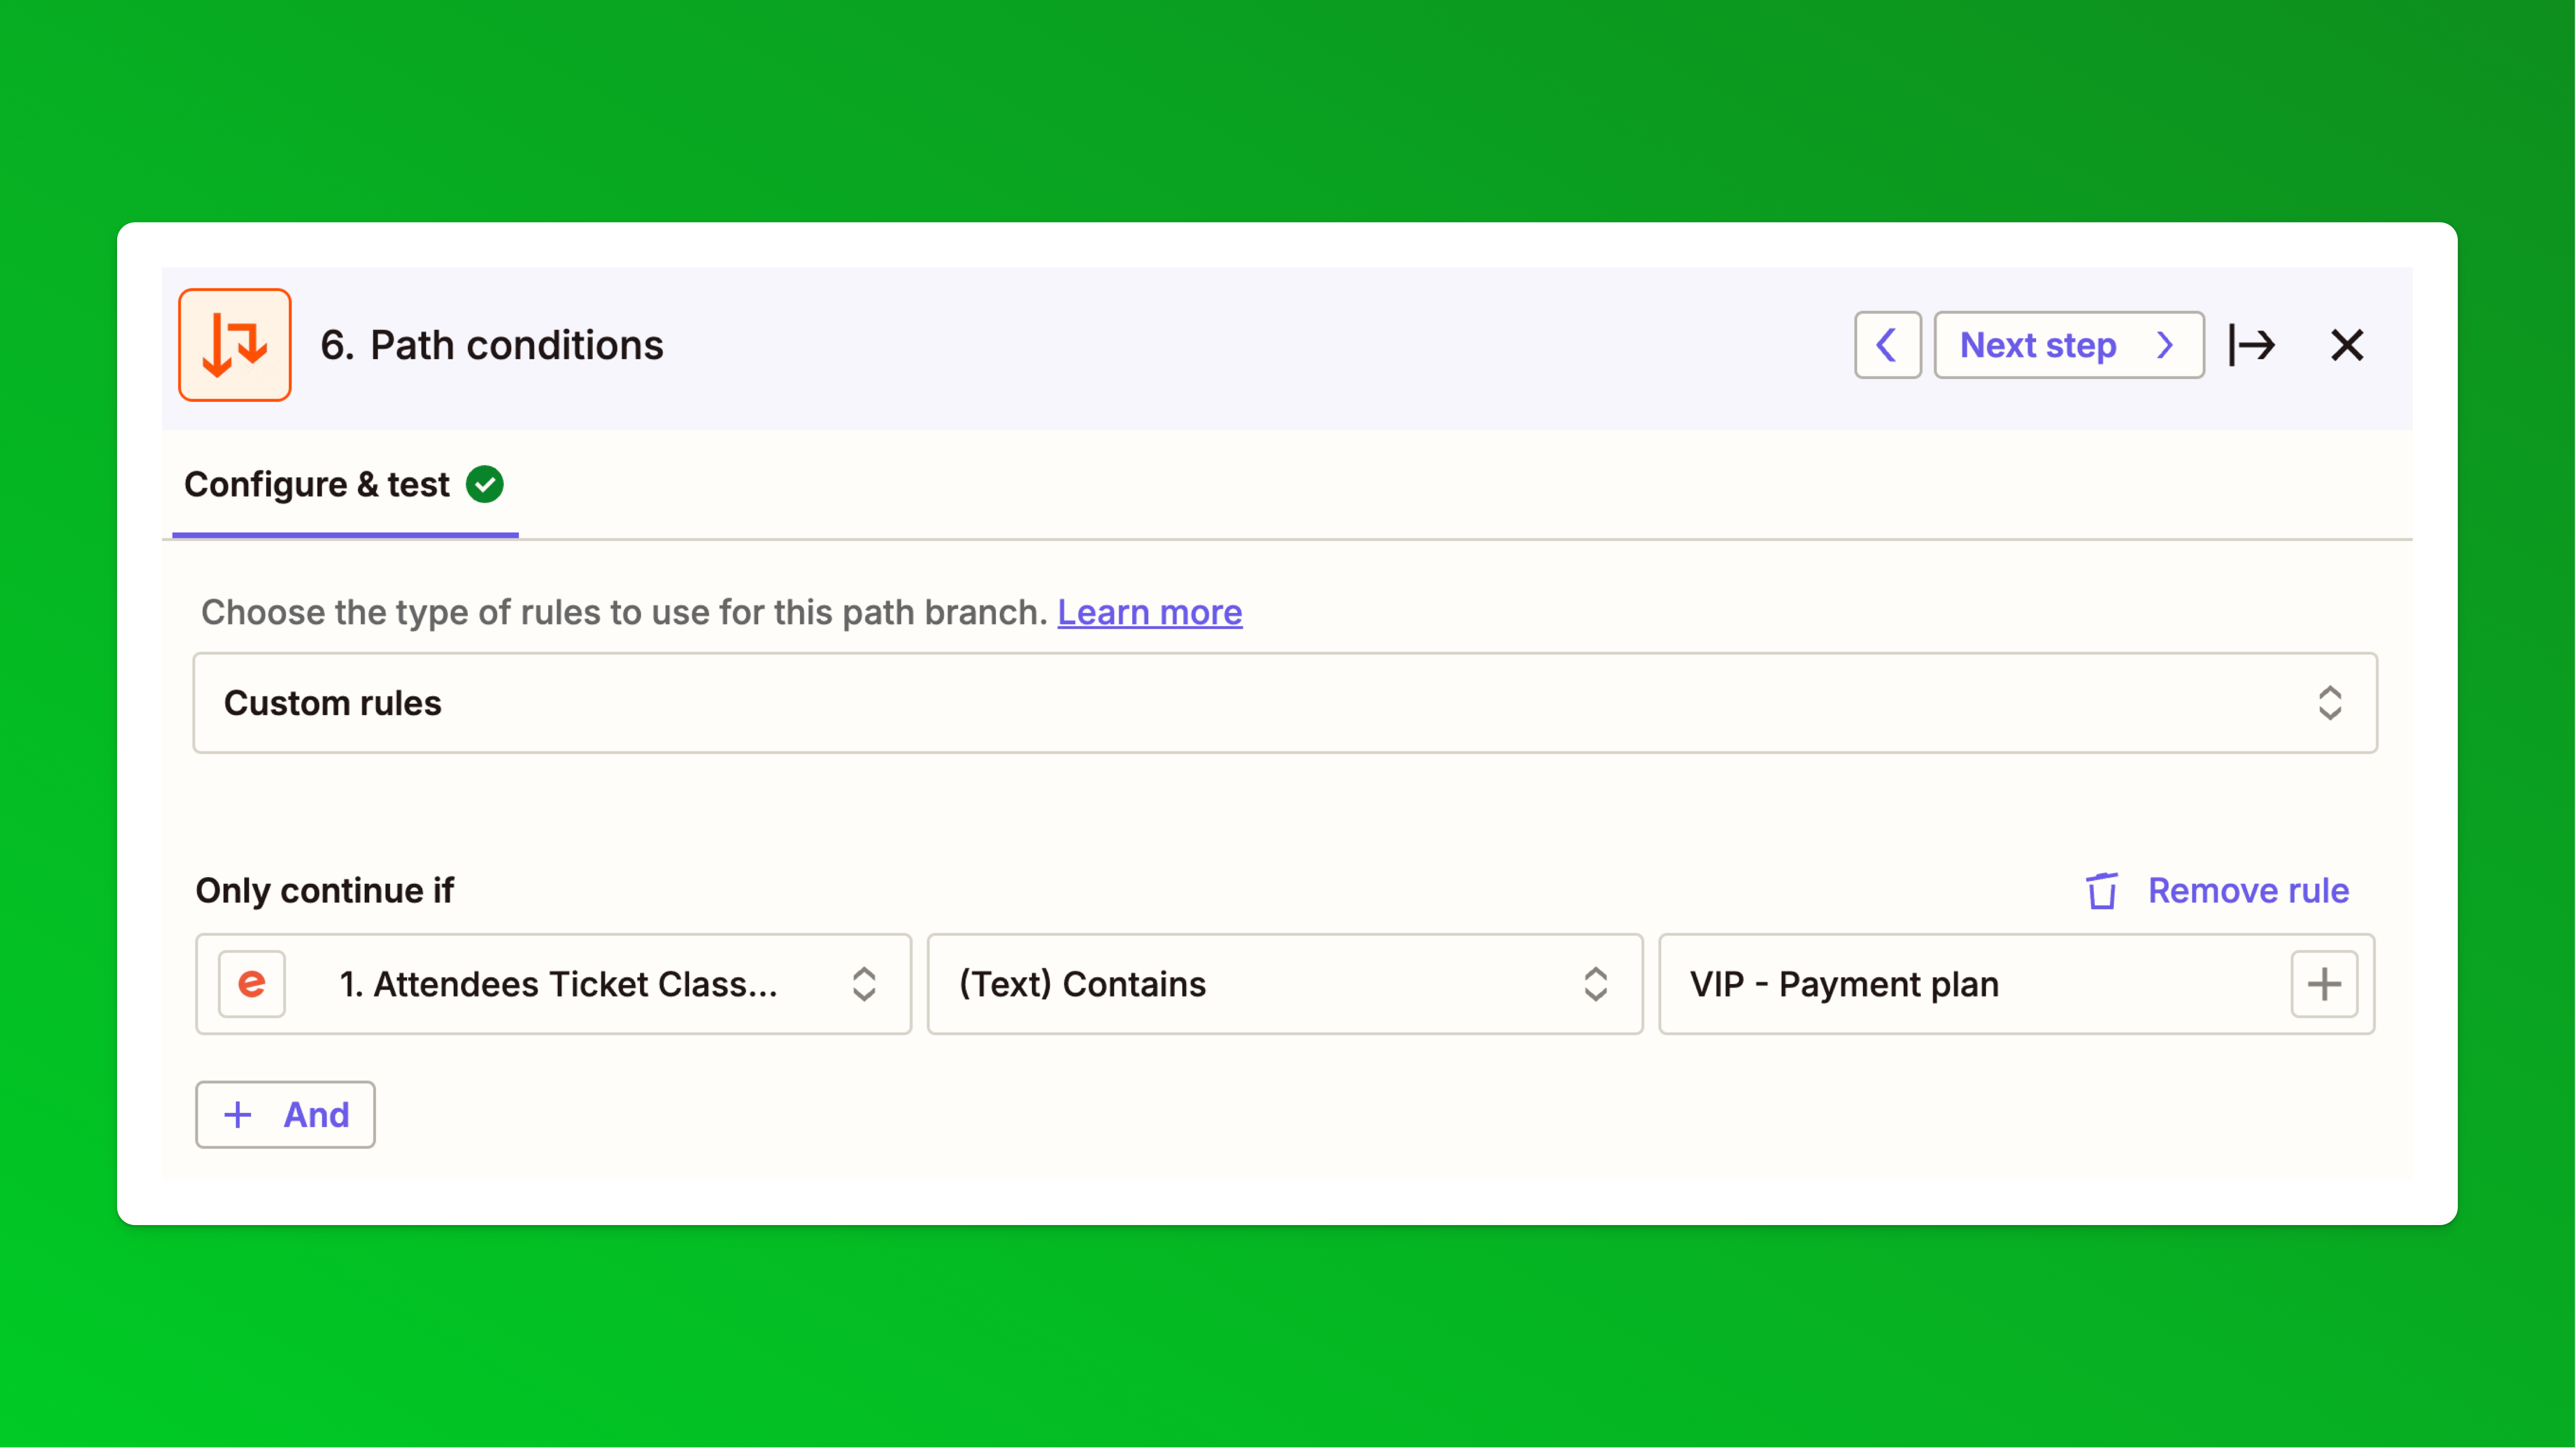
- Zapier step 3: In your Path conditions for each path, choose Custom rules then Only continue if Attendees Ticket Class Name (inserted from the Eventbrite step) – Text (Contains) – “VIP – Payment plan” or “Standard – Payment plan” – in this step, enter the exact name that corresponds with the ticket type name you set up in Eventbrite. This will filter this path for specific ticket types.
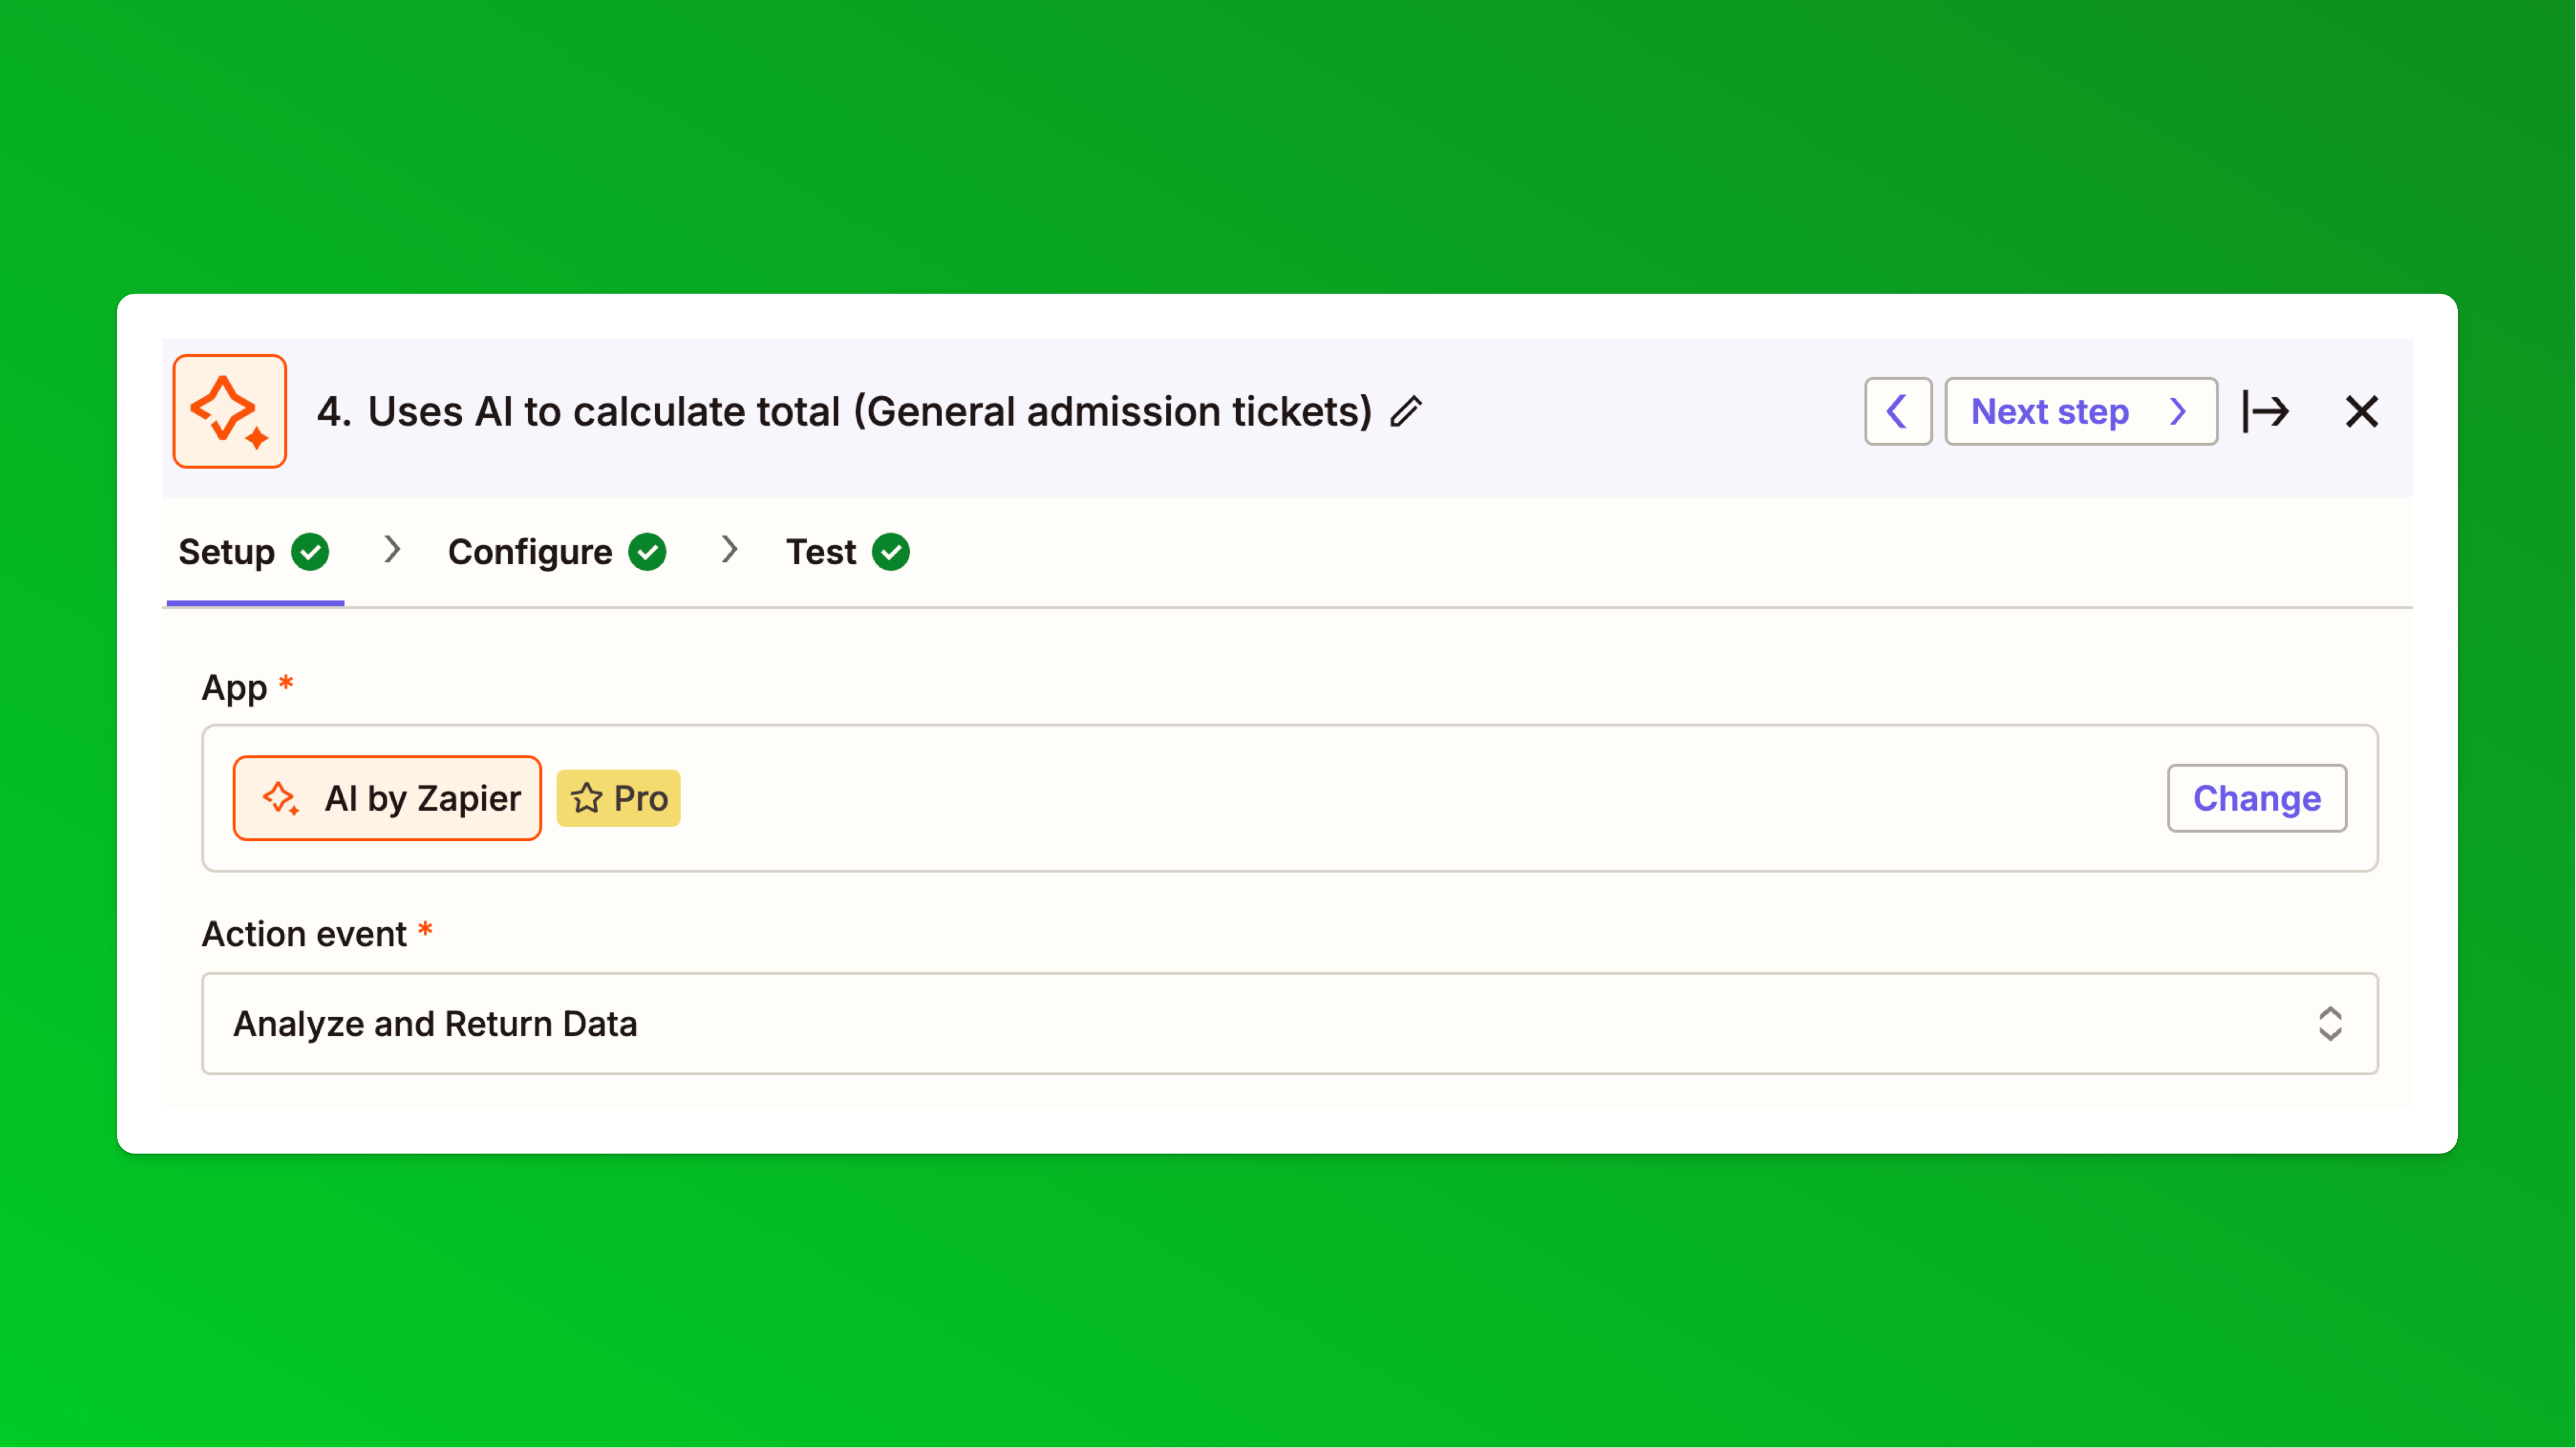
- Zapier step 4: We will now calculate the total payment amount for each order based on the ticket type and number of tickets they chose. Complete this step for each path you have.This can’t be calculated in Eventbrite since the ticket type in Eventbrite is set to free. For this step, you can use any app that lets you calculate the total but we’ve found the easiest way is to use the new “AI by Zapier” app. Choose Analyze and Return Data in the Action event dropdown.
 In the Configure step for this, what we need to do is give the AI some basic instructions, the cost per ticket for this ticket type and the Eventbrite order quantity field as shown and ask it to calculate a total by multiplying the cost per ticket with the order quantity (number of tickets) and return a final total that we will use in the next step.
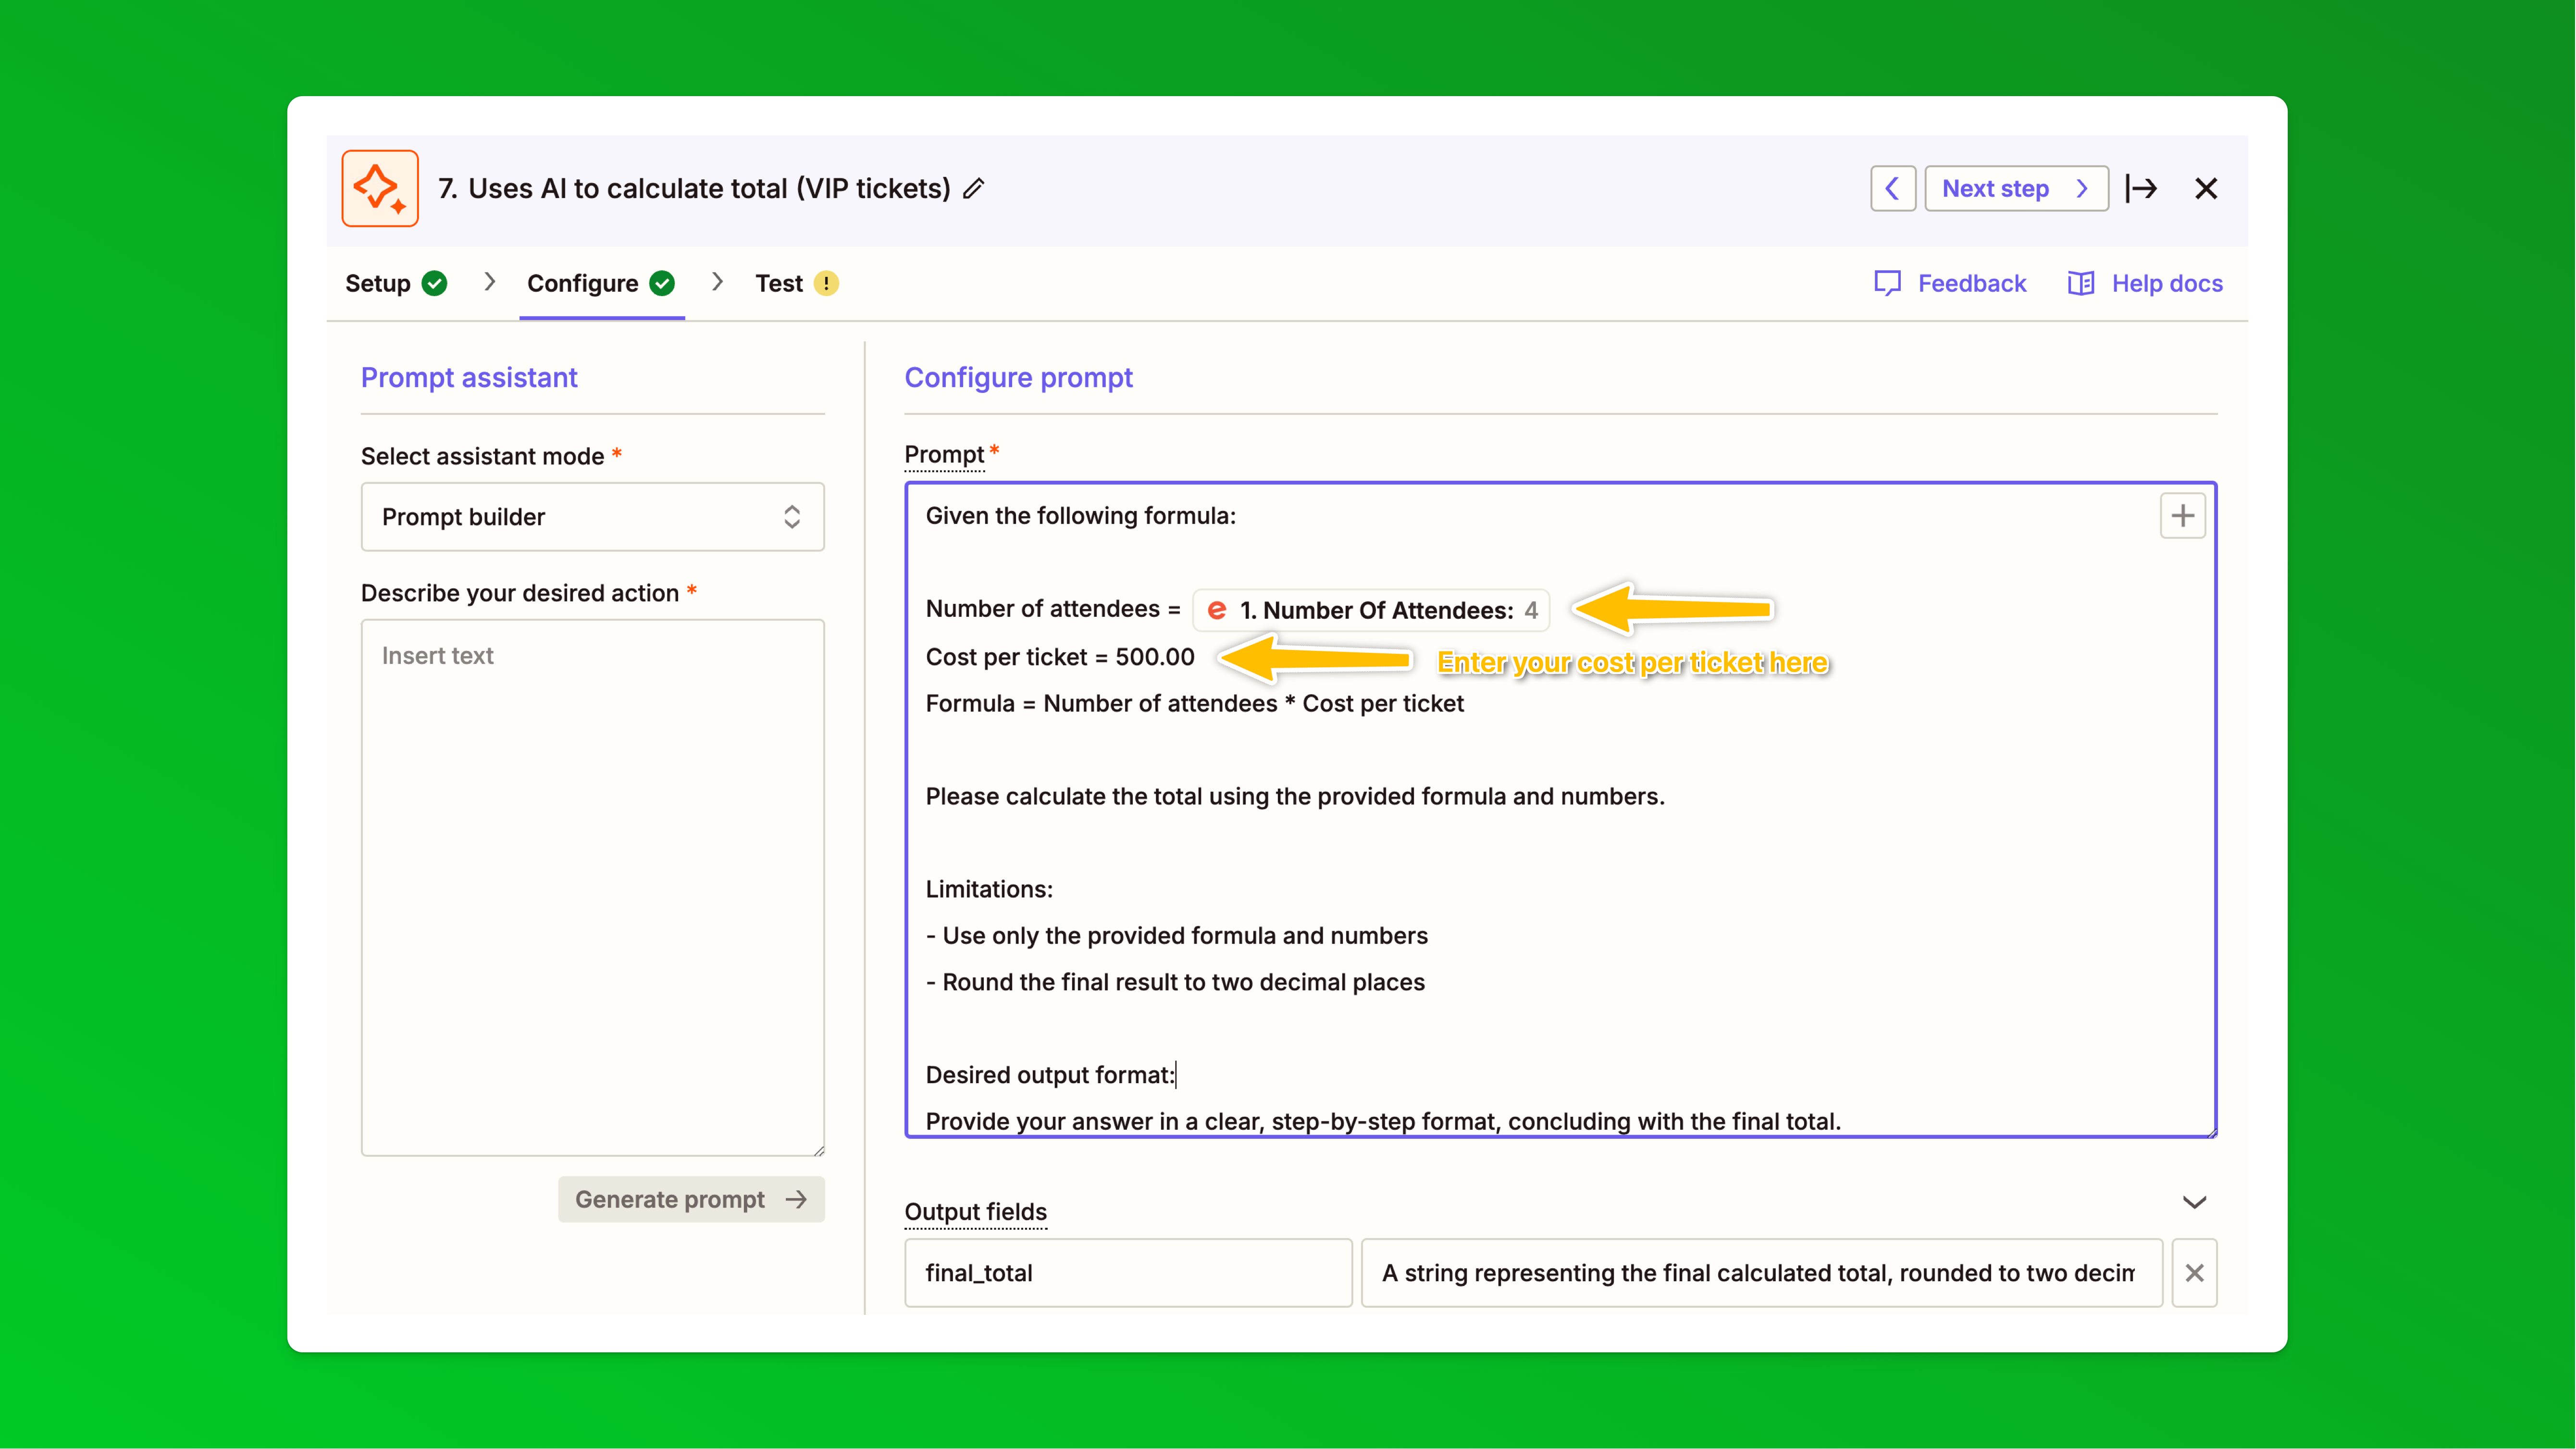 This is the exact text we used you can copy and paste:
———————————————
Given the following formula:
Number of attendees = [Insert number of attendees field from Eventbrite here, delete this text]
Cost per ticket = 500.00 [Manually update this value without symbols to match your ticket price – then delete this text]
Formula = Number of attendees * Cost per ticket
Please calculate the total using the provided formula and numbers.
Limitations:
– Use only the provided formula and numbers
– Round the final result to two decimal places
Desired output format:
Provide your answer in a clear, step-by-step format, concluding with the final total.
———————————————
In Output fields, add this:final_total A string representing the final calculated total, rounded to two decimal places.Now in the test step, in “Data in” you should see the values from your test order: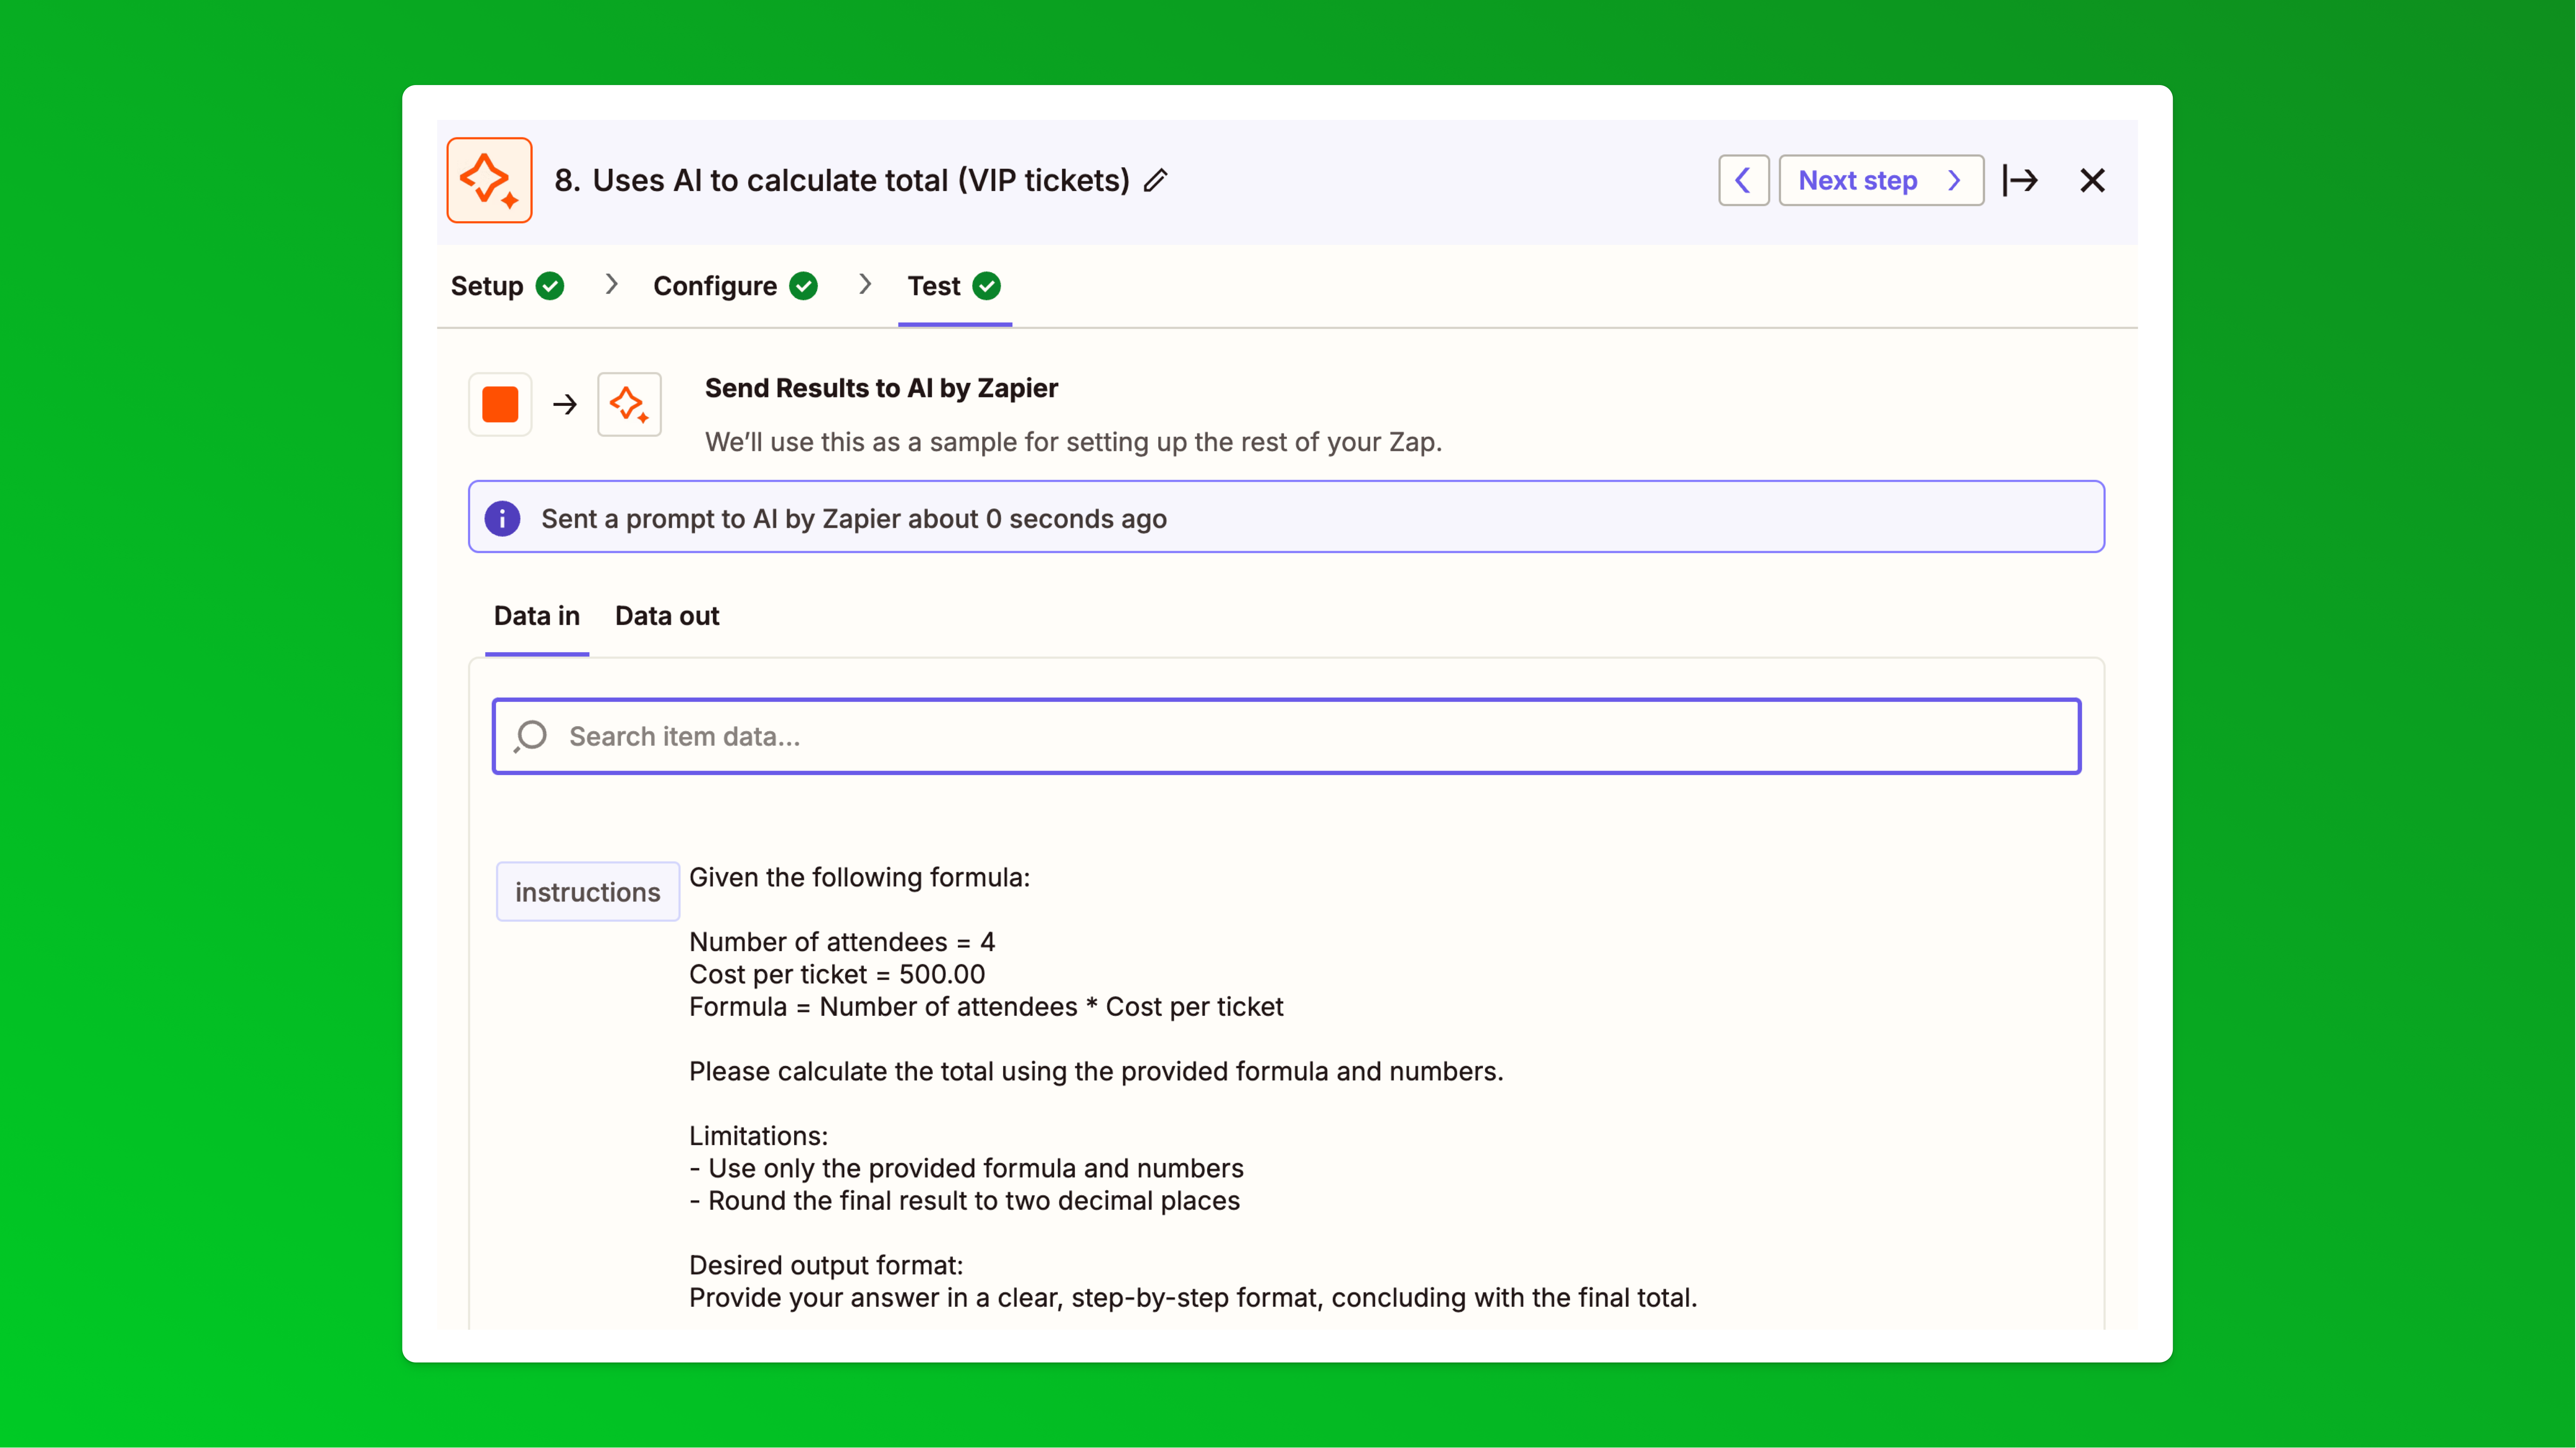 And in the Data out tab or if you continue, you should see the correct final_total value. In our example, it would be 4 * 500 = 2,000In our Paythen payment plan template, we have added a 10% payment plan admin fee that will now be added on top of this amount when the payment plan link is generated and sent to customers. We recommend handling any payment plan specific surcharges and other changes there to keep your Zapier setup simple. So in this instance the customer’s total payment plan amount will be $2,200 on the payment page.
 - Zapier step 5: Now we’ll configure the final step of each path – to send a custom payment plan link via email to customers that chose the payment plan ticket types at checkout. Choose Paythen as the app, then choose the Send payment plan link via email action, and authenticate your Paythen account if you haven’t already:
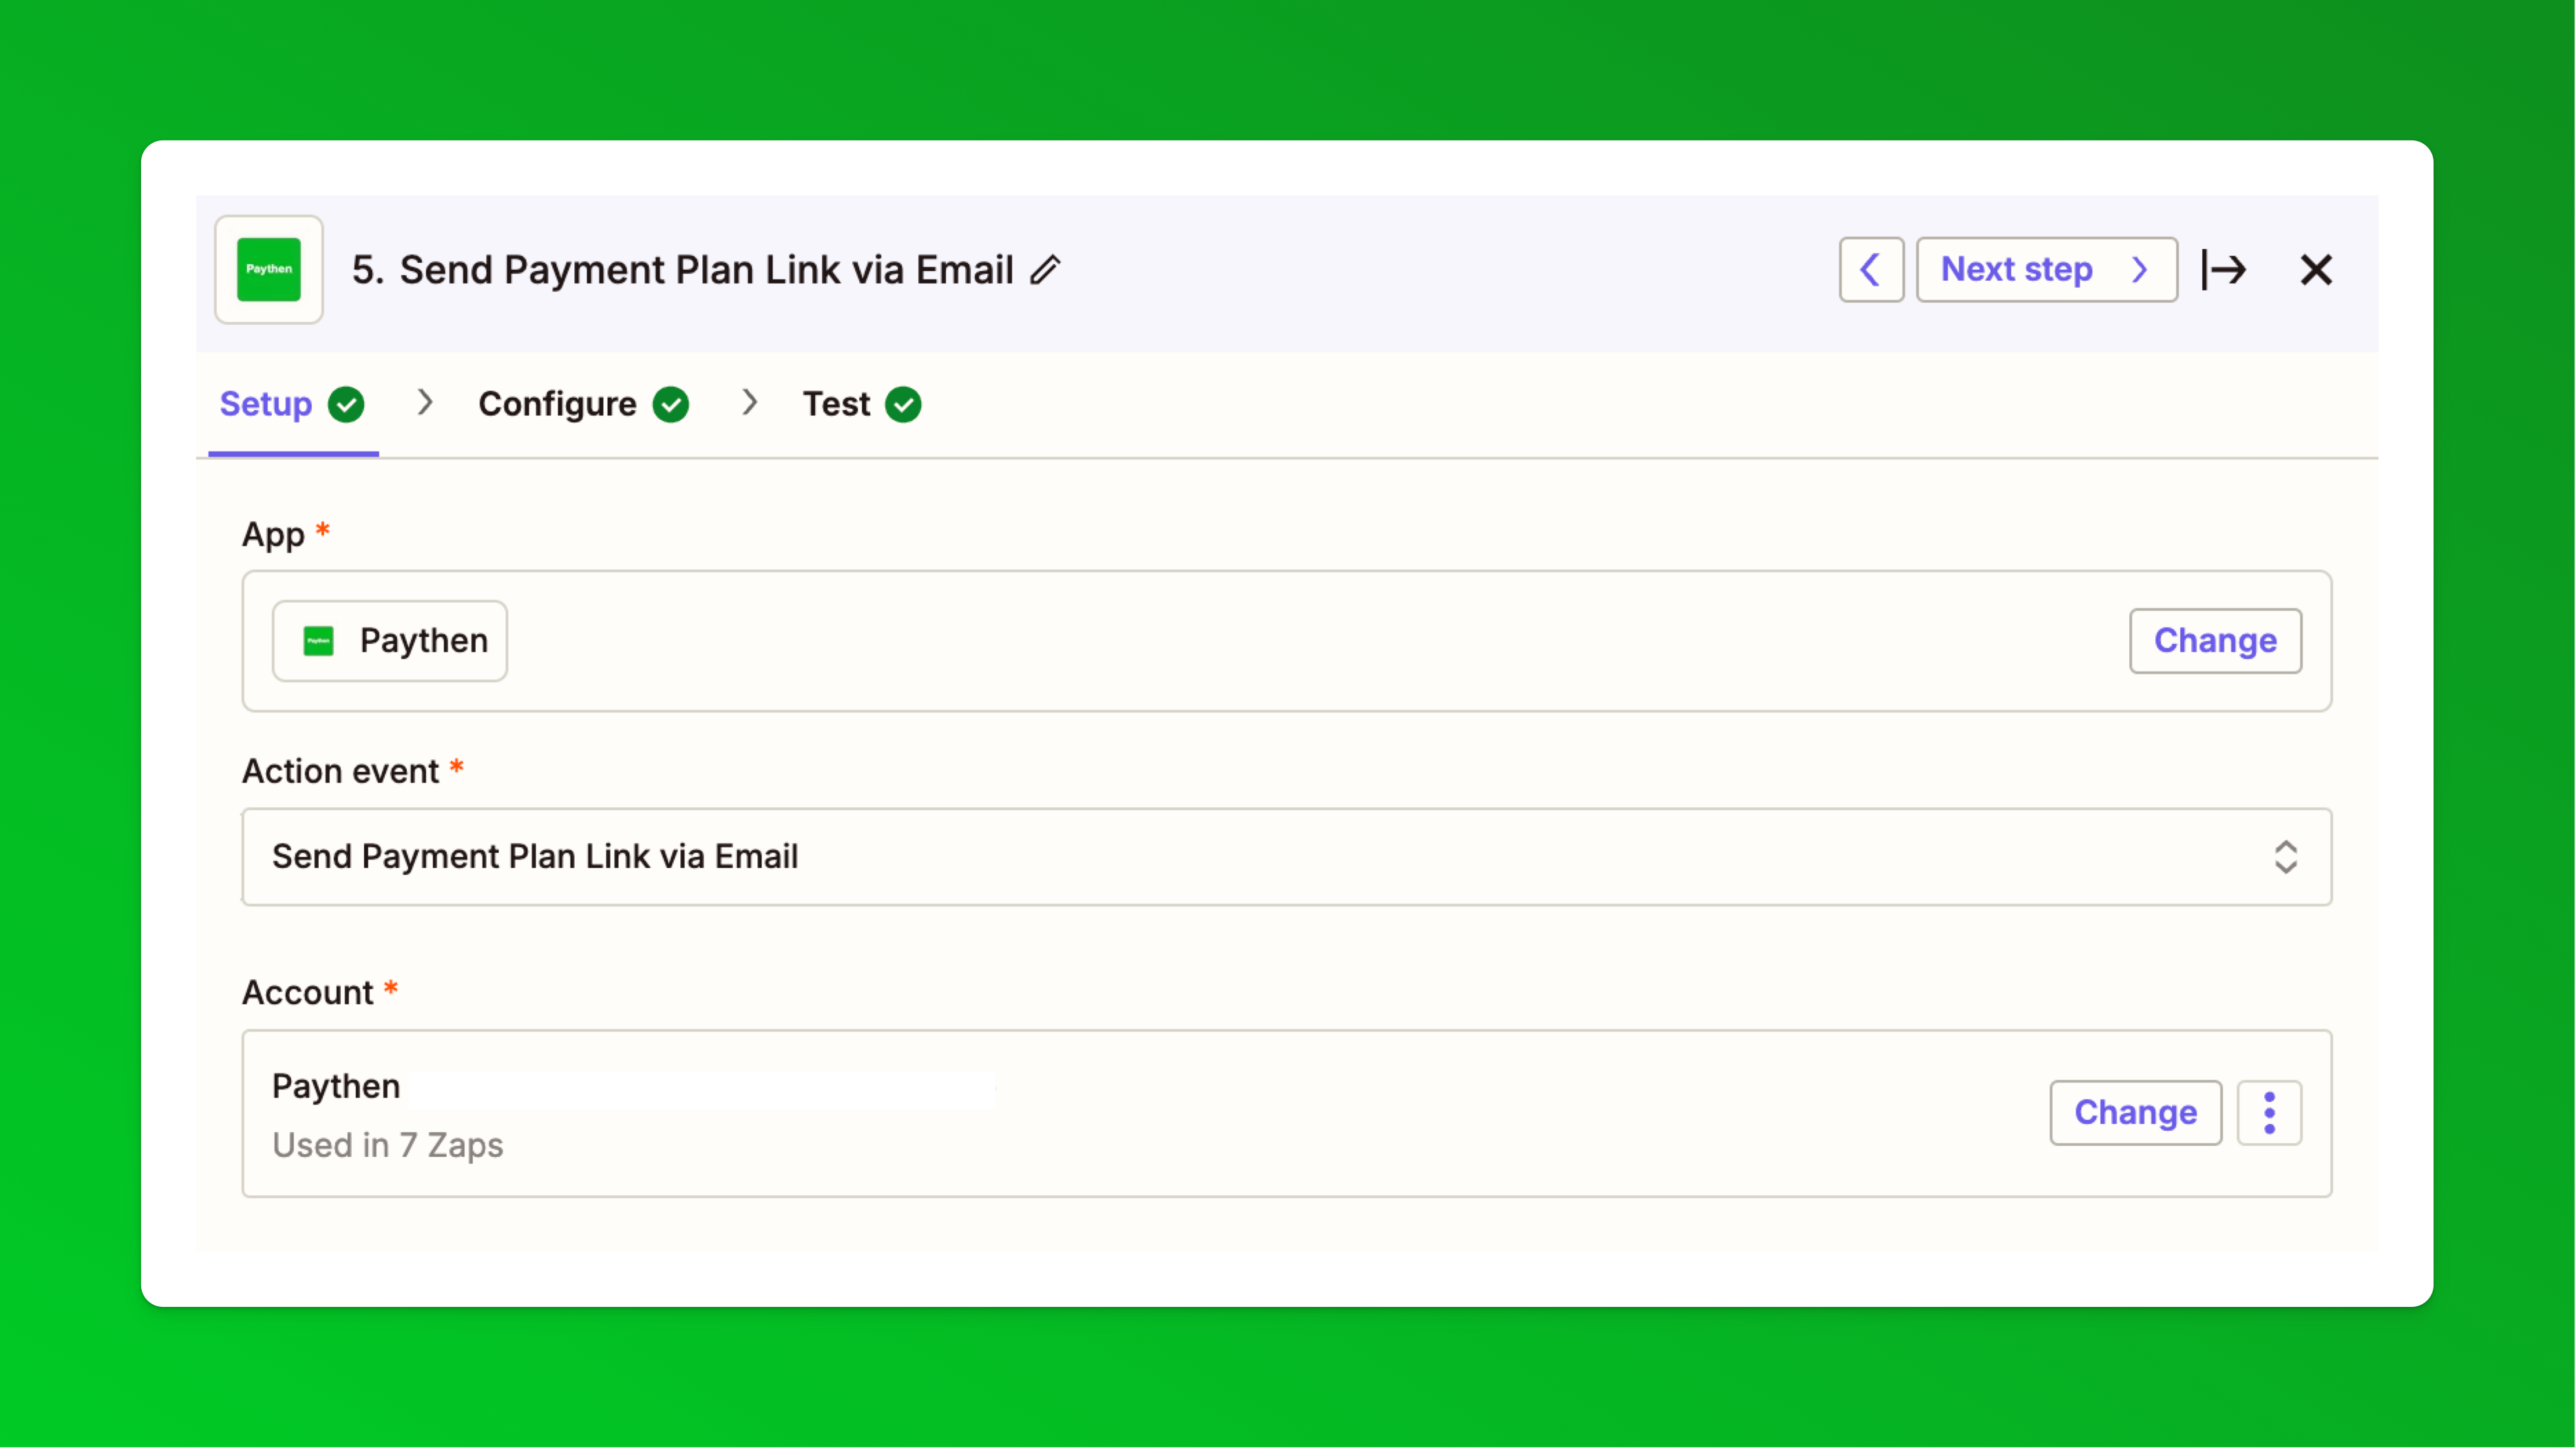
- In the Configure step,
a) paste in the Paythen template link that you generated in your Paythen dashboard,
b) add in the customer email field from Eventbrite and
c) in the plan name, you can choose any format you want but we recommend this: First name Last name Event Name Text and then “Payment Plan” – This is the name of the payment plan shown to customers and also what you see in the plan name in your Paythen dashboard. With this format, the plan name would be created as:Billy Bob Thornton Big Day Out Payment PlanIf you want this to be more granular you can include the Eventbrite order ID, the ticket name, and more. Finally in the “Total payment amount” field inset the “Final total” that was generated from the previous AI by Zapier step
 - All other fields on this page are optional – but we recommend adding in the Plan description field with data from your Eventbrite order like this:
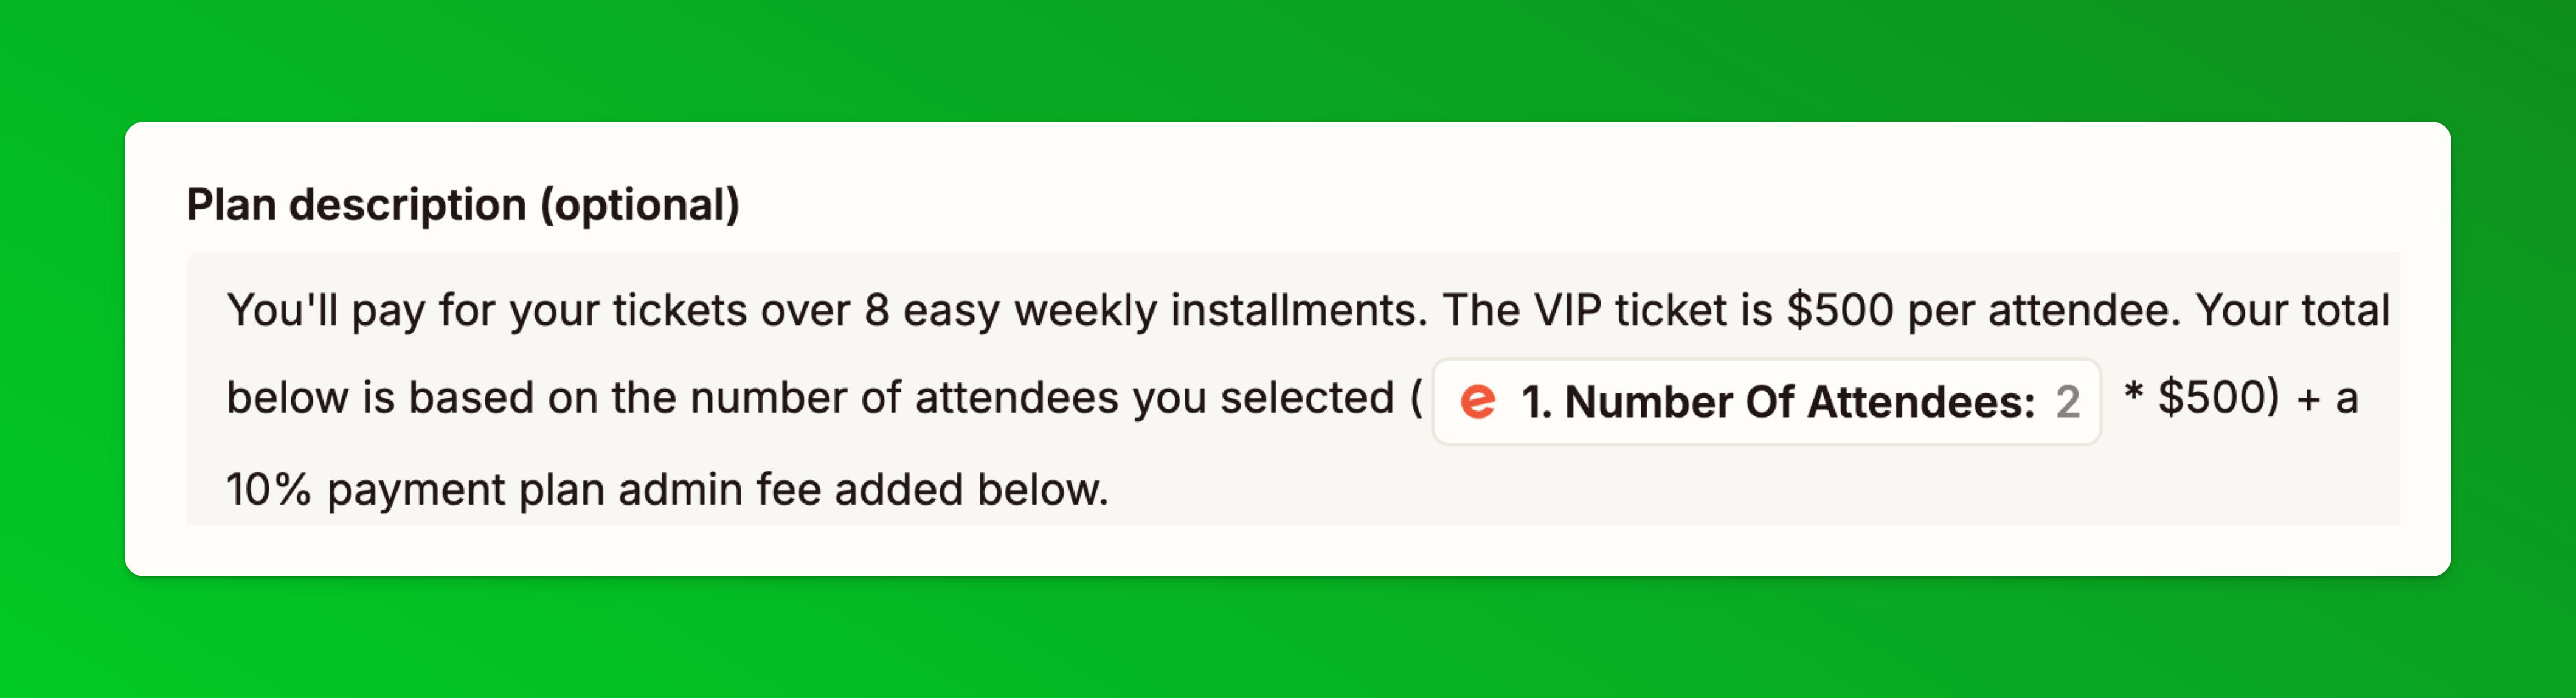 This is the text we used in our demo you can copy and change:You’ll pay for your tickets over 8 easy weekly installments. The VIP ticket is $500 [update ticket price] per attendee. Your total below is based on the number of attendees you selected ([Insert Eventbrite number of attendees field] * $500 [update ticket price] ) + a 10% payment plan admin fee added below.
 - Repeat steps 10 – 15 above for each different ticket type you have payment plans for.
- Name your zap and publish it to make it live.
- Now place new test orders on your event to ensure everything works as expected. Place a separate order for each ticket type so you can check the totals and all text is as it should be.
- And you’re done! 🎉 🎟️ ⚡
Now, if someone buys the payment plan tickets in Eventbrite, they will get an email with their payment plan link. Once they complete the first payment, they will be created as customers in Paythen and can be easily managed there. Each customer gets their own unique customer link like this emailed to them immediately after sign up where they can manage their plan, pay early, and more.You can create separate Zaps to send Paythen customer data into your CRM or other systems to set up more automated workflows.
🙋 If you need help with this or the setup isn’t working as expected, just reach out to us via the chat icon and we’ll help you get it up and running .
Approach #2 Same ticket types step-by-step setup instructions
Approach 2 which uses a single ticket type for immediate or payment plan payments is shorter and easier to set up vs approach 1 above.
- Before you start, if you haven’t already done so, create your Paythen account and a Zapier account.
- In Eventbrite, in your event dashboard, go to Payment options and under the heading Offline options (optional) enable one of the offline options – we suggest “Pay by invoice”
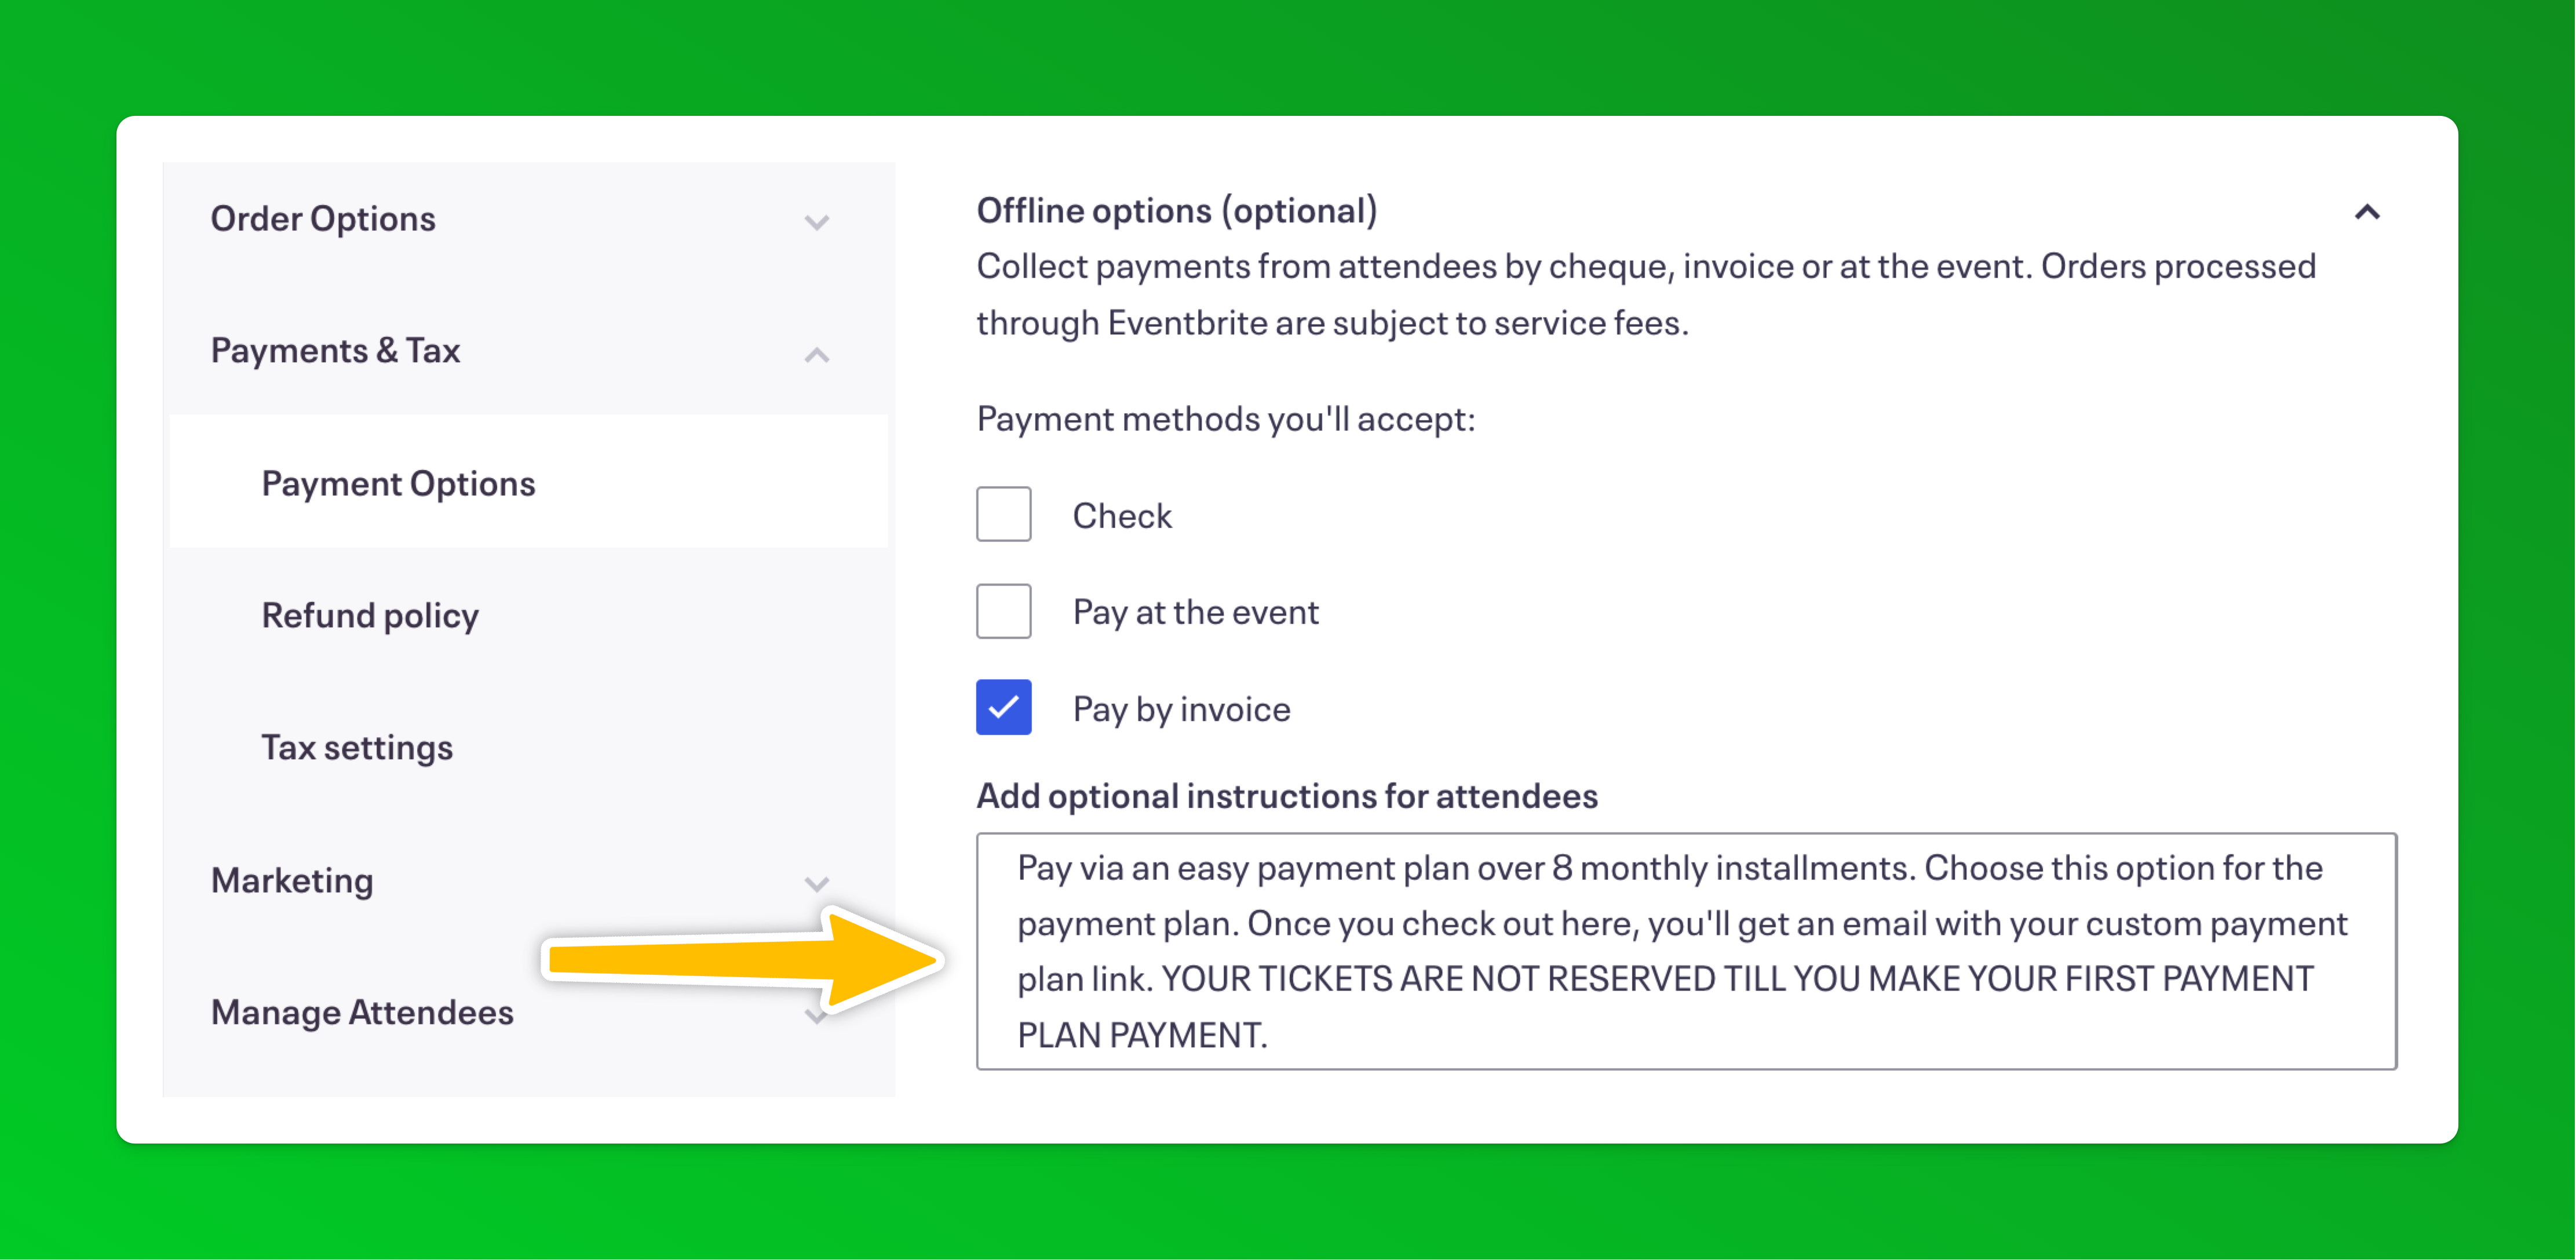 In the Add optional instructions for attendees box we recommend clearly explaining that they should choose this option if they want to pay via the payment plan and providing details on the length of the payment plan and even any surcharge that will be added on the payment plan page. We also recommend clearly stating that their tickets will not be reserved till they click on the link in their email and sign up to their payment plan. This is the text we have in our demo:Pay via an easy payment plan over 8 monthly installments. Choose this option for the payment plan. Once you check out here, you’ll get an email with your custom payment plan link. YOUR TICKETS ARE NOT RESERVED TILL YOU MAKE YOUR FIRST PAYMENT PLAN PAYMENT.
This is how it shows to attendees at checkout: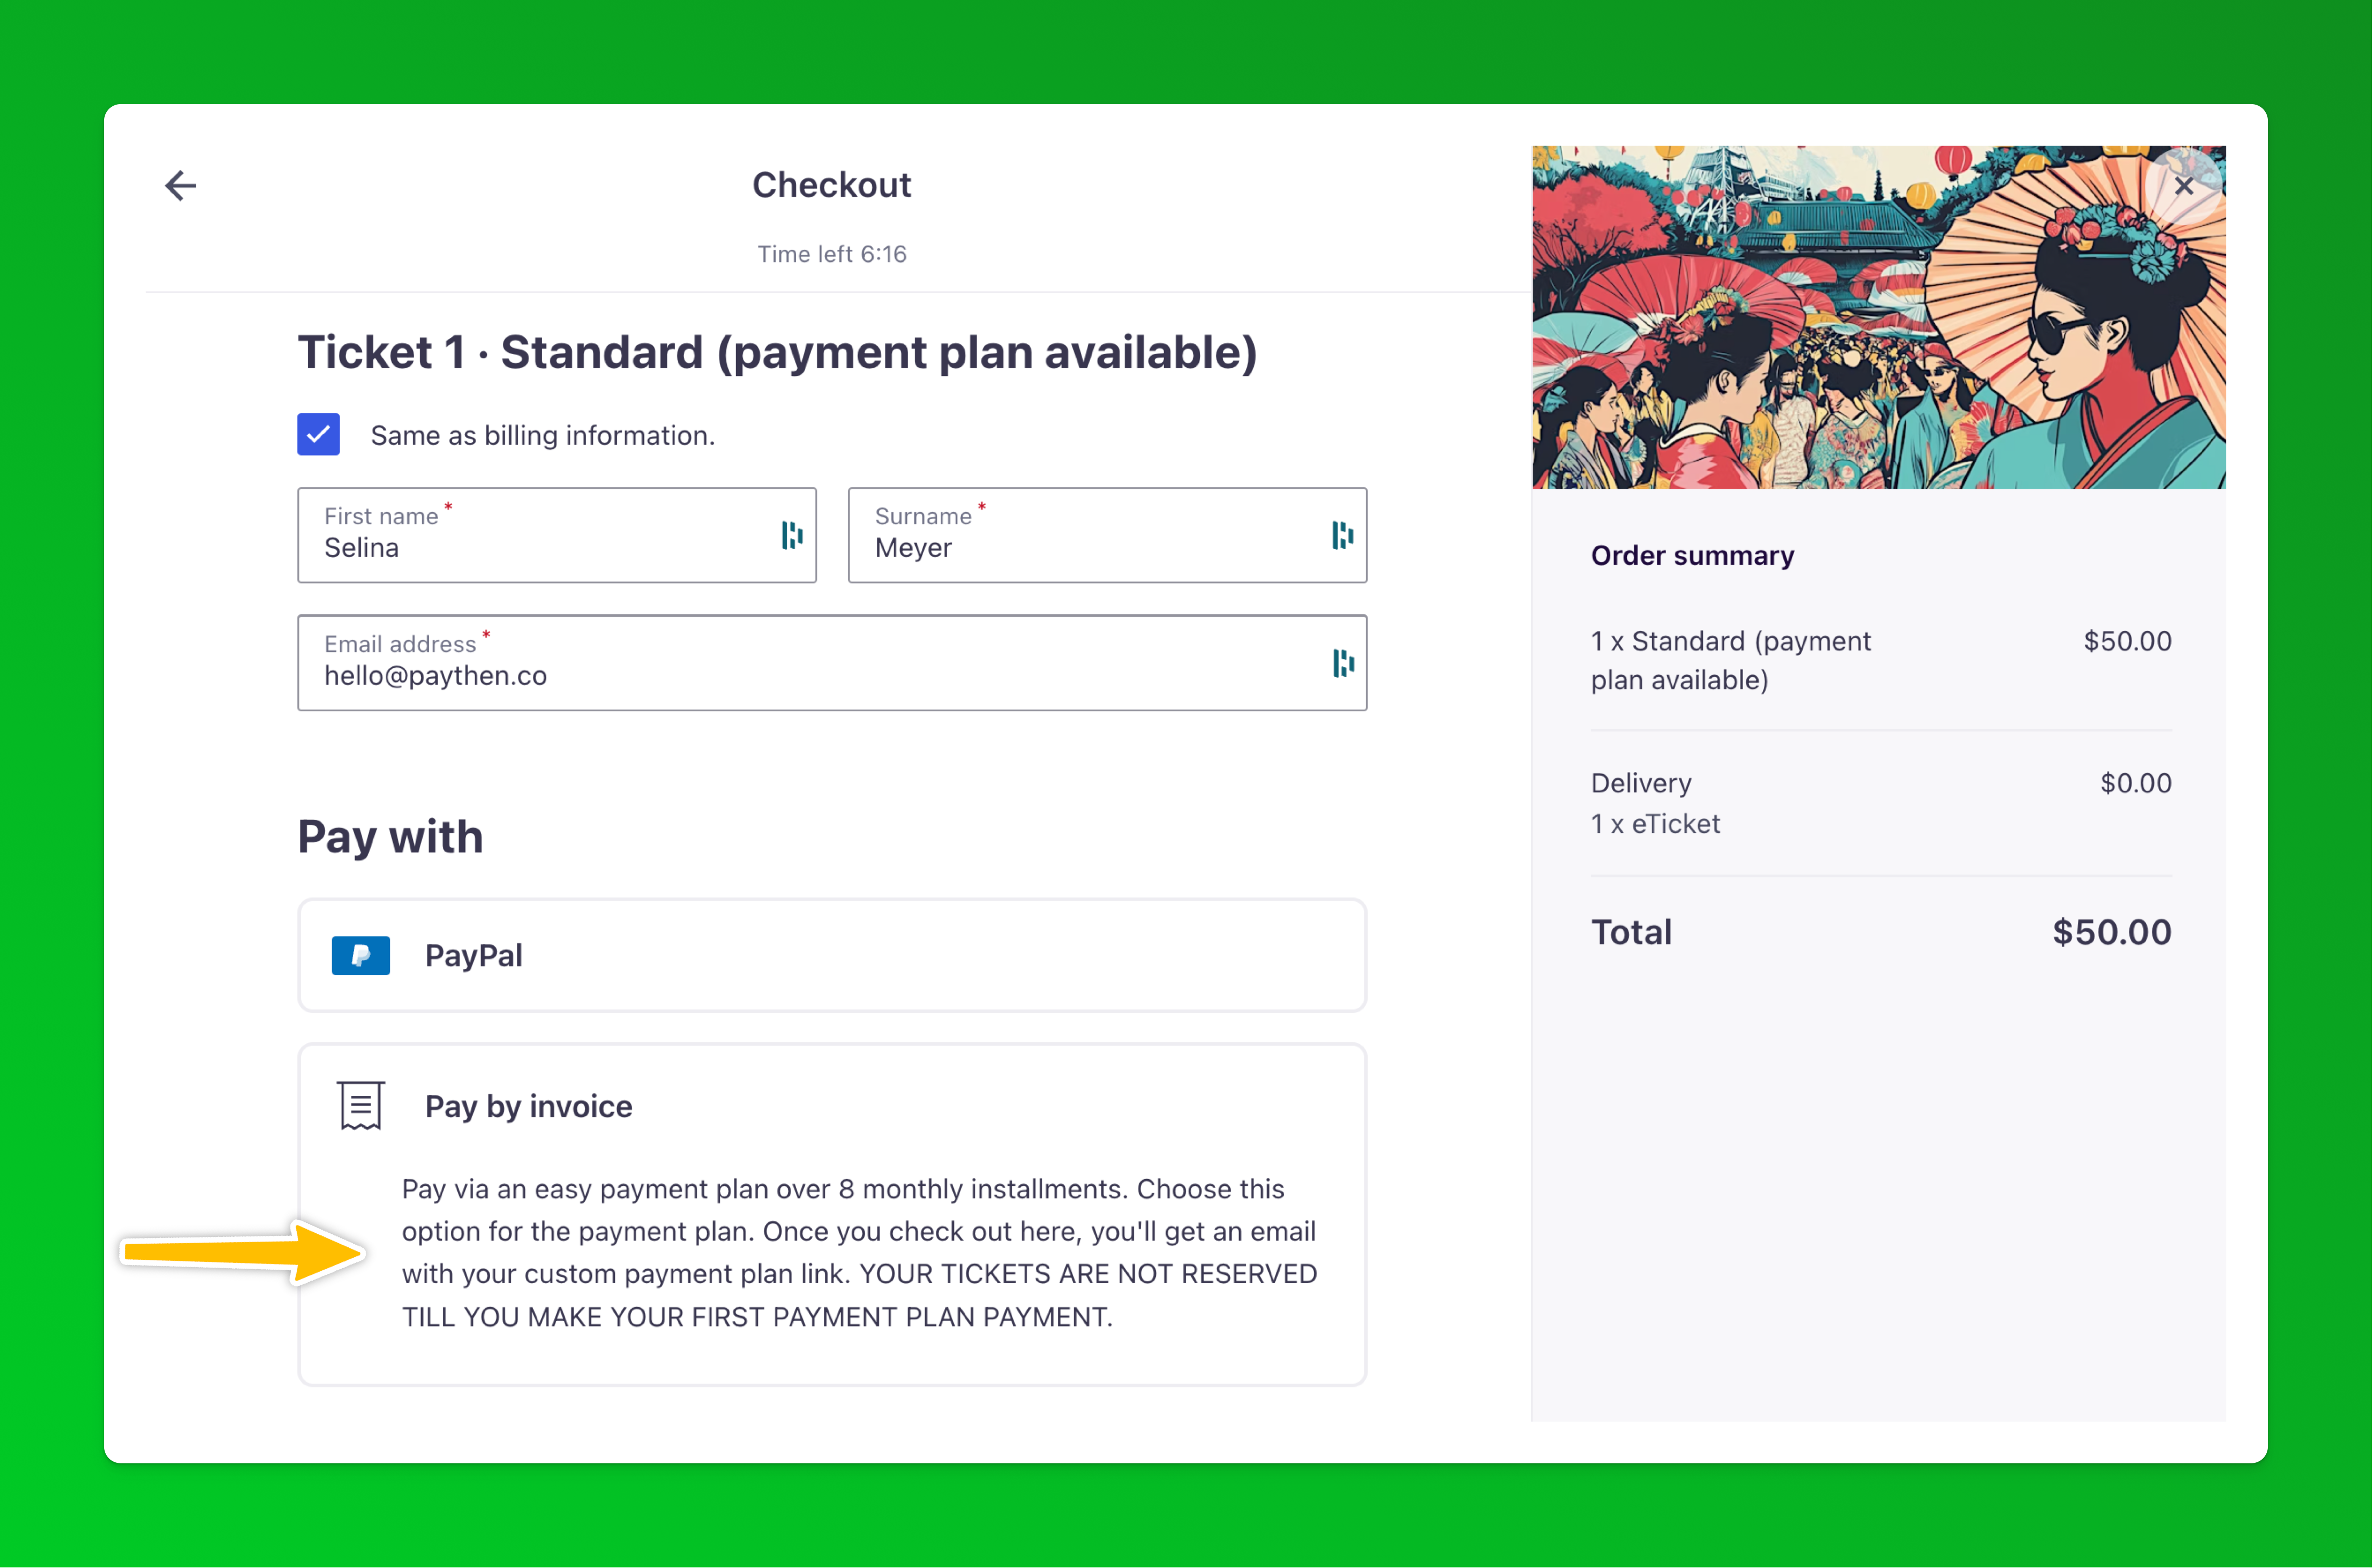
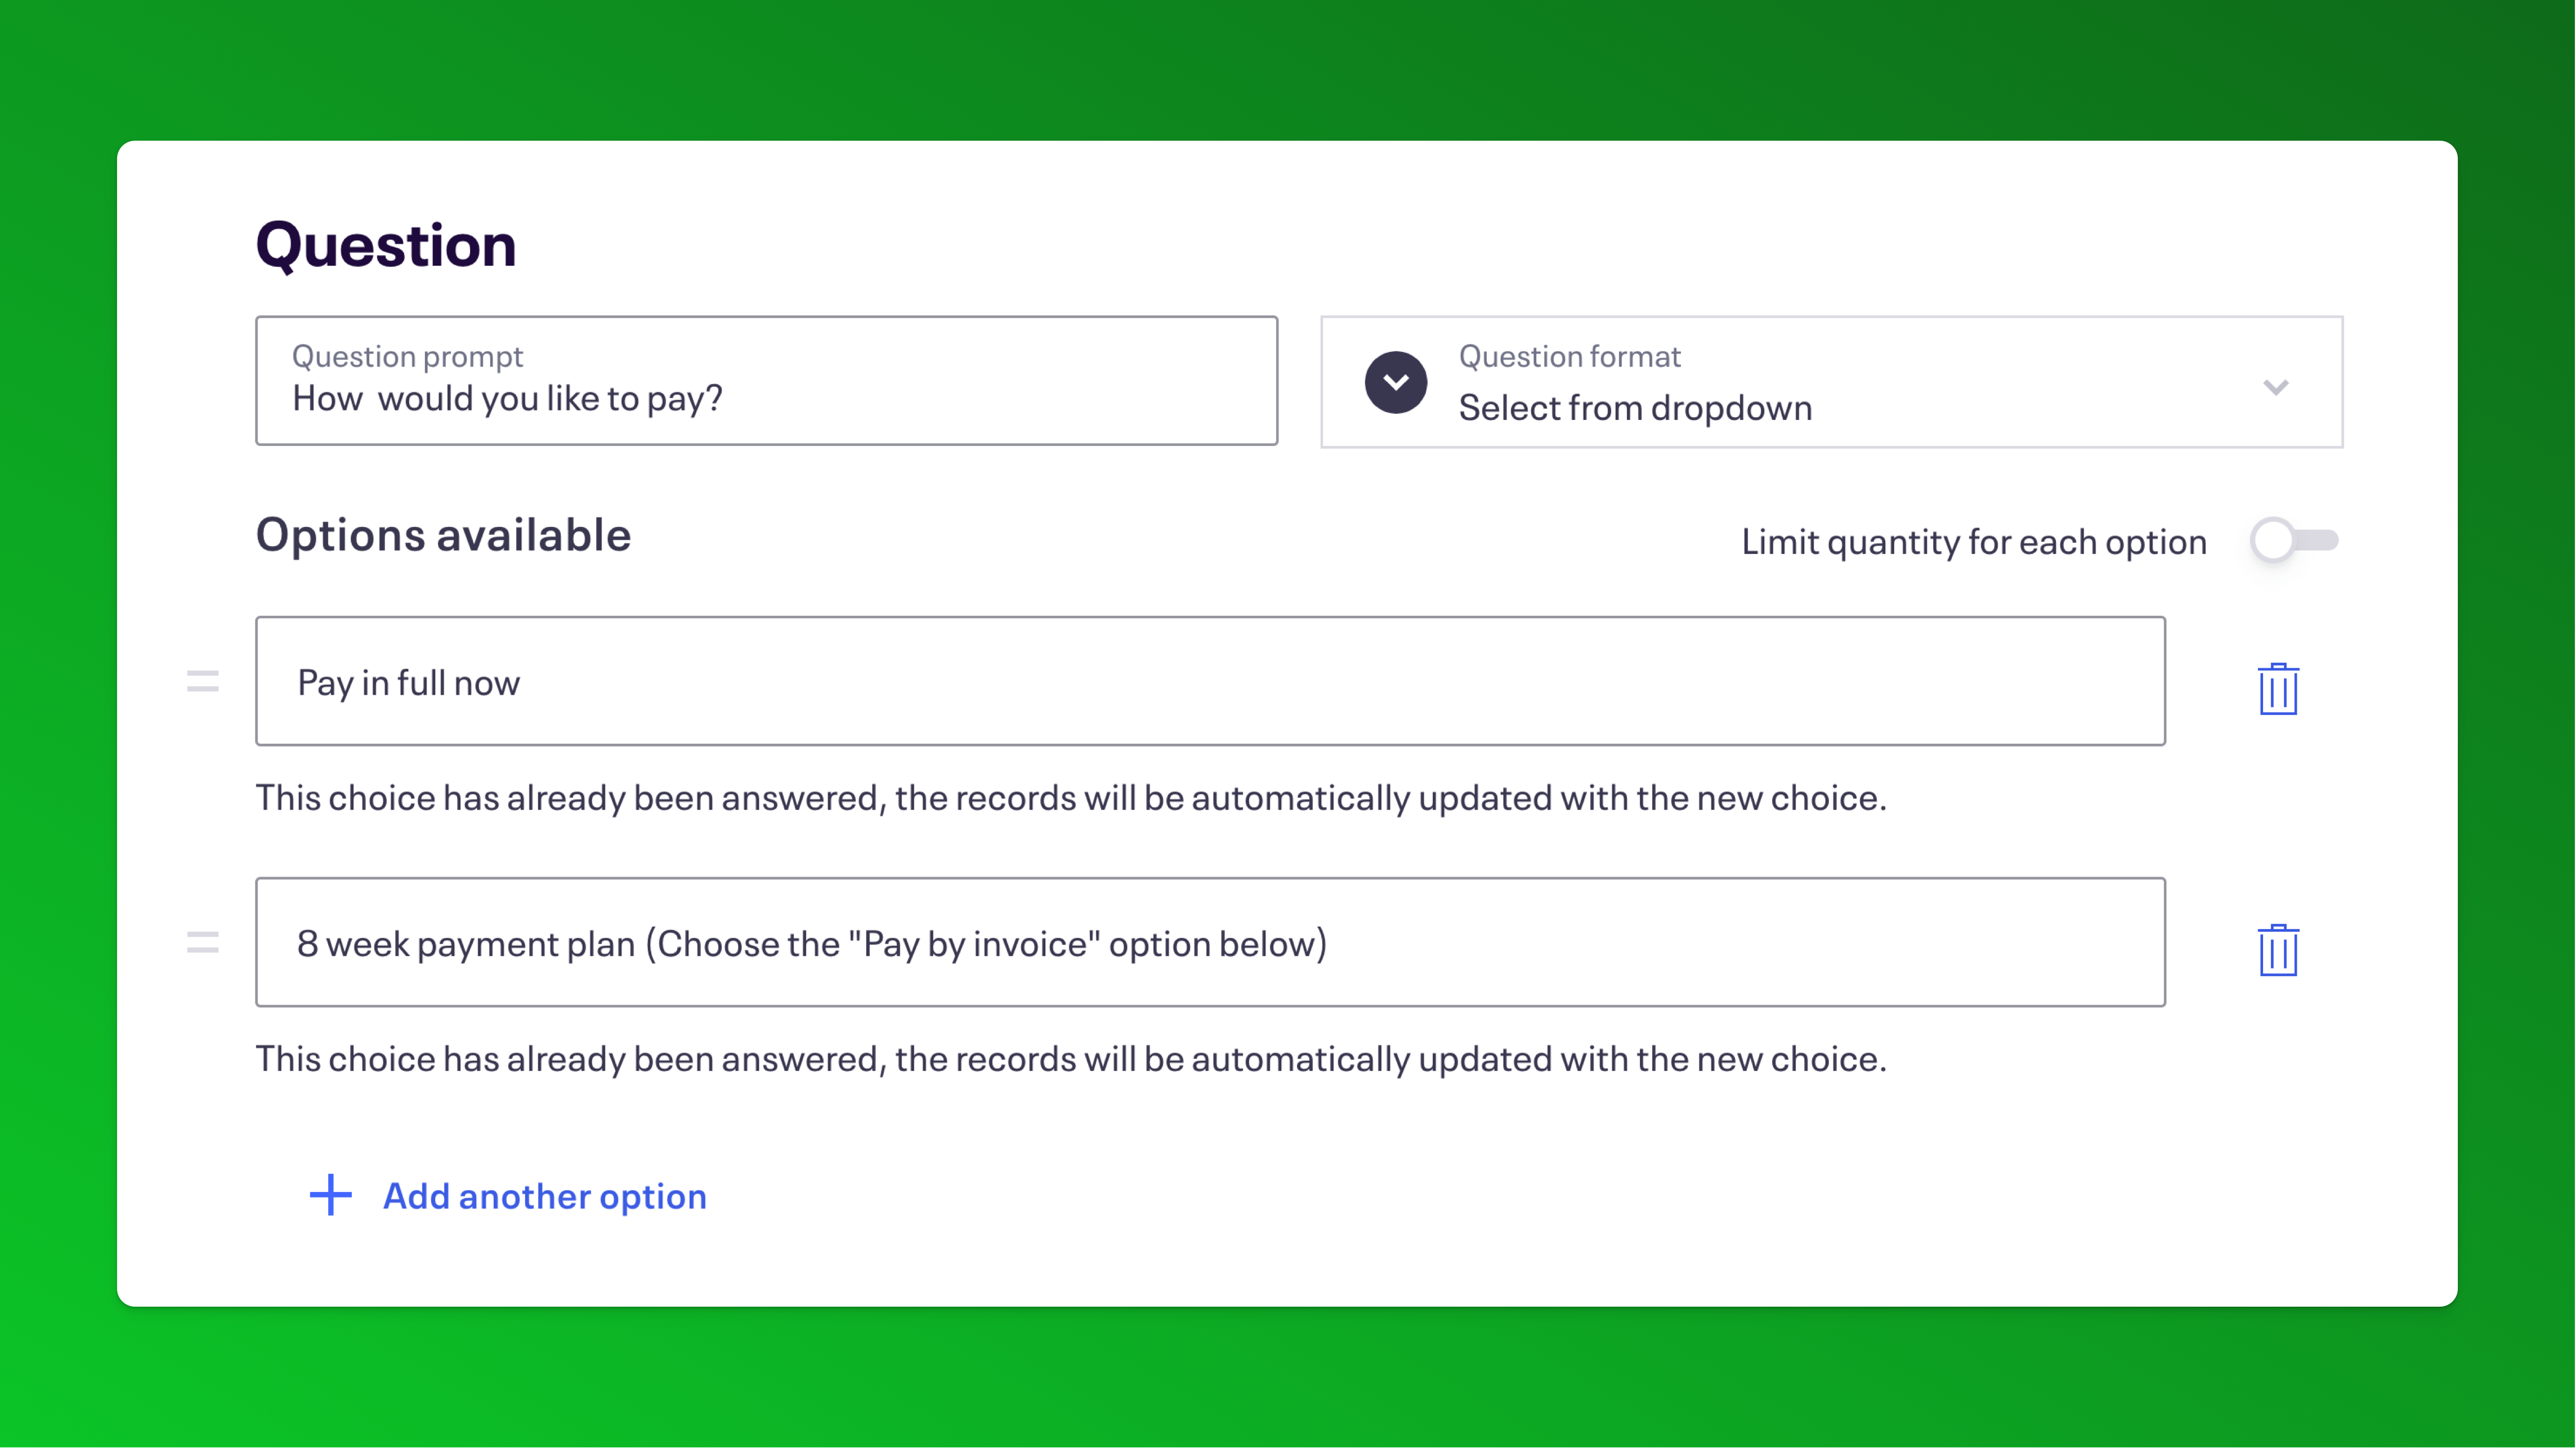
- In Order Options > Order Form add a custom question as a dropdown (or radio button) – as a required field which asks “How would you like to pay?” or something similar and it should give customers two options – Pay in full and pay via a payment plan – see the text we’ve used below.
This will appear like this when attendees are checking out:
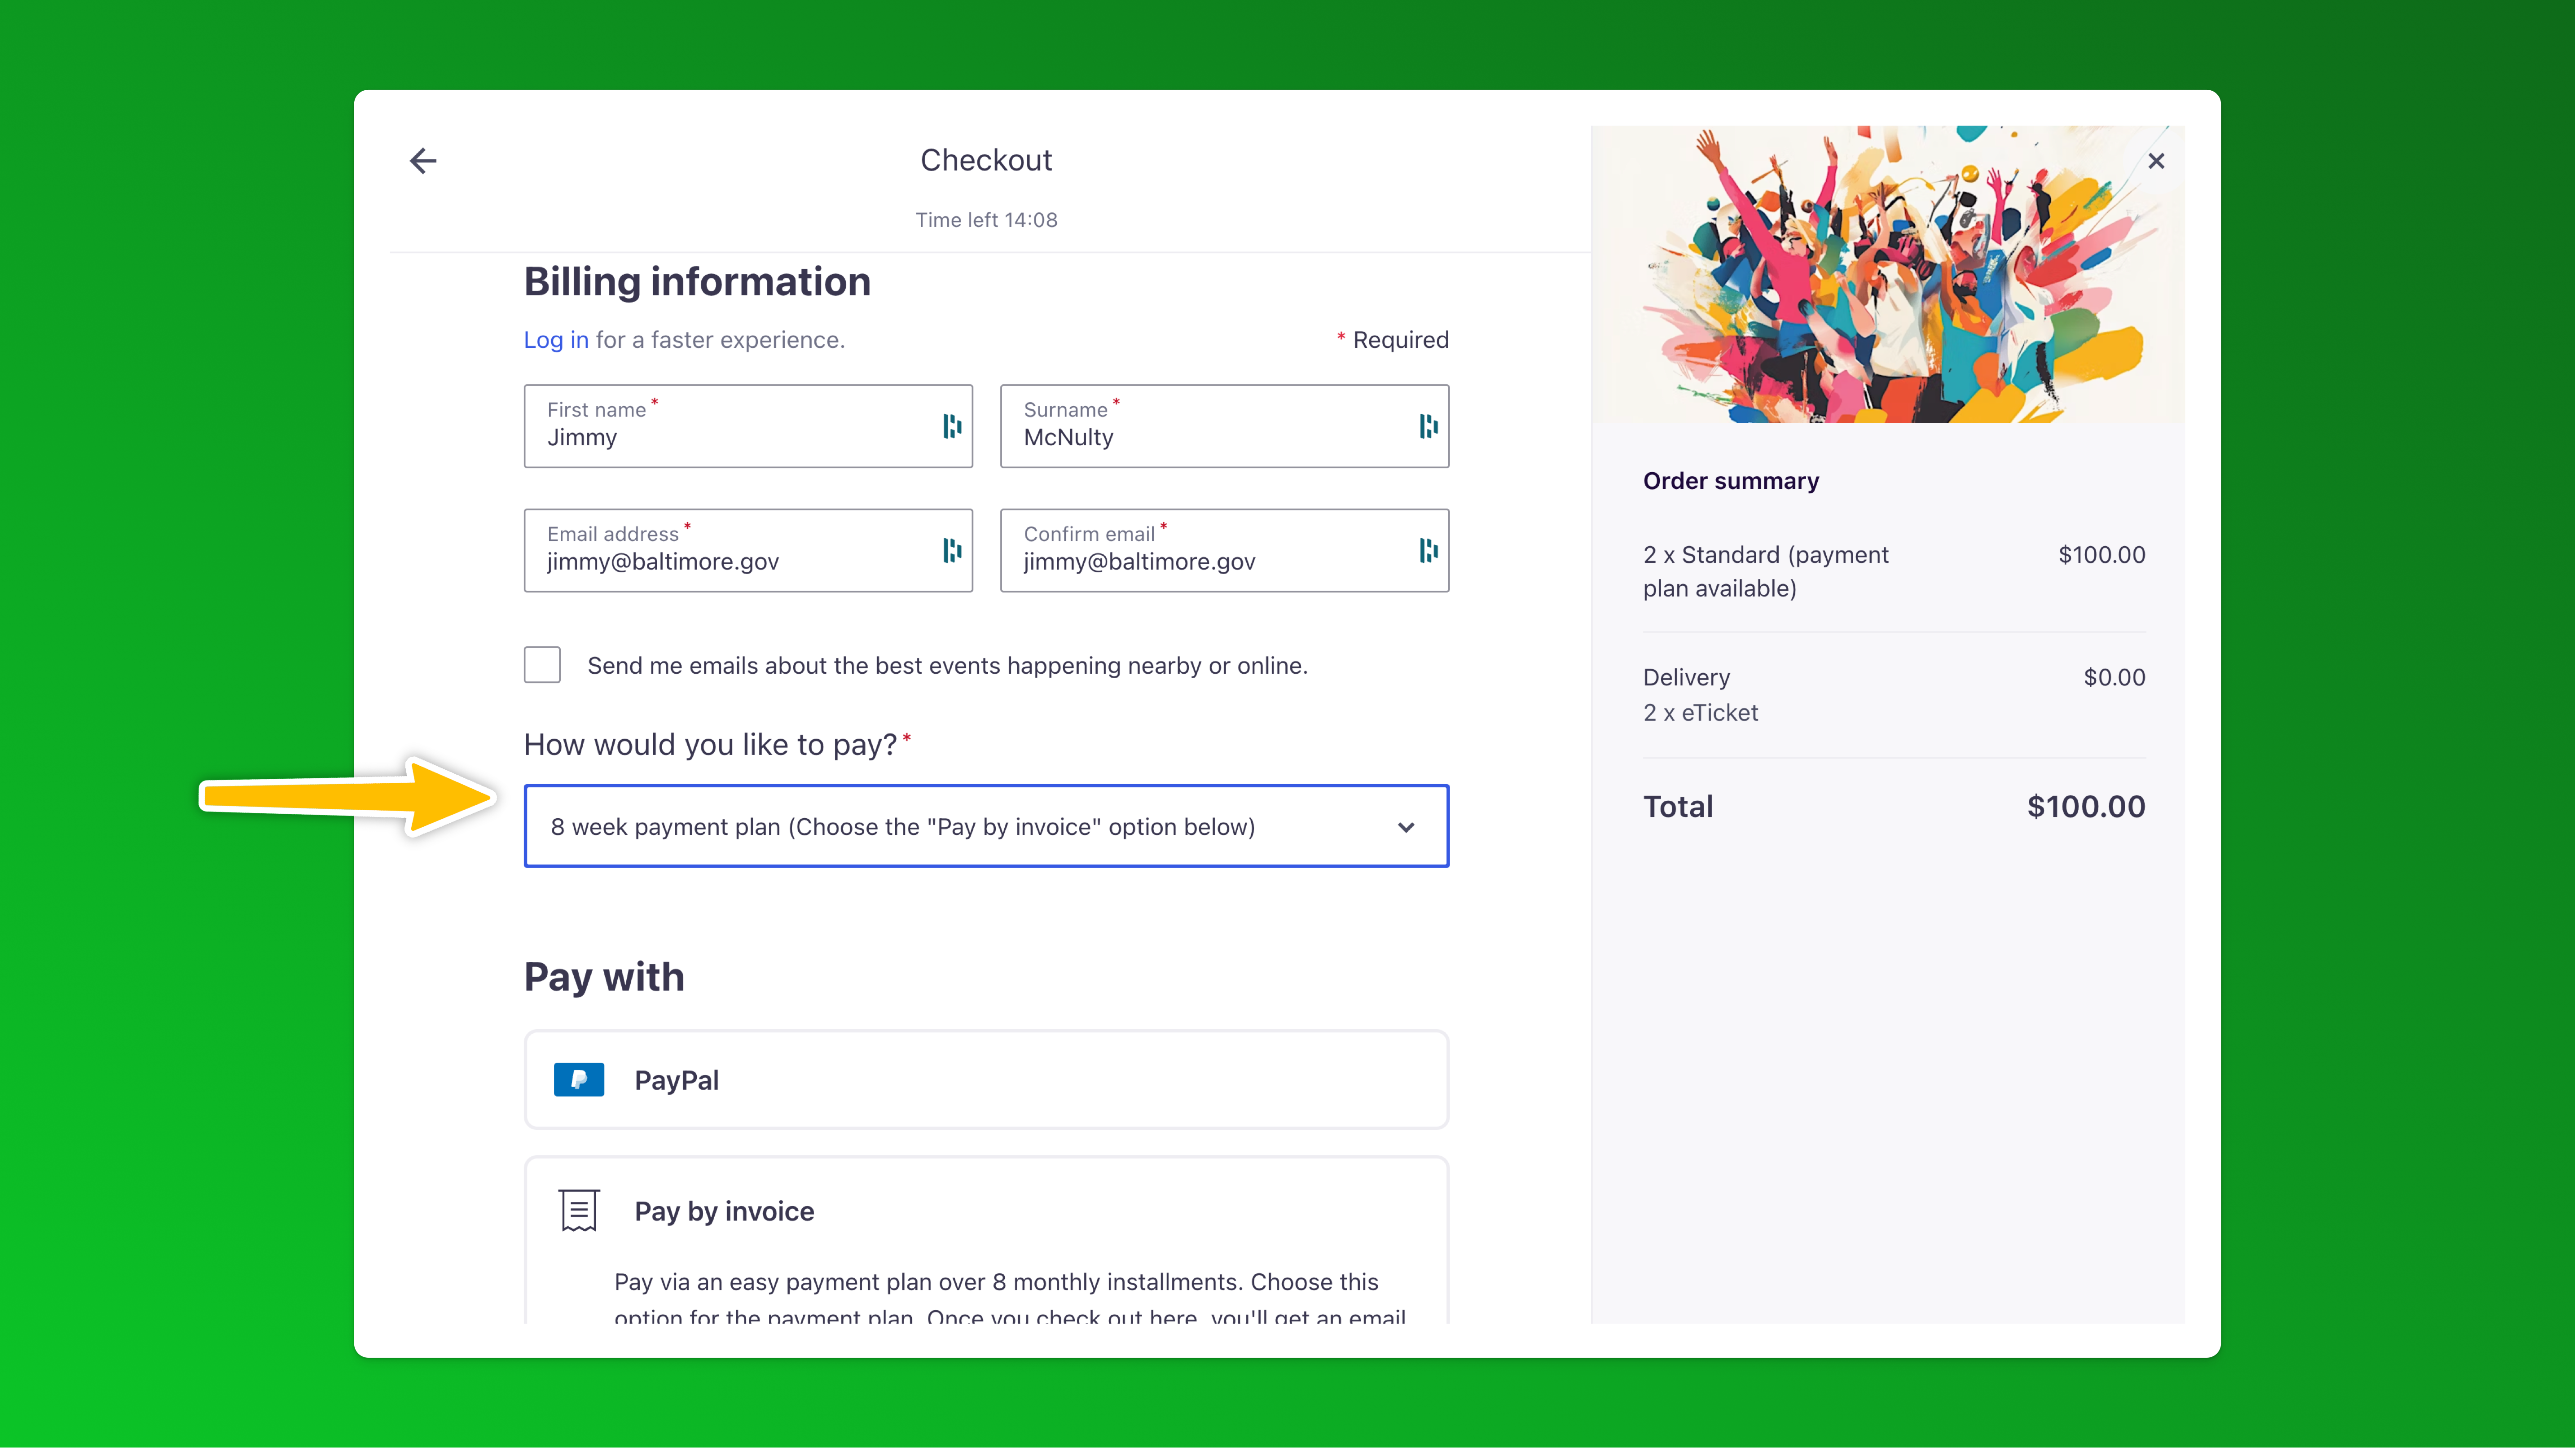
⚠️ This is critical as this is the field we will use in Zapier below to identify payment plan customers and send the payment plan link via email. - This is optional but we recommend changing the ticket names to have the text payment plan available at the end as shown in our screenshots and clearly highlighting the payment plan option on the event description page too
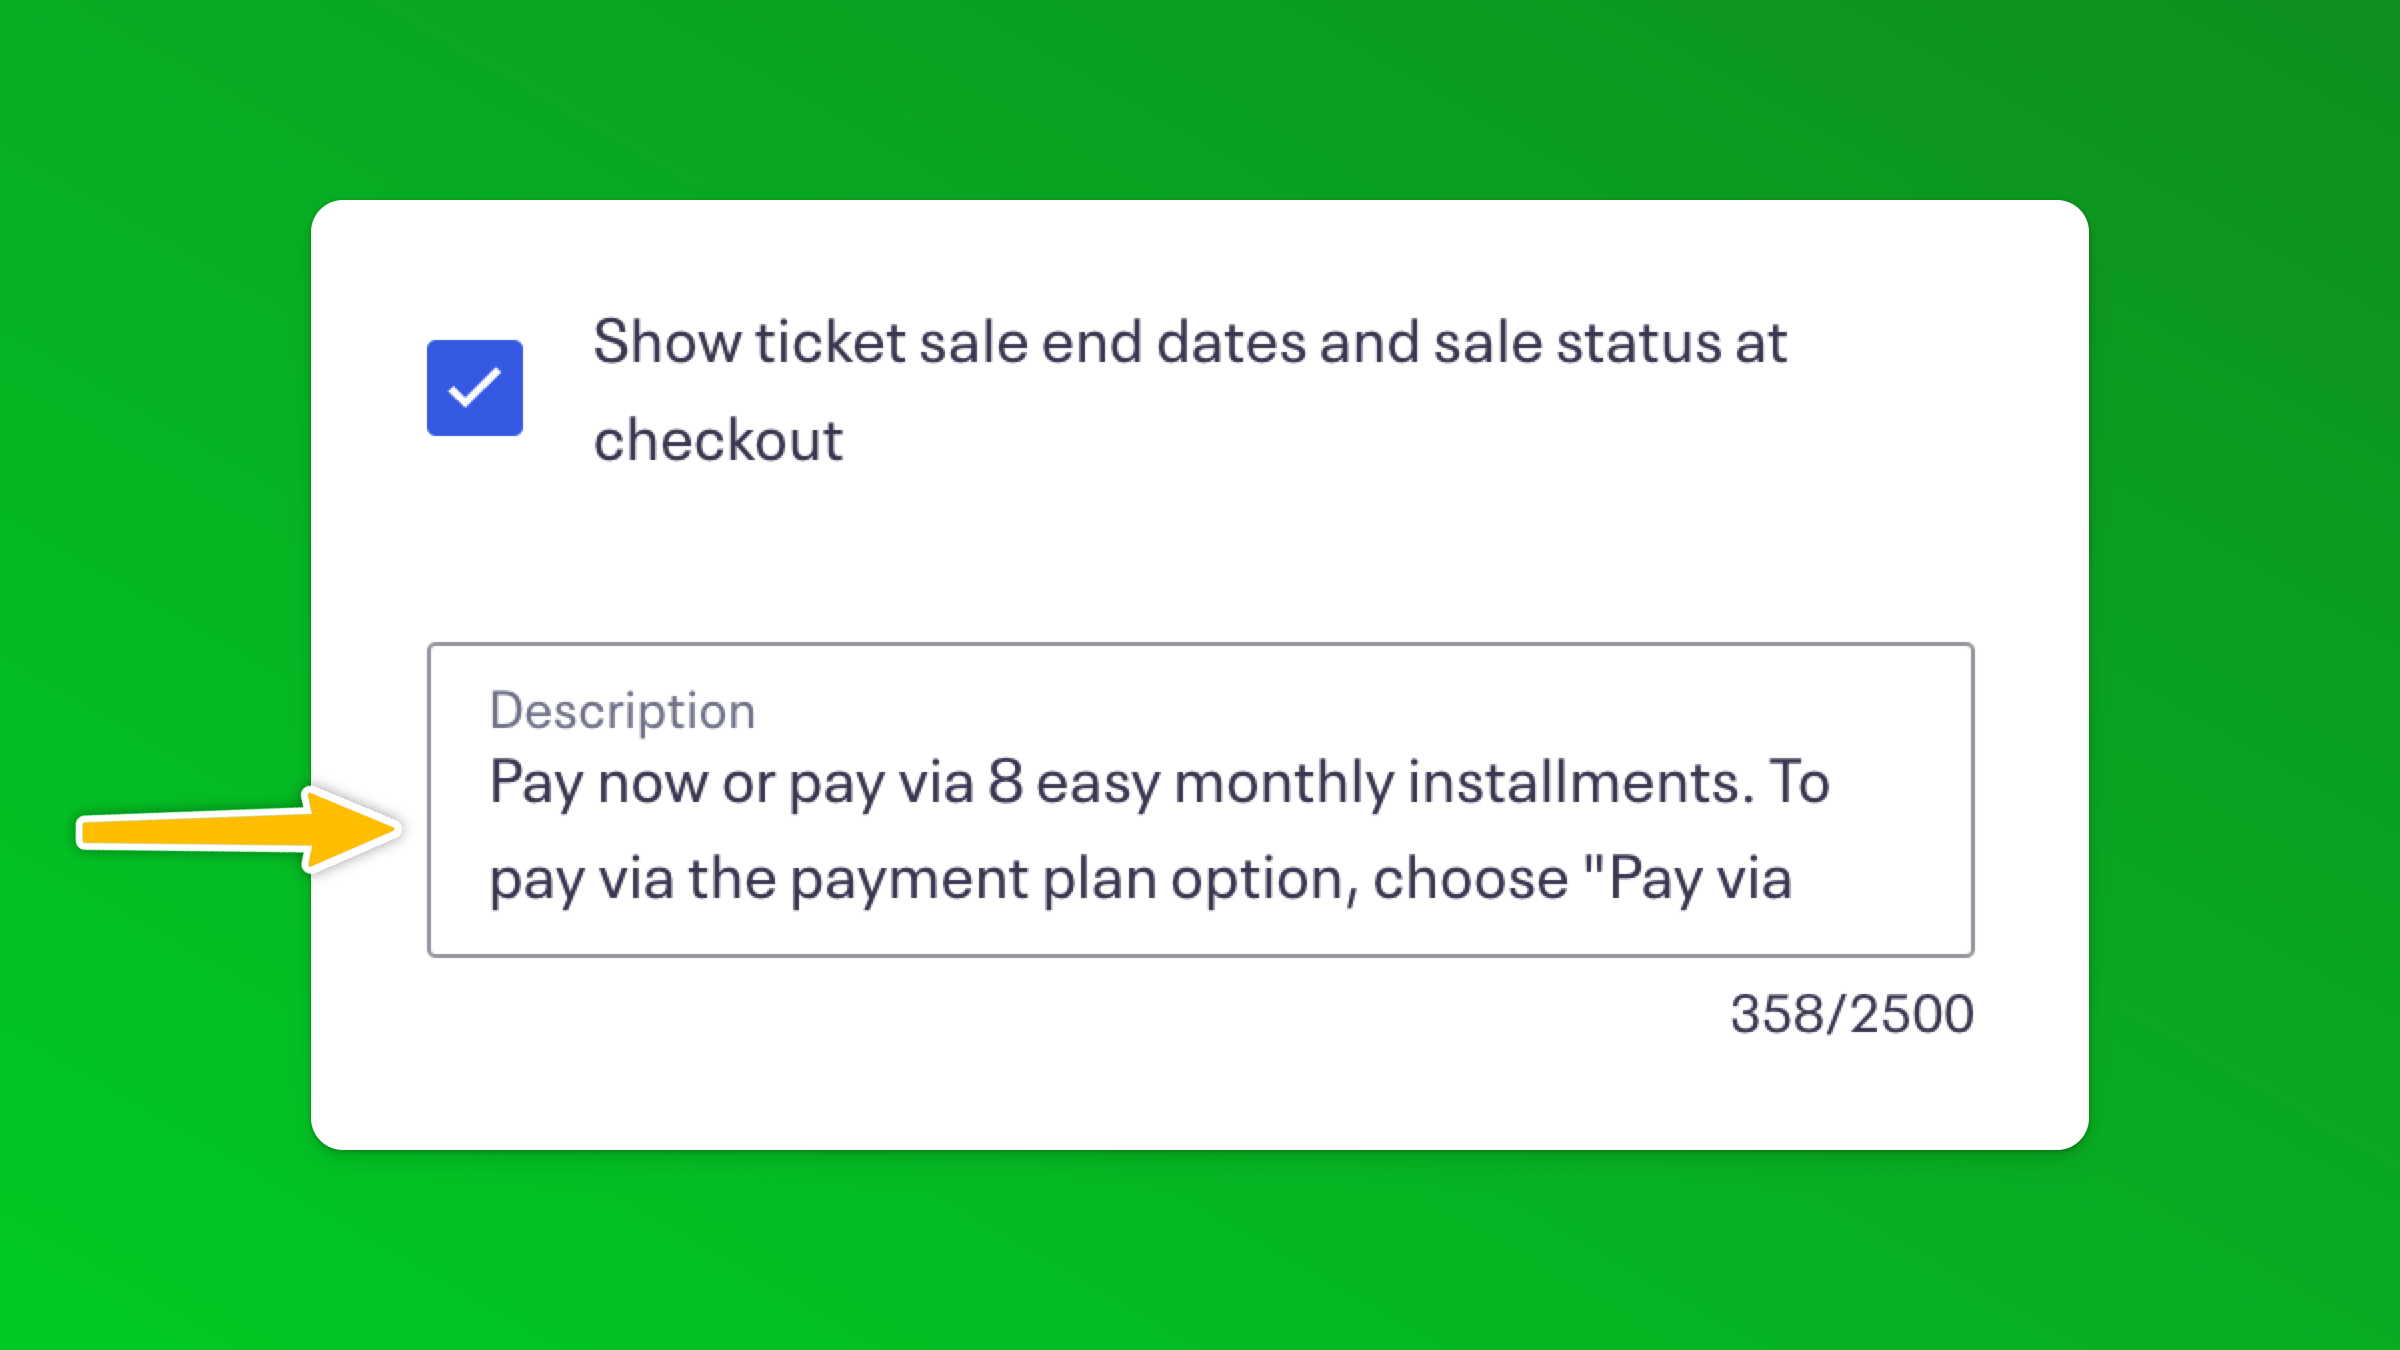
- We also recommend updating the Advanced settings under each ticket type to explain the two payment options available:
 You can copy and edit this text to suit your event and payment plan option:
———————————————
Pay now or pay via 8 easy weekly installments. To pay via the payment plan option, choose the payment plan option in the dropdown and checkout with the “Pay via invoice” option selected on the payment page. You will get an email with a payment plan link. If you choose the payment plan / pay by invoice option, your tickets are NOT reserved until you click on the link in your email and complete the first payment of your payment plan.
———————————————
This is how it shows on the event page when attendees click on the “Read more” link on each ticket type: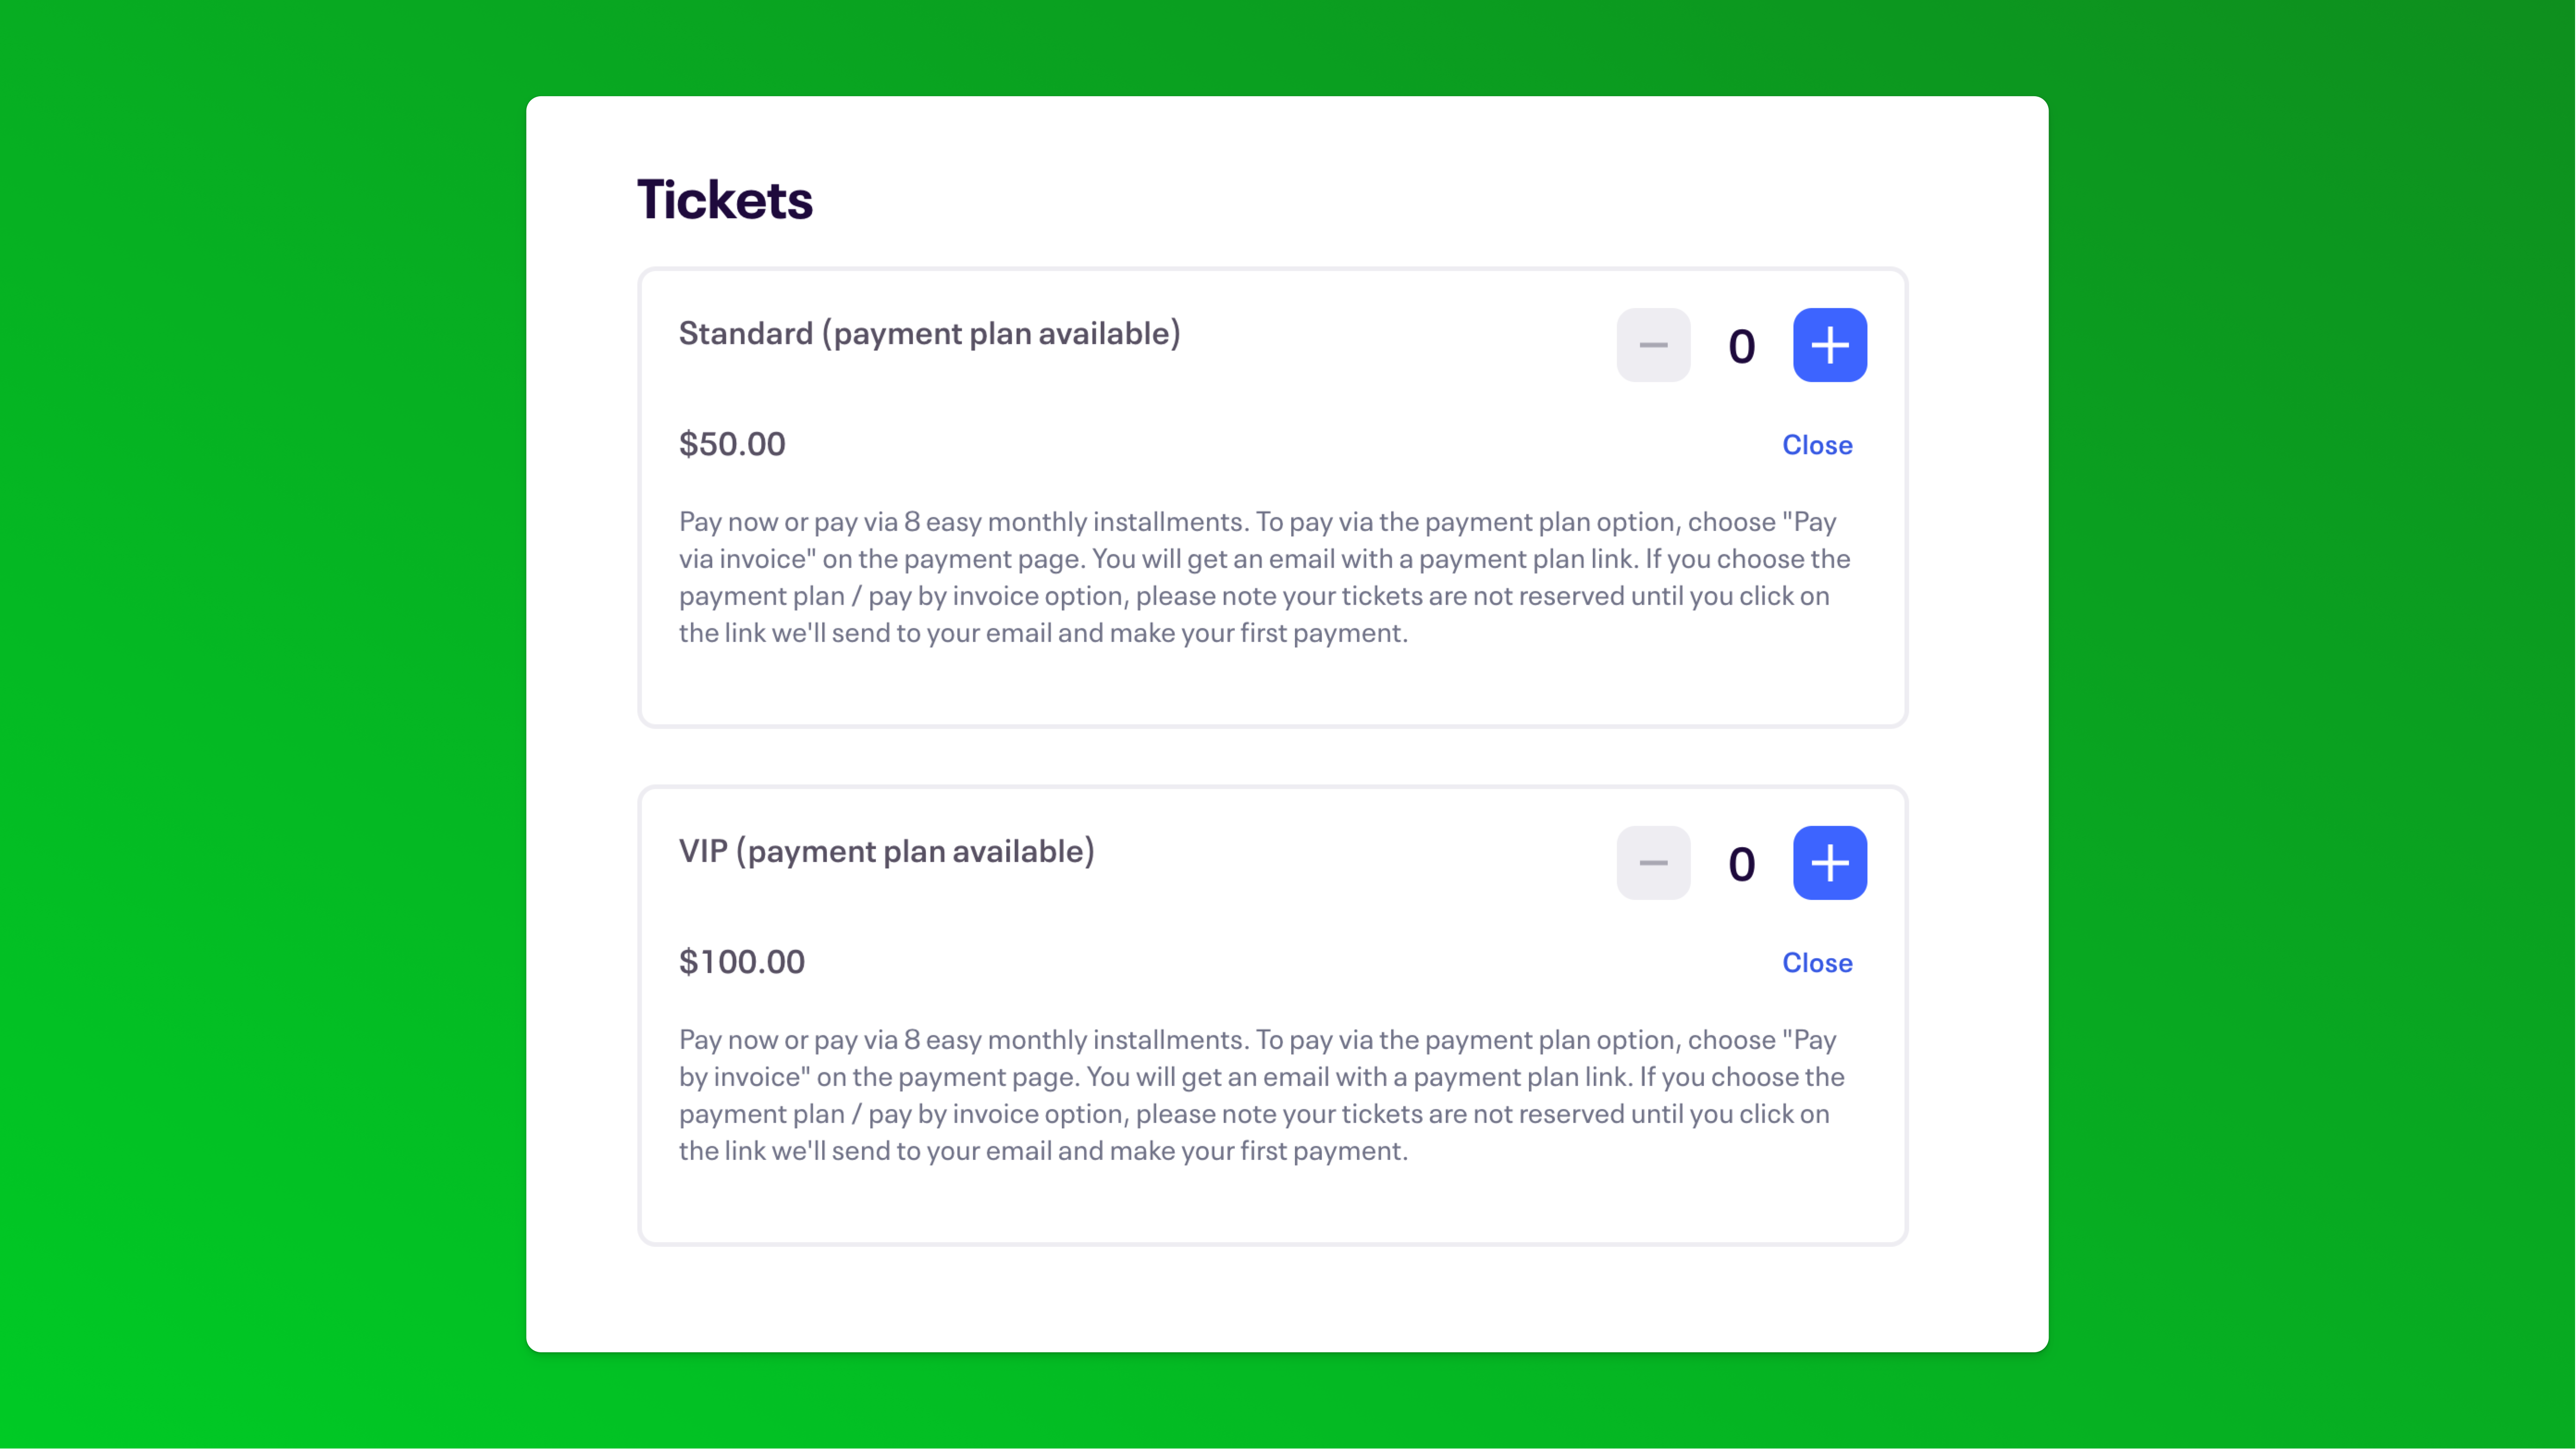
- We also recommend updating the order confirmation page text as well as the order confirmation email attendees get after registration via the Order Options > Order Confirmation page in Eventbrite.
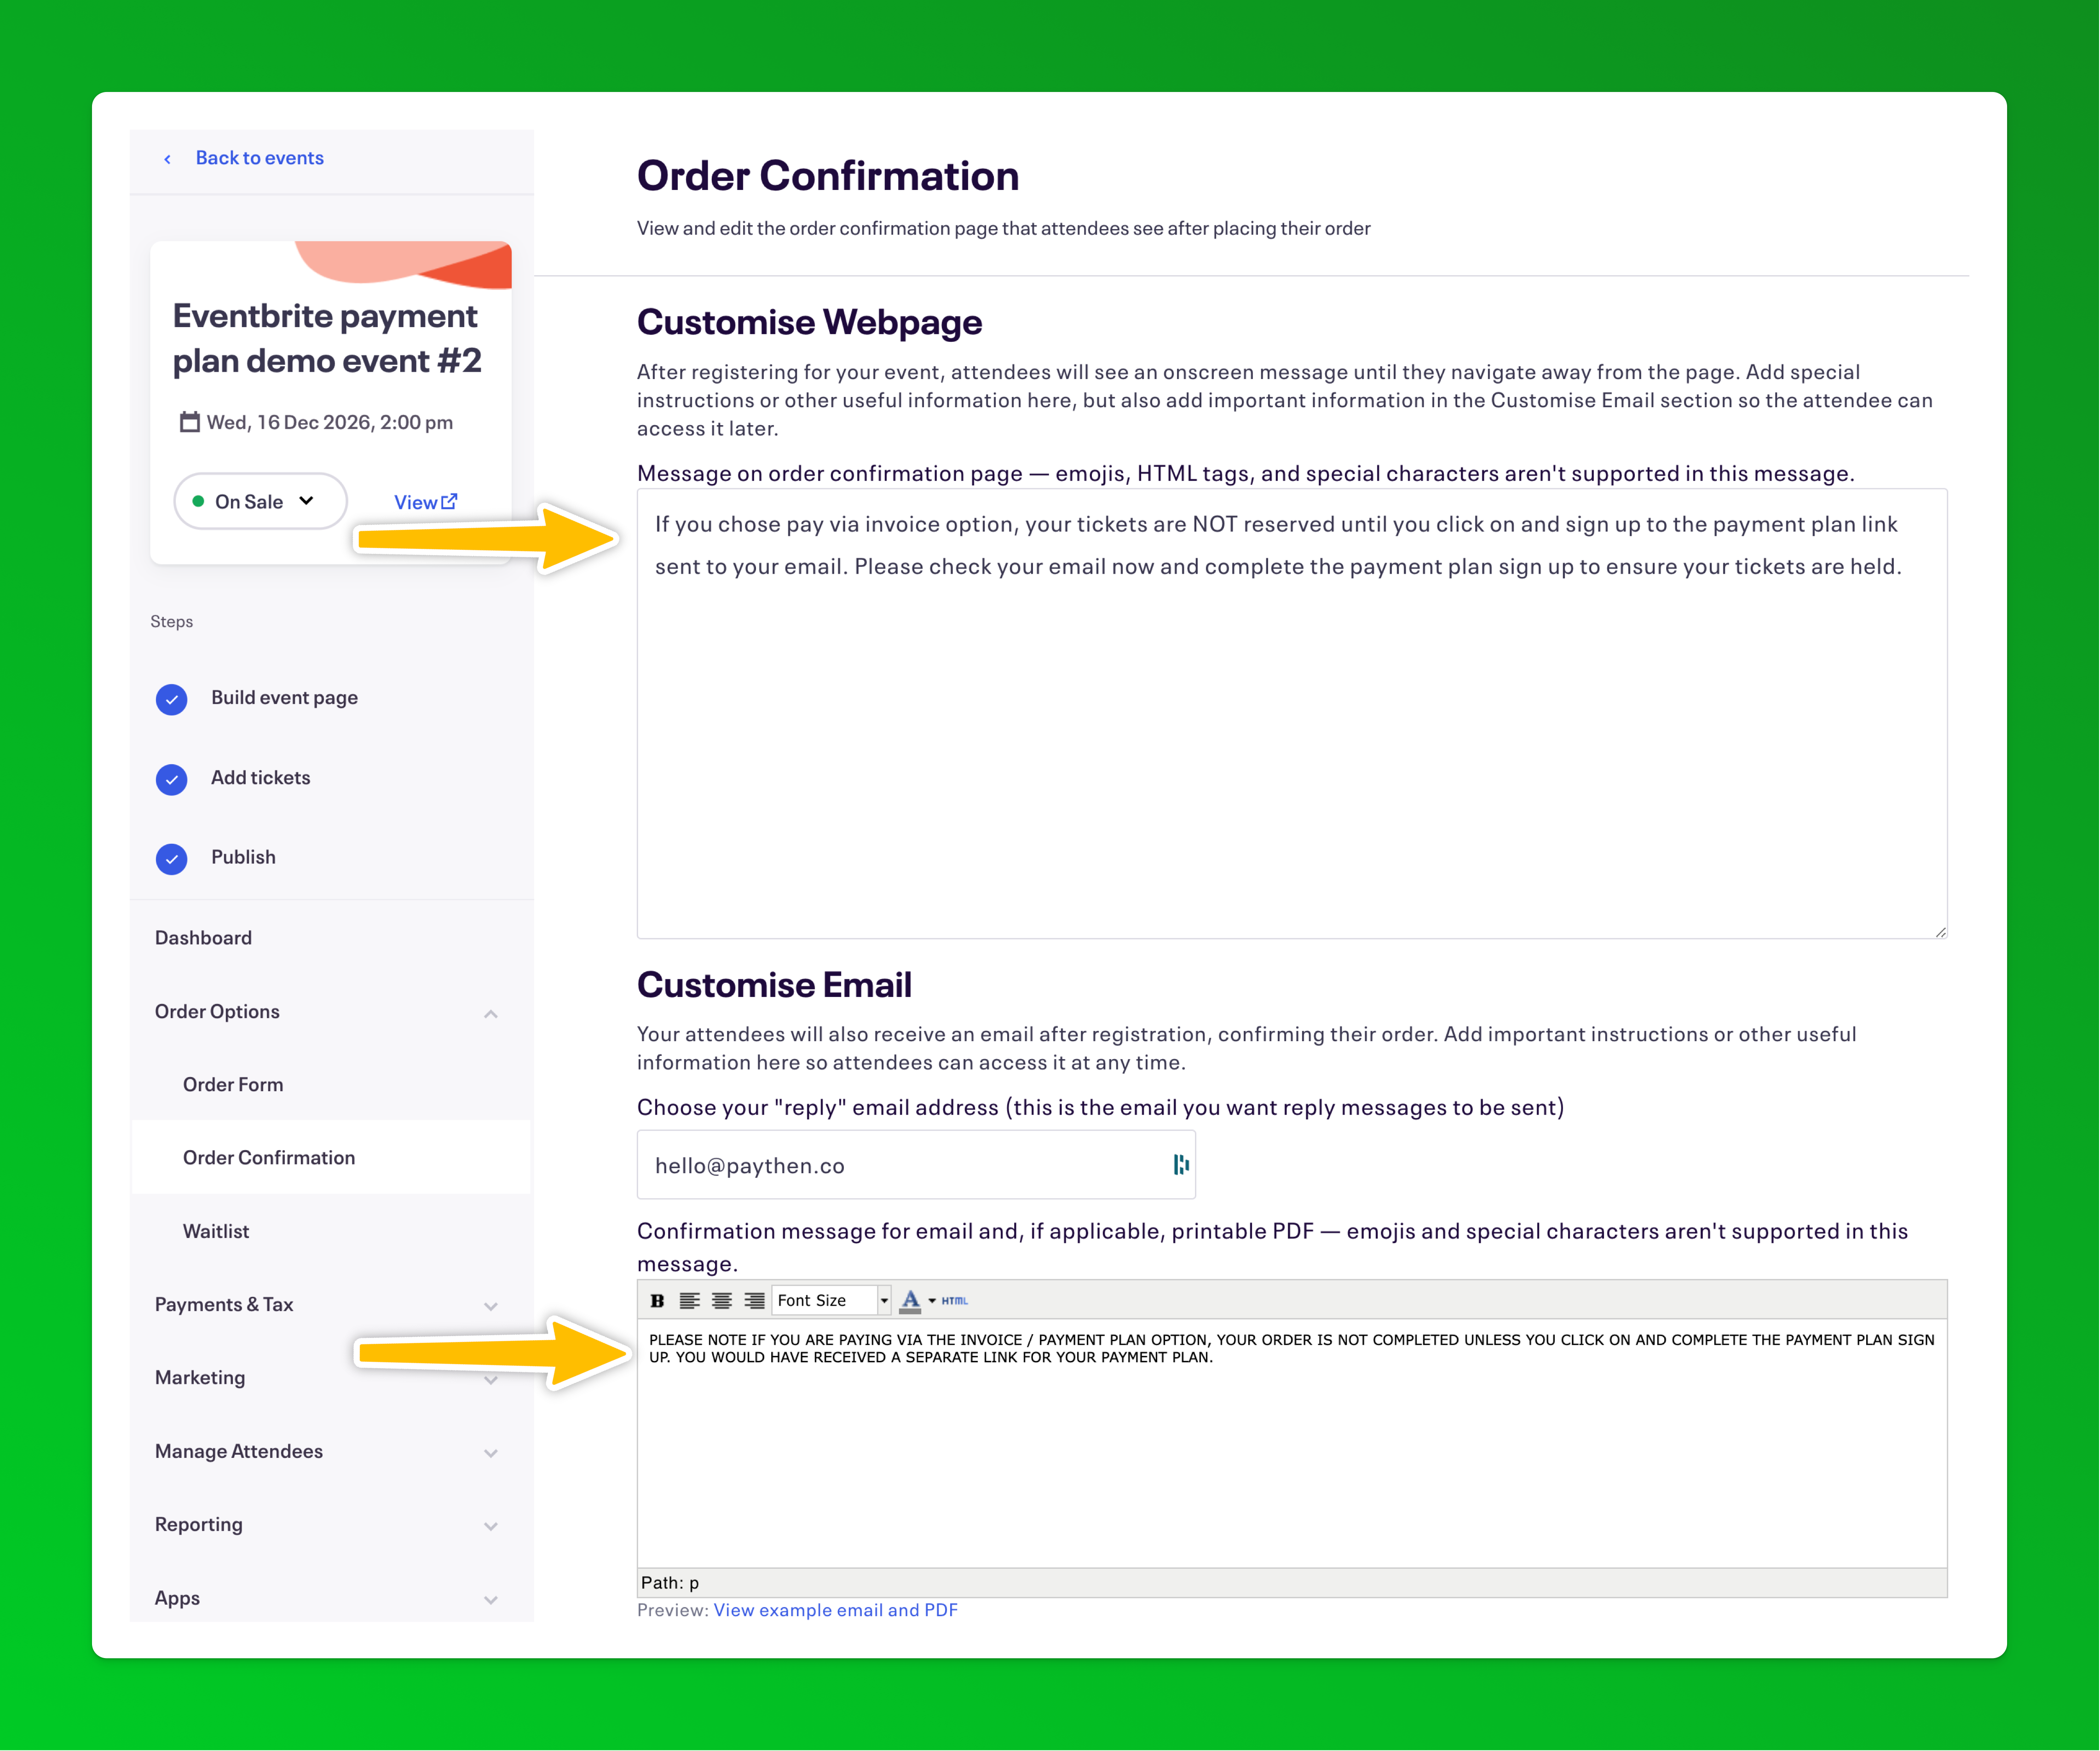 👉 It’s important to repeat this messaging in as many places as possible to counter the Eventbrite default messaging which can make it seem like the order is completed which can lead to attendees who choose the payment plan option forgetting to complete the payment step. 👈
 - Complete one purchase with each payment plan ticket type so that data is available as test records in the Zapier setup below. Buy each ticket type in a separate order. Eg; if you have three ticket types, complete three separate purchases. When testing with this “Pay by invoice” approach, we recommend changing the ticket prices to something low or immediately refunding the order after testing to avoid paying any / high Eventbrite service fees for test orders.
- In your Paythen dashboard, create a new templateWe recommend either the standard payment plan template or if you’d like to align all payment plan buyers payments to the same future dates, consider the date-based payment plan template. You can read more about each template type here.In the template setup, you can choose the amounts, billing intervals, etc – most of these fields can be overwritten and replaced with dynamic data from Eventbrite when we set up Zapier below. You can also edit the template fields any time.
- Once you’ve created the template, it will generate a template link that you will need for the Zapier step below.
- Zapier step 1: Log in to your Zapier account and click on this Zap template to generate a new zap with the steps pre-selected 👉 Zapier easy setup link Your Zap editor should load with these three steps pre-loaded, you will need to click on each one to authenticate your accounts and choose specific information from your account
- Zapier step 2: In the Eventbrite new order step connect your Eventbrite account and choose New order as the trigger. Choose your event and go to the test step. In the “Test” step you should see one or more of your test orders you placed earlier. If you can’t we recommend placing an order on your even with the payment plan ticket type selected to make it easier to map data in the following steps. Select a test order and continue your Zap.
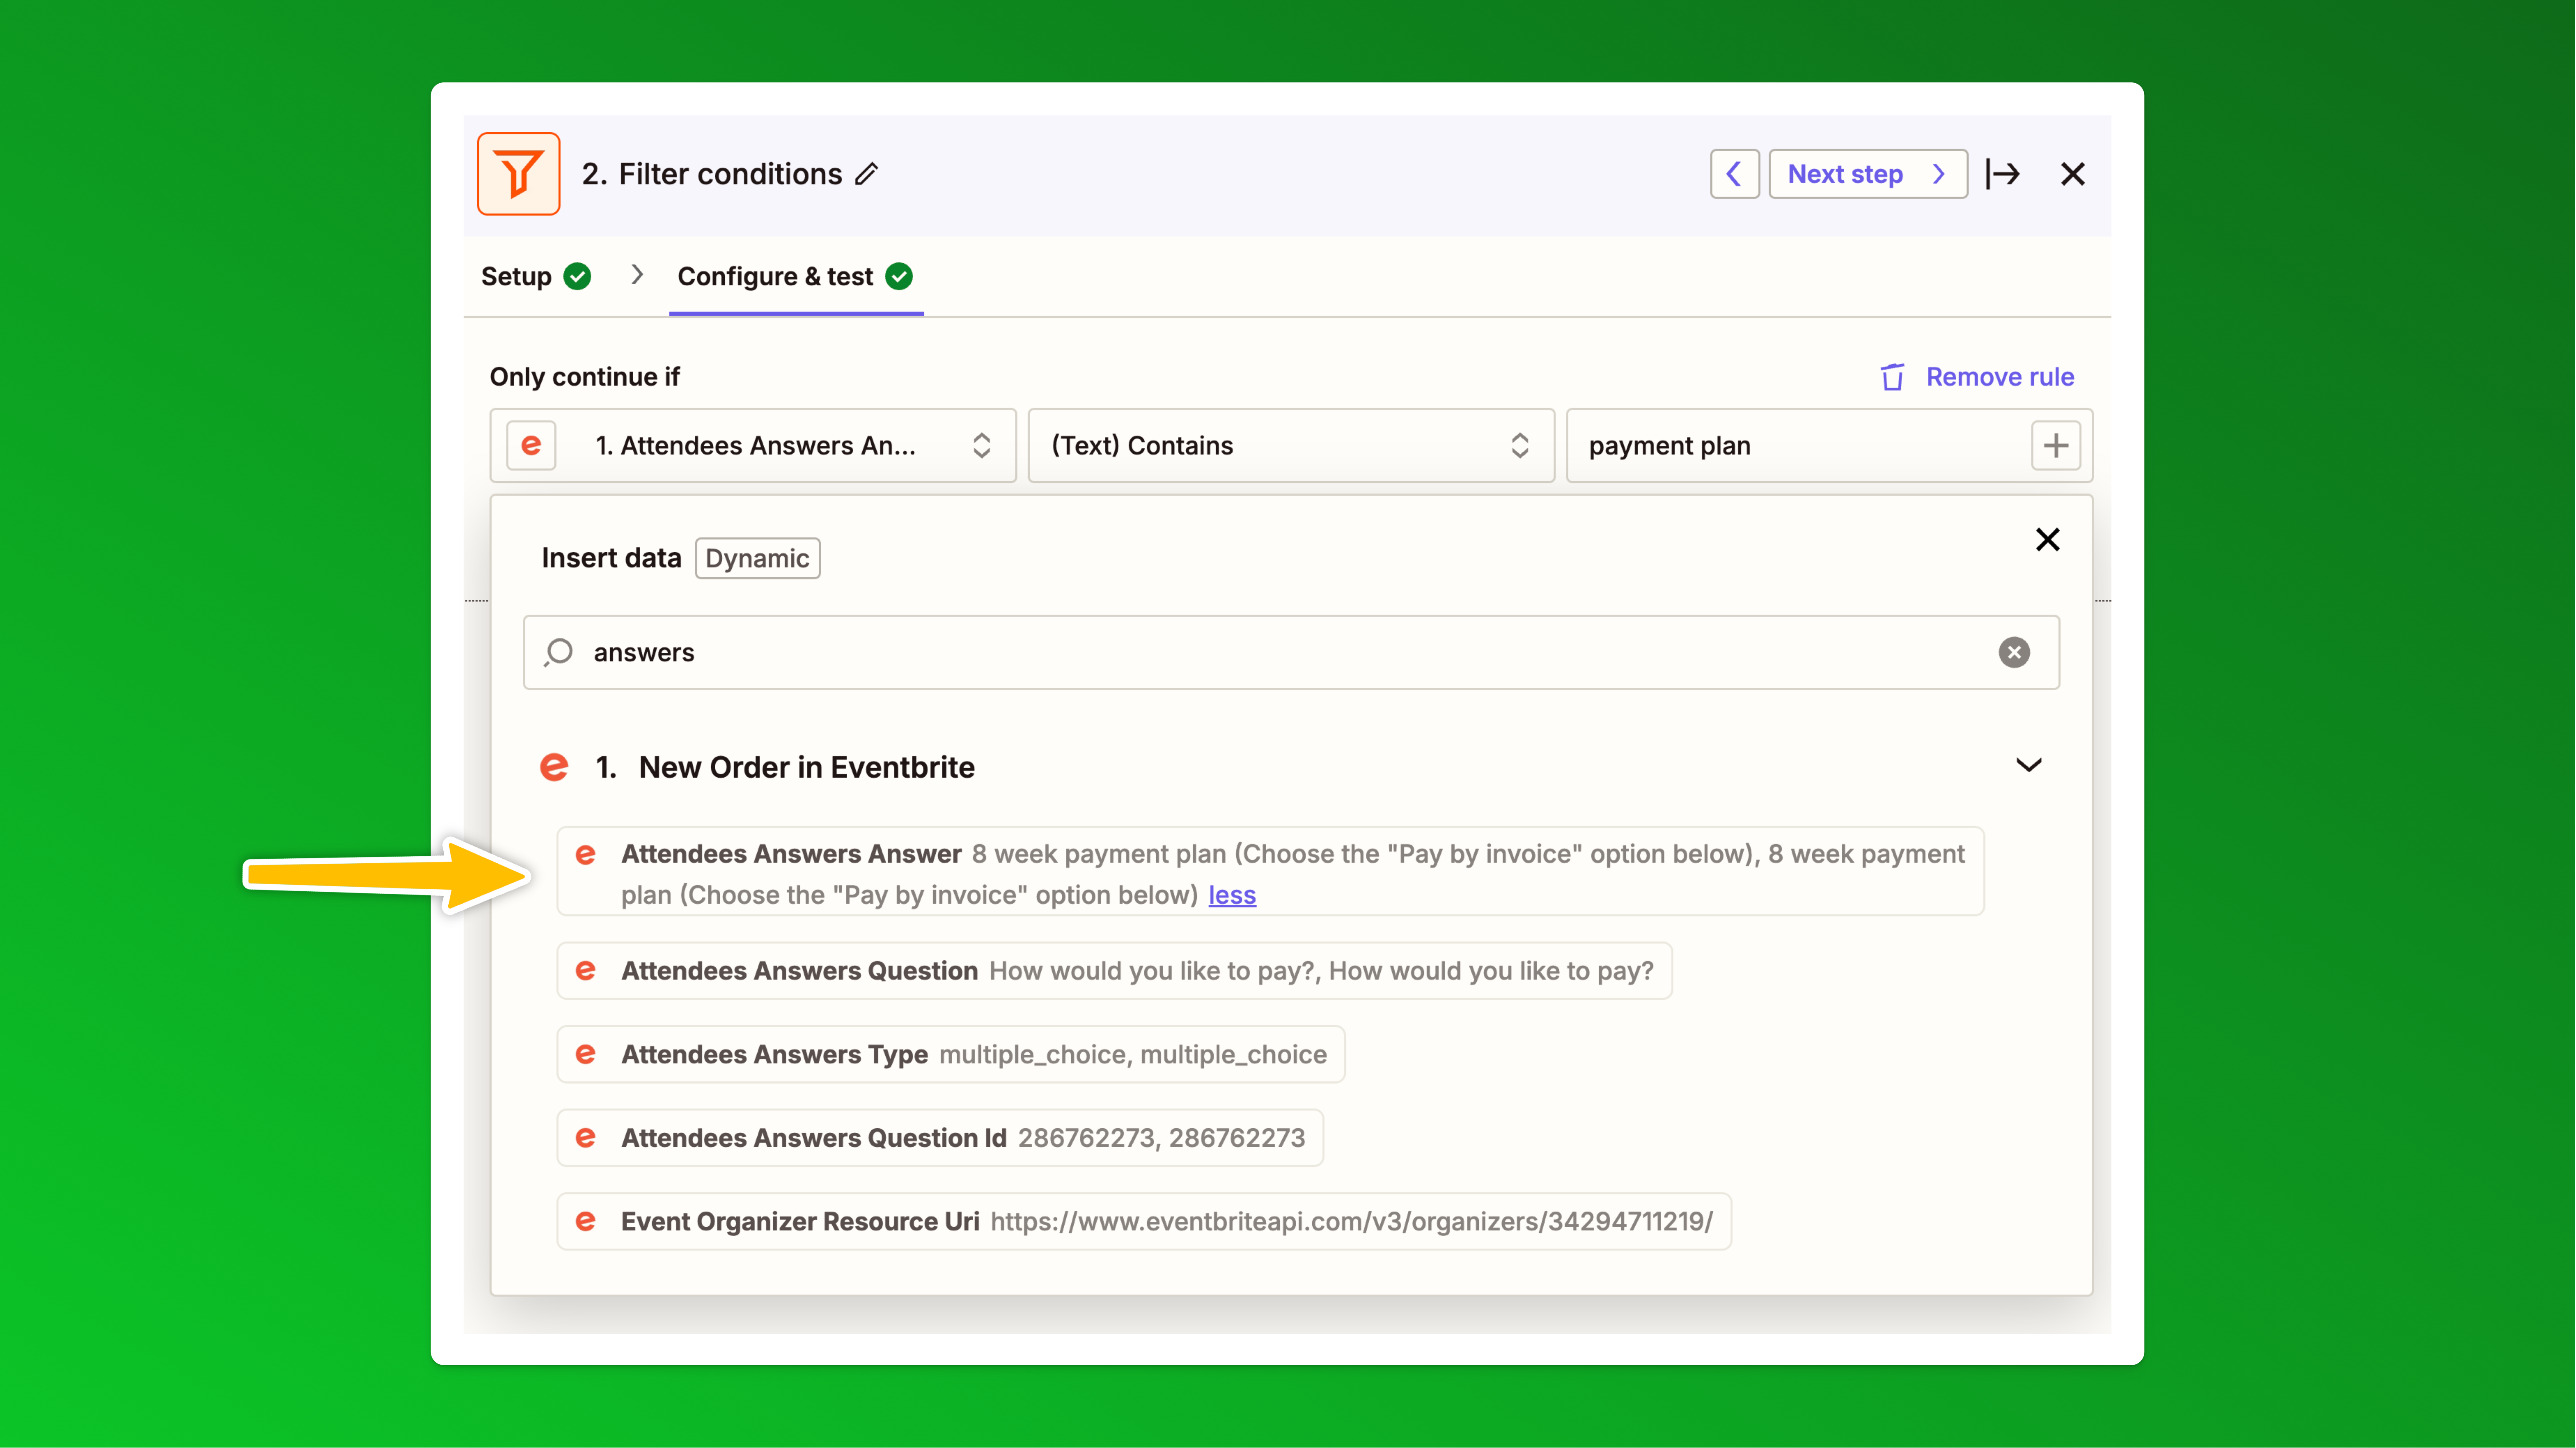
- Zapier step 3: In the Filter by Zapier step, in the Configure & test tab, choose Attendees Answers Answer > then (Text) Contains > payment plan ensuring the text you enter here is unique and matches or partly matches what you entered in the custom question you added in step 3 above. This is what is used to identify those attendees that chose the payment plan option vs. those that paid in full.
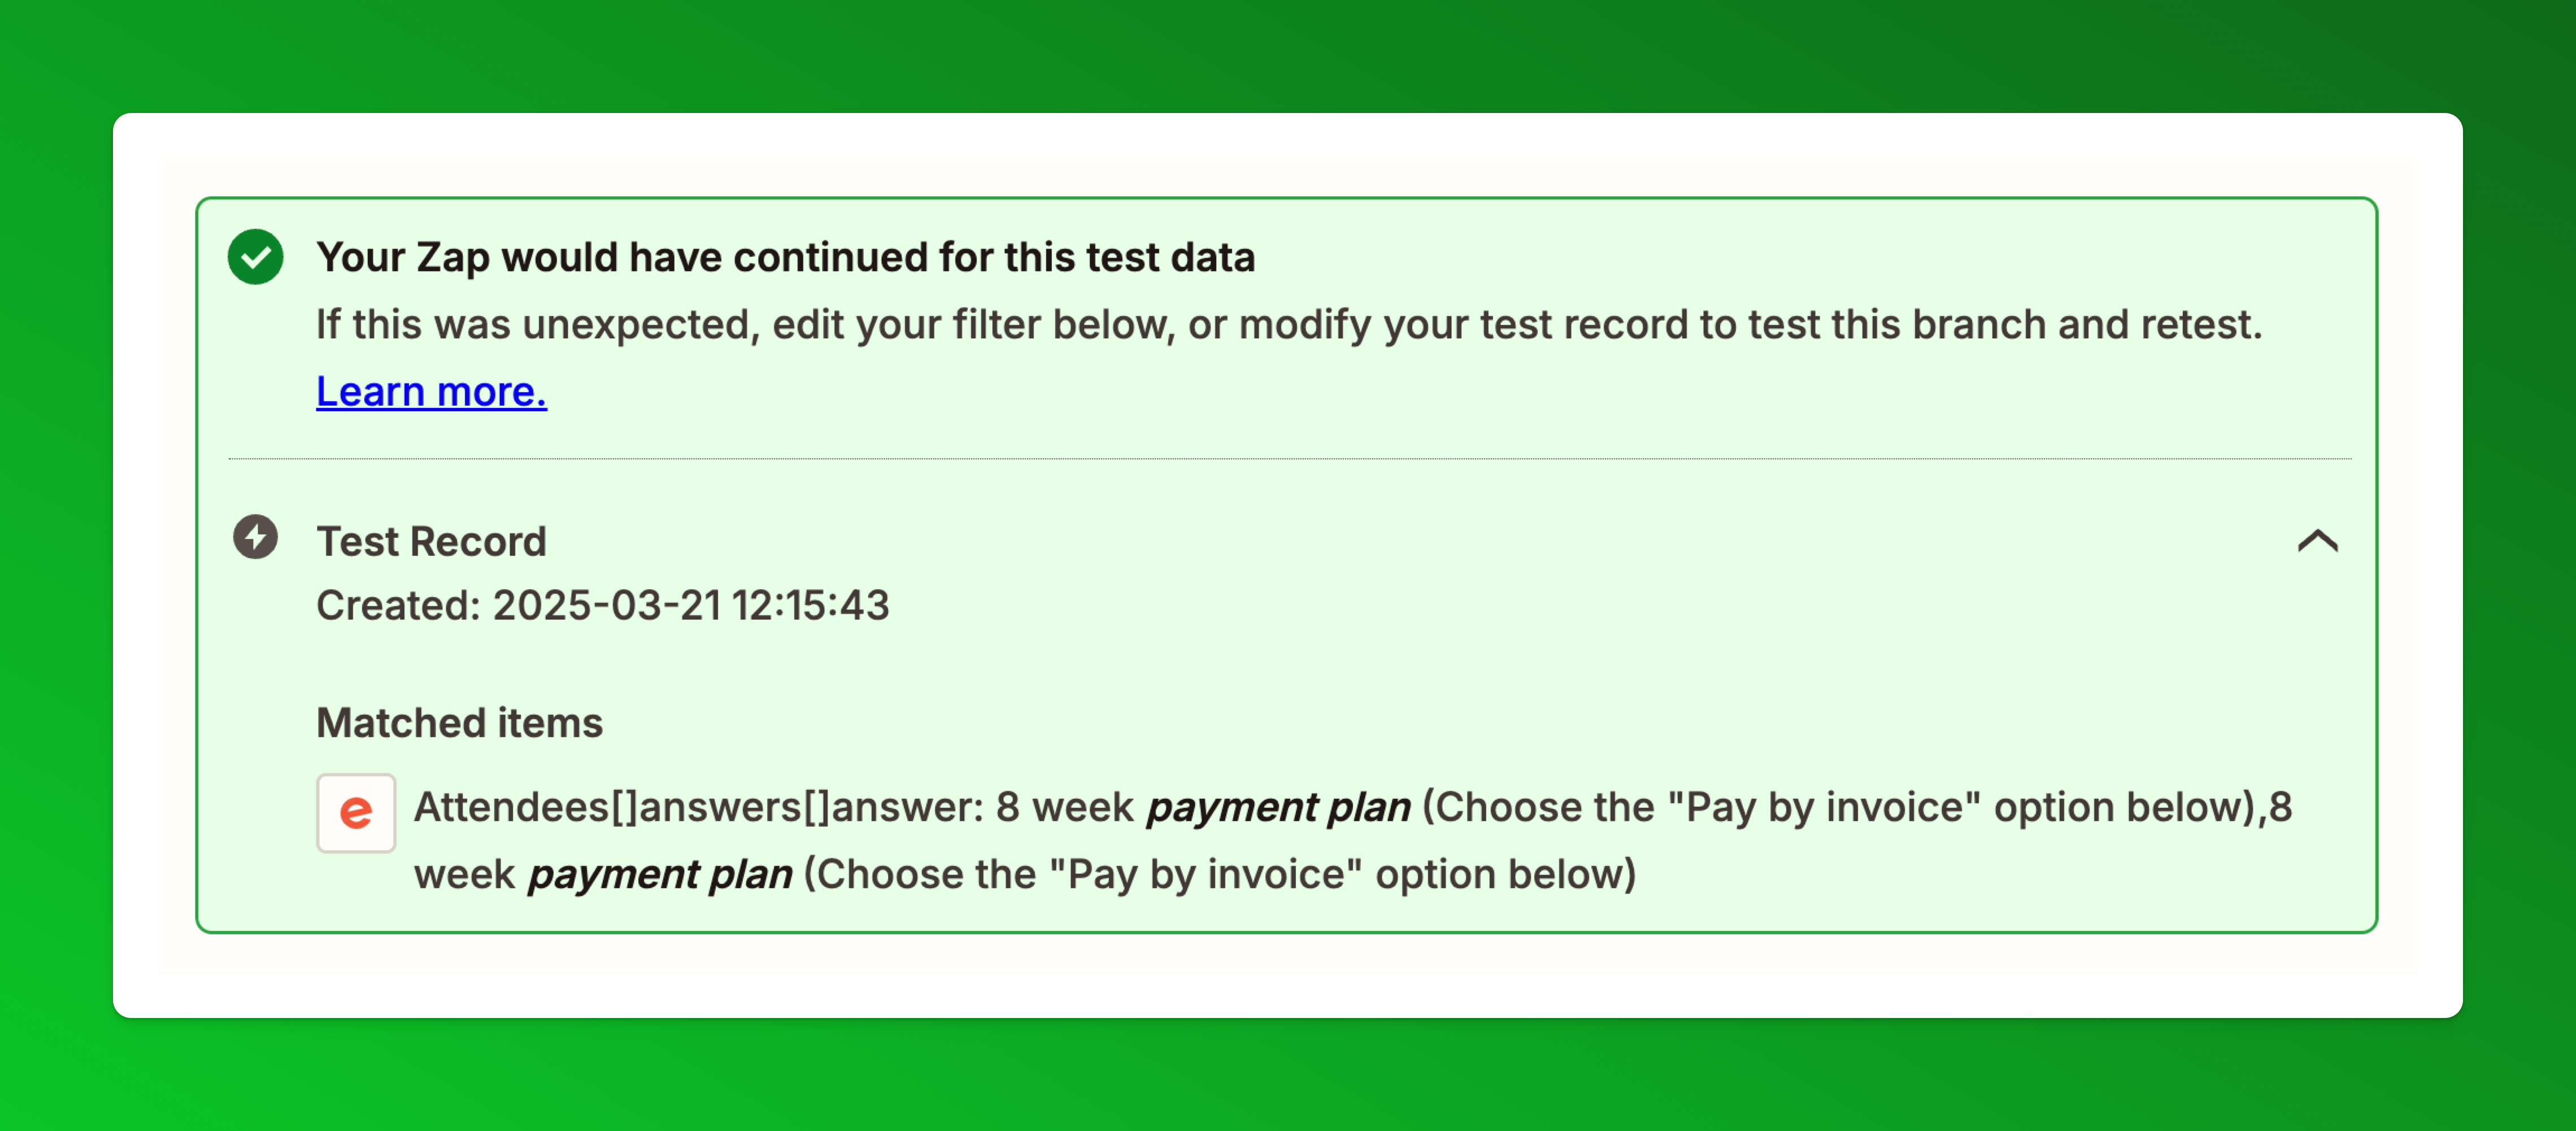
- When you click continue it should show you a “Your Zap would have continued for this test data” message like this
- Zapier step 4: Click continue and that will bring you to the final step “Send Payment Plan Link via Email” Choose Paythen as the app, then choose the Send payment plan link via email action, and authenticate your Paythen account if you haven’t already:
- In the Configure step,
a) paste in the Paythen template link that you generated in your Paythen dashboard,
b) add in the customer email field from Eventbrite and
c) in the plan name, you can choose any format you want but we recommend this: First name Last name Event Name Text and then “Payment Plan” – This is the name of the payment plan shown to customers and also what you see in the plan name in your Paythen dashboard. With this format, the plan name would be created as: Joshua Lyman Blues n Roots Festival Payment PlanIf you want this to be more granular you can include the Eventbrite order ID, the ticket name, and more.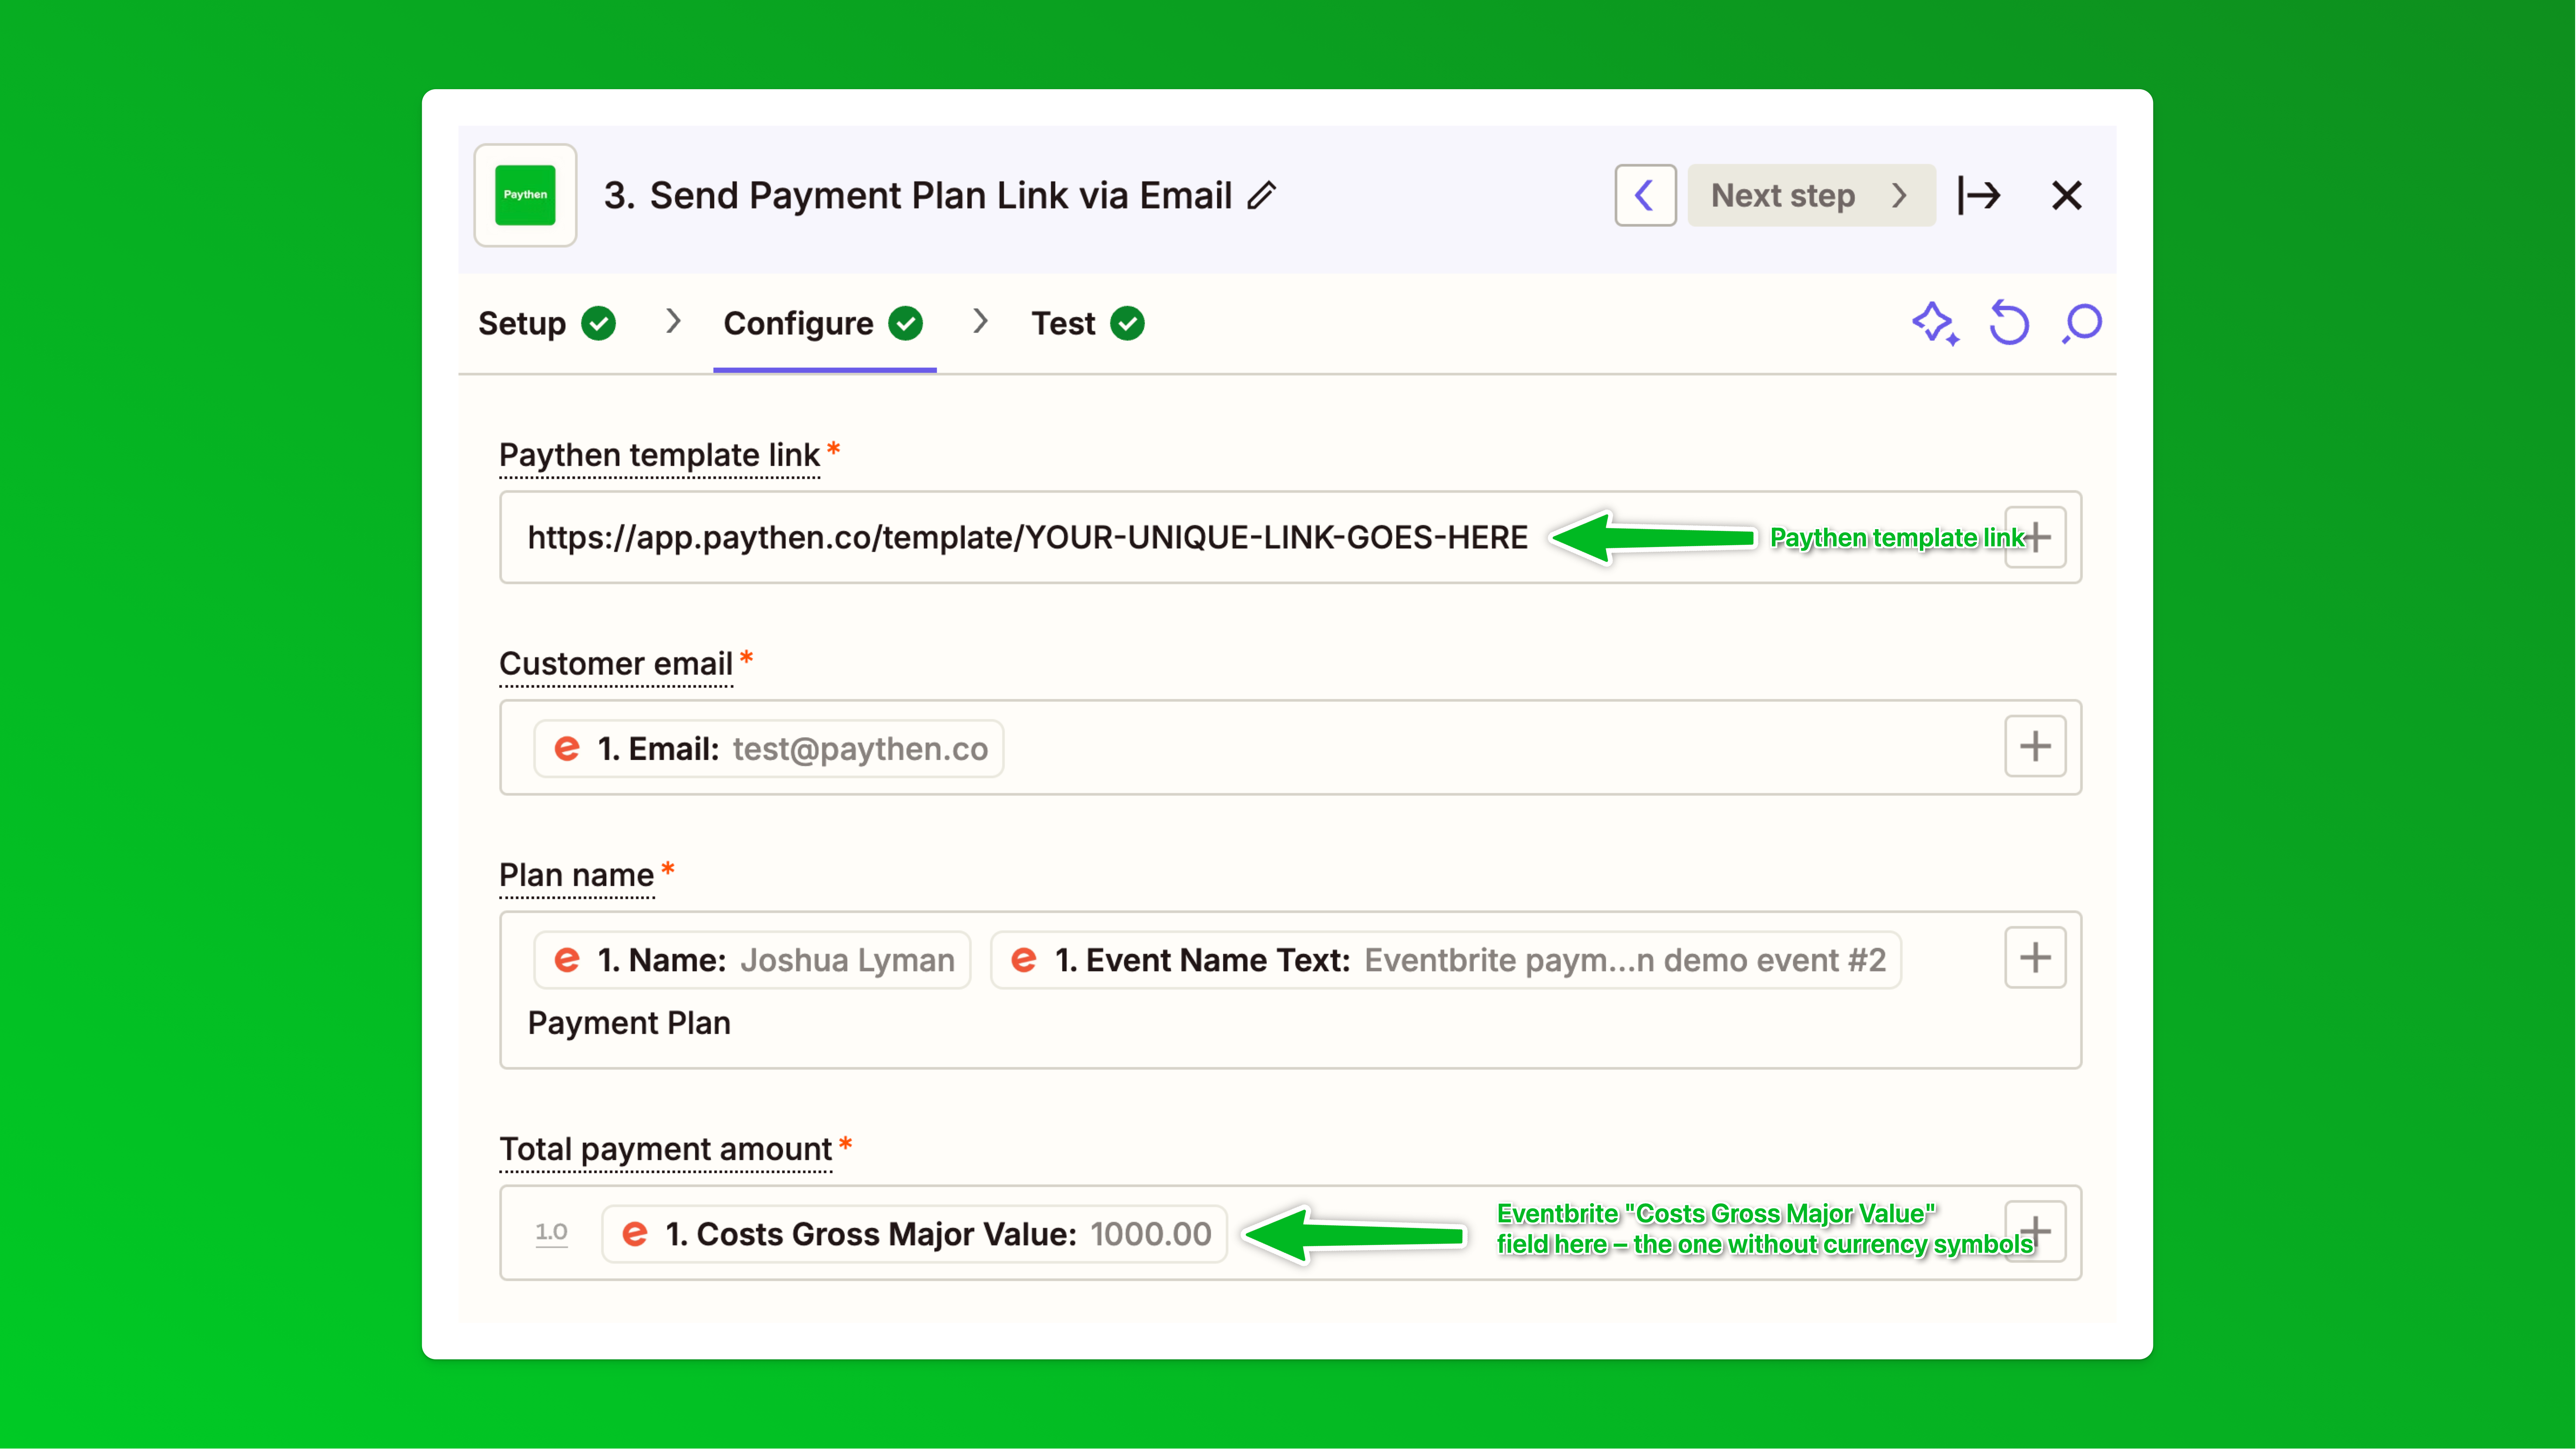 Finally in the “Total payment amount” field insert the Costs Gross Major Value field from Eventbrite. Ensure you use this one and not other similar sounding ones as this does not have any currency symbols included in it. The values needs to be just numbers for it to work correctly. This is different from the “Costs Gross Display” field used in the next step.
 - All other fields on this page are optional – but we recommend adding in the Plan description field with data from your Eventbrite order like this:
 This is the text we used in our demo you can copy and change:
———————————————
You’ll pay for your tickets over 8 easy monthly installments. Your total cost of tickets based on the ticket type and quantity chosen is [Insert Costs Gross Display field from Eventbrite here]. A 10% payment plan admin fee is added to that below.
——————————————— - You can optionally also add custom text into the payment plan email attendees will get for more context. This is also one of the optional fields on this step. You can use this to re-iterate next steps but also add relevant links like your event policies and more.
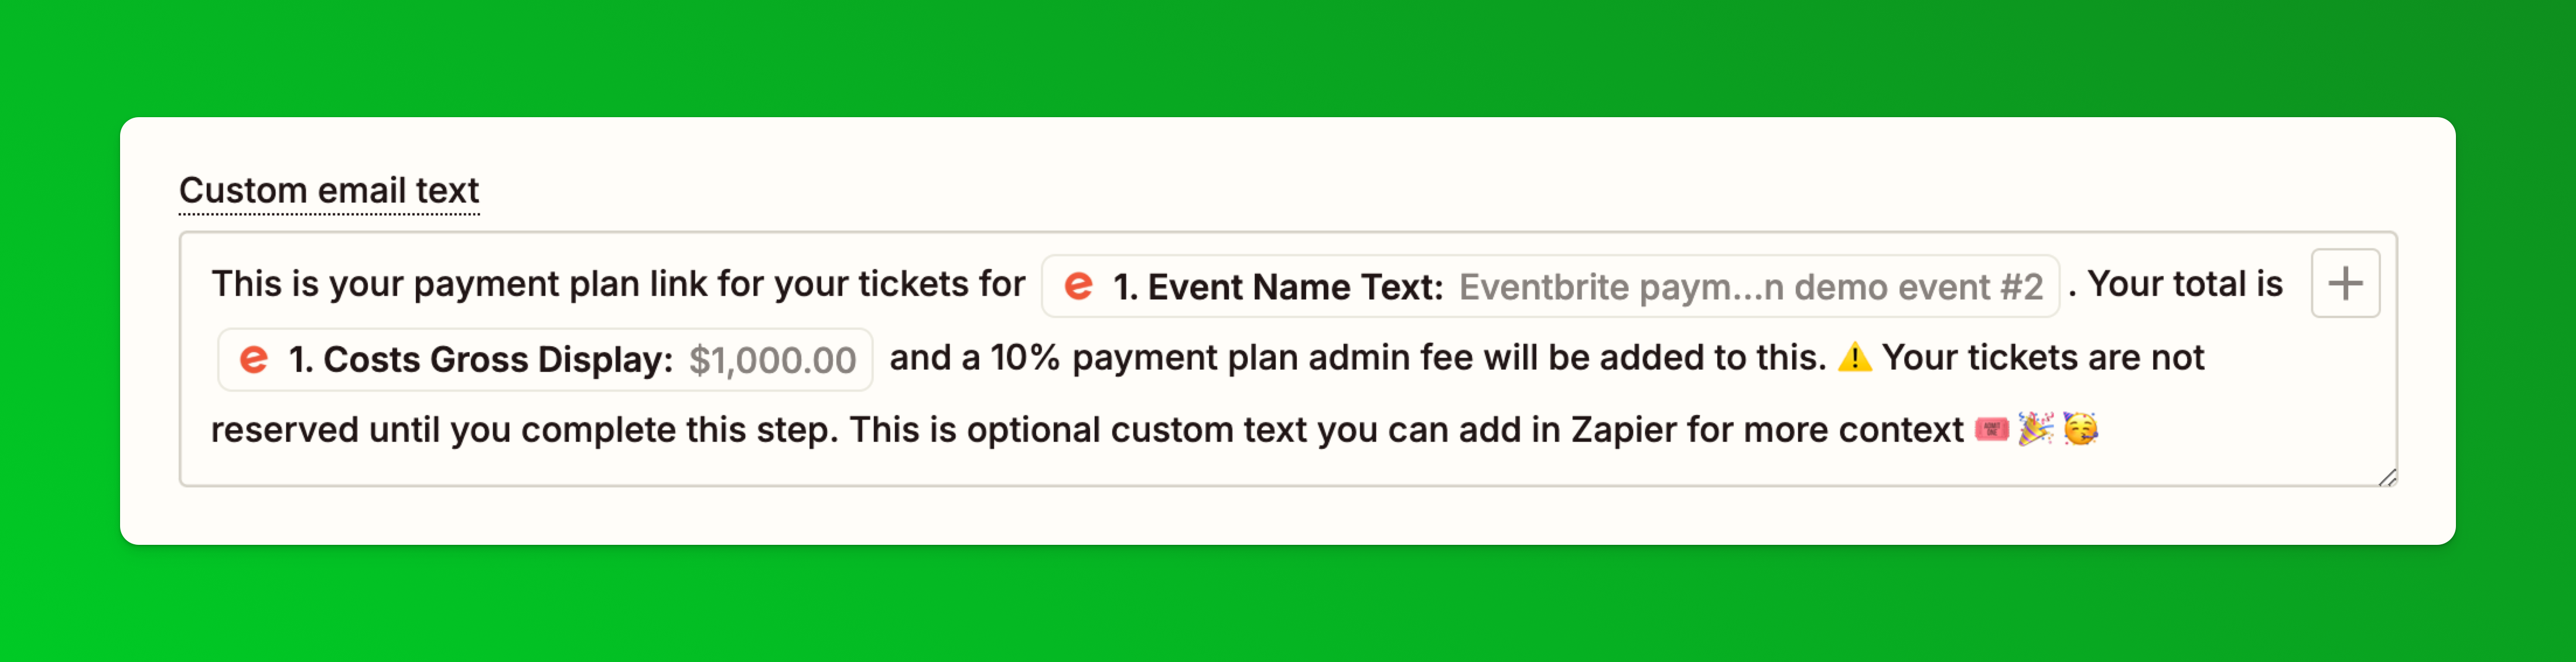 This is how the email will look with custom text added:
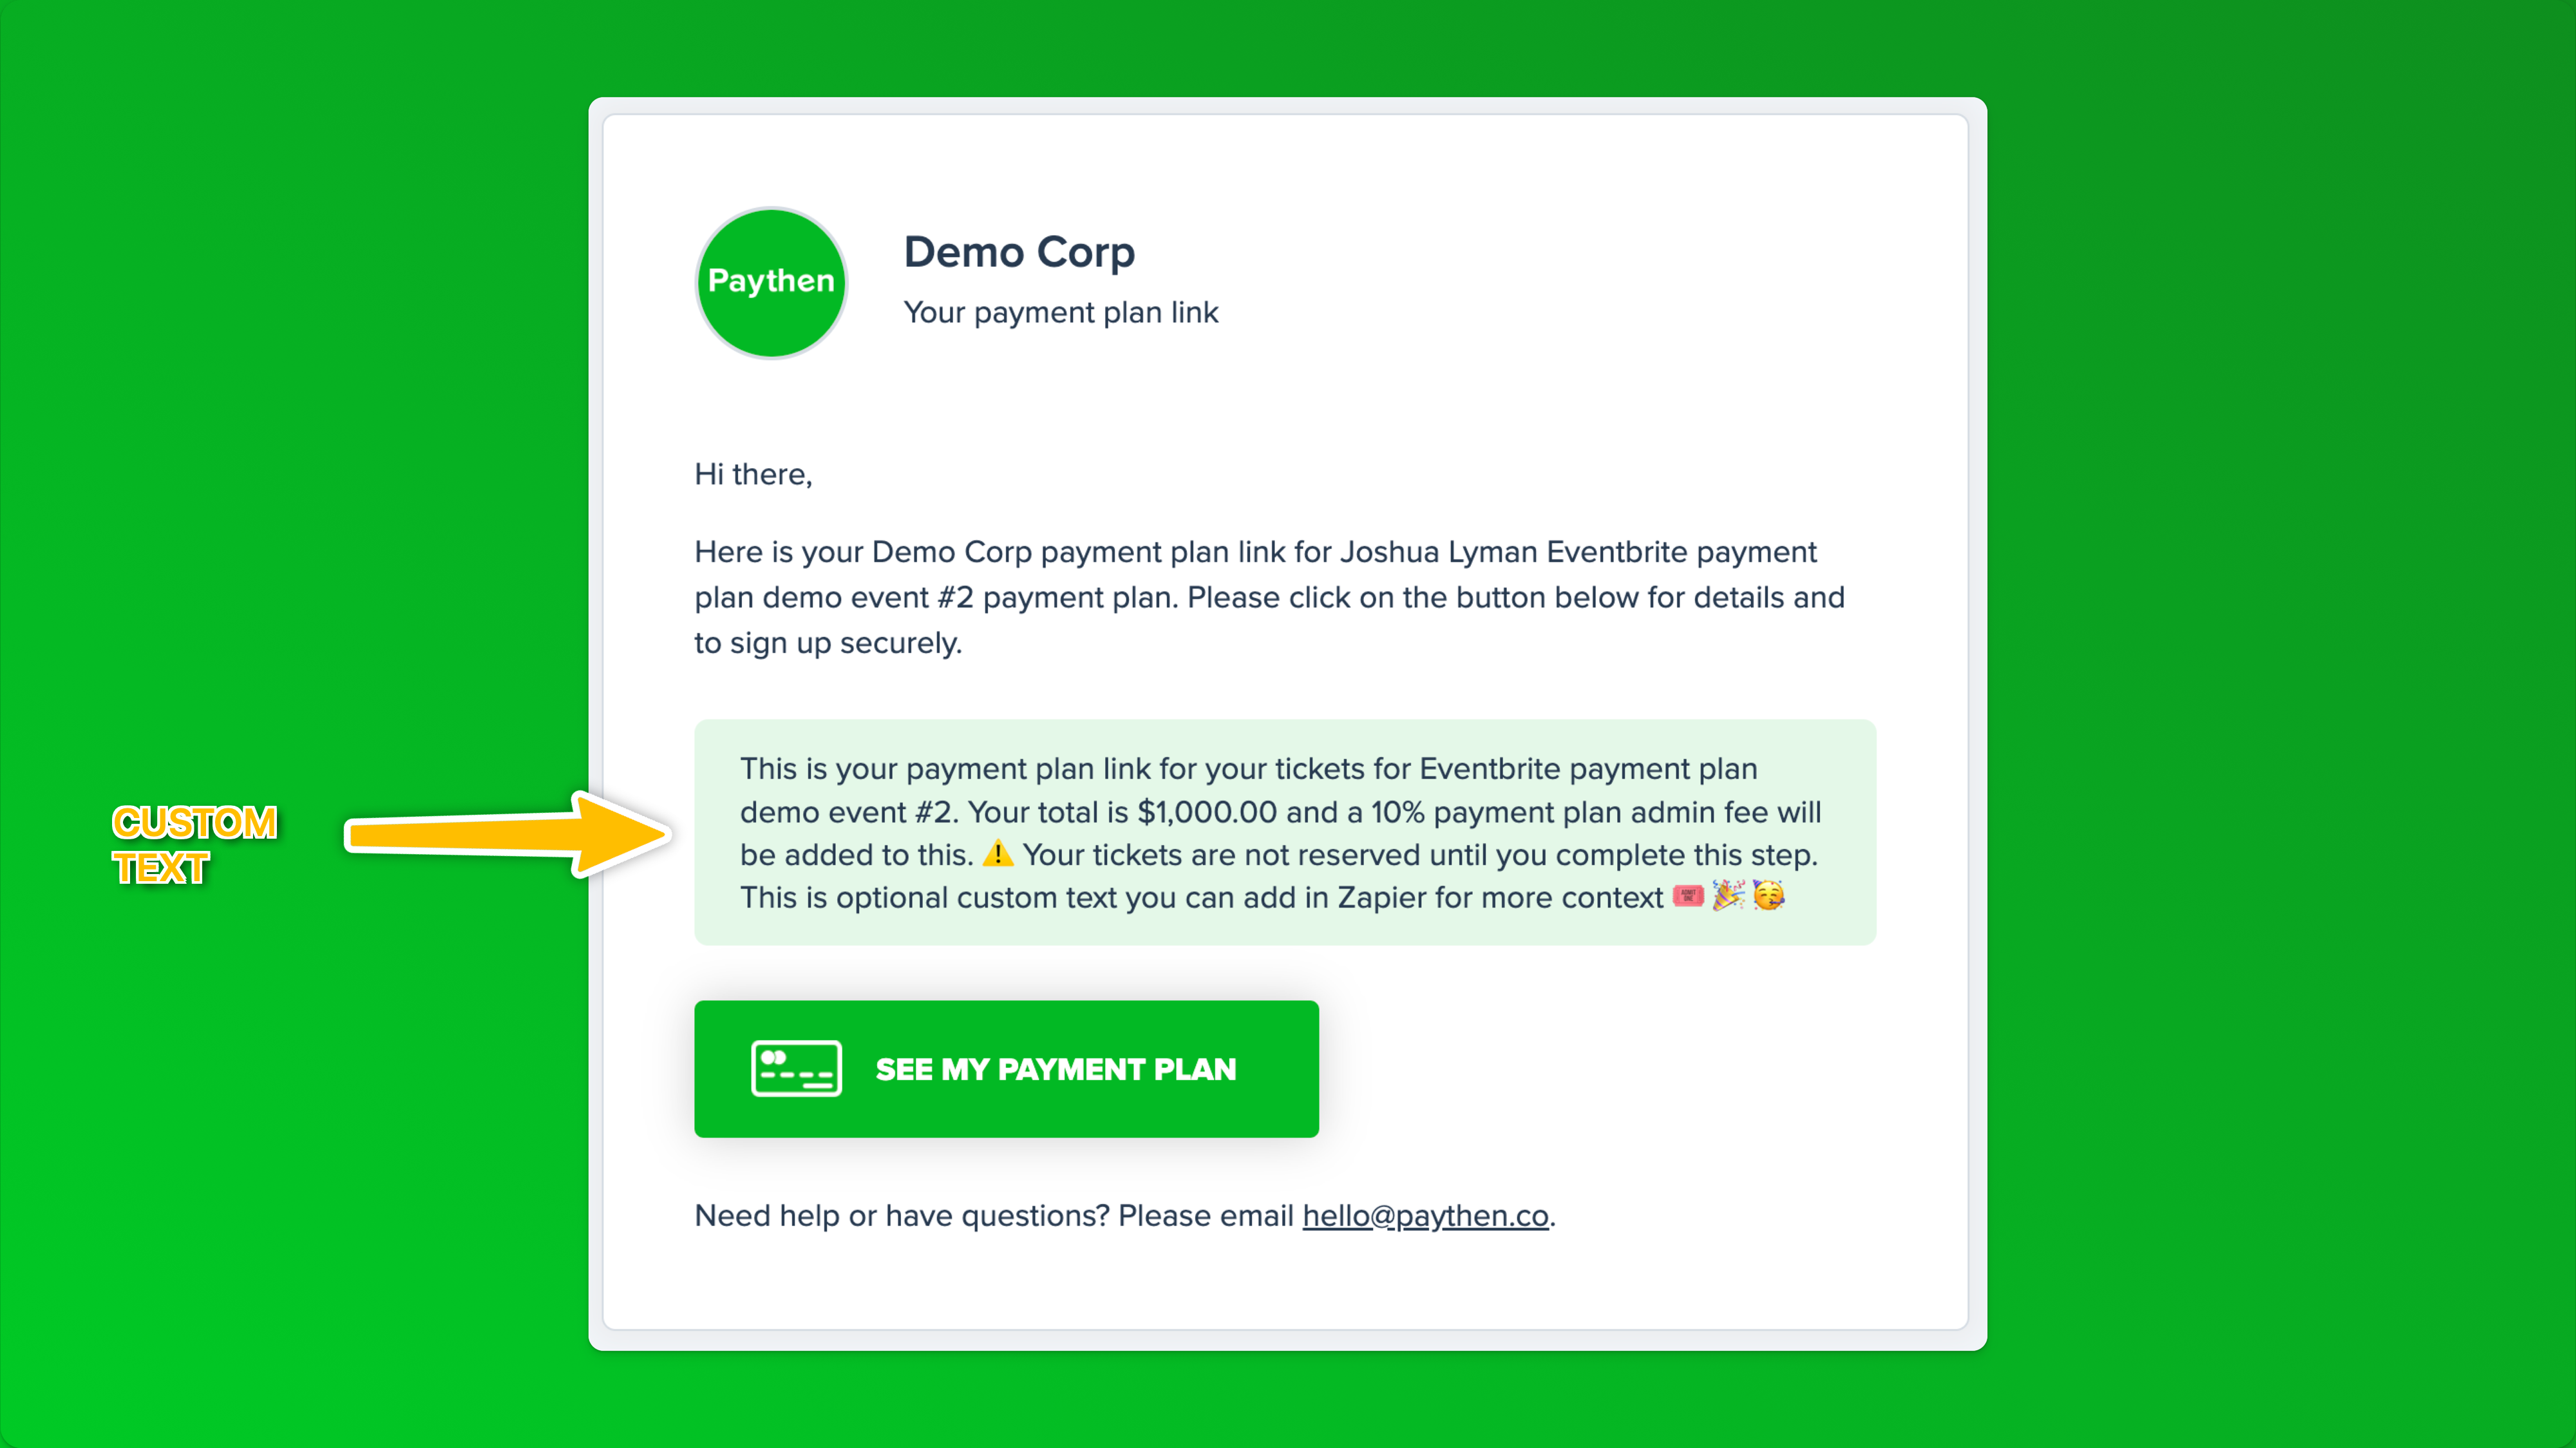
- Name your Zap and publish it
- We recommend placing orders with each ticket type and choosing the Pay by invoice option to ensure all amounts are correct and as expected.
- And you’re done! 🎉 🎟️ ⚡
Now, if someone buys tickets and chooses the Pay via payment plan option in the custom question on Eventbrite, they will get an email with their payment plan link. Once they complete the first payment, they will be created as customers in Paythen and can be easily managed there. Each customer gets their own unique customer link like this emailed to them immediately after sign up where they can manage their plan, pay early, and more.You can create separate Zaps to send Paythen customer data into your CRM or other systems to set up more automated workflows.
🙋 If you need help with this or the setup isn’t working as expected, just reach out to us via the chat icon and we’ll help you get it up and running.